


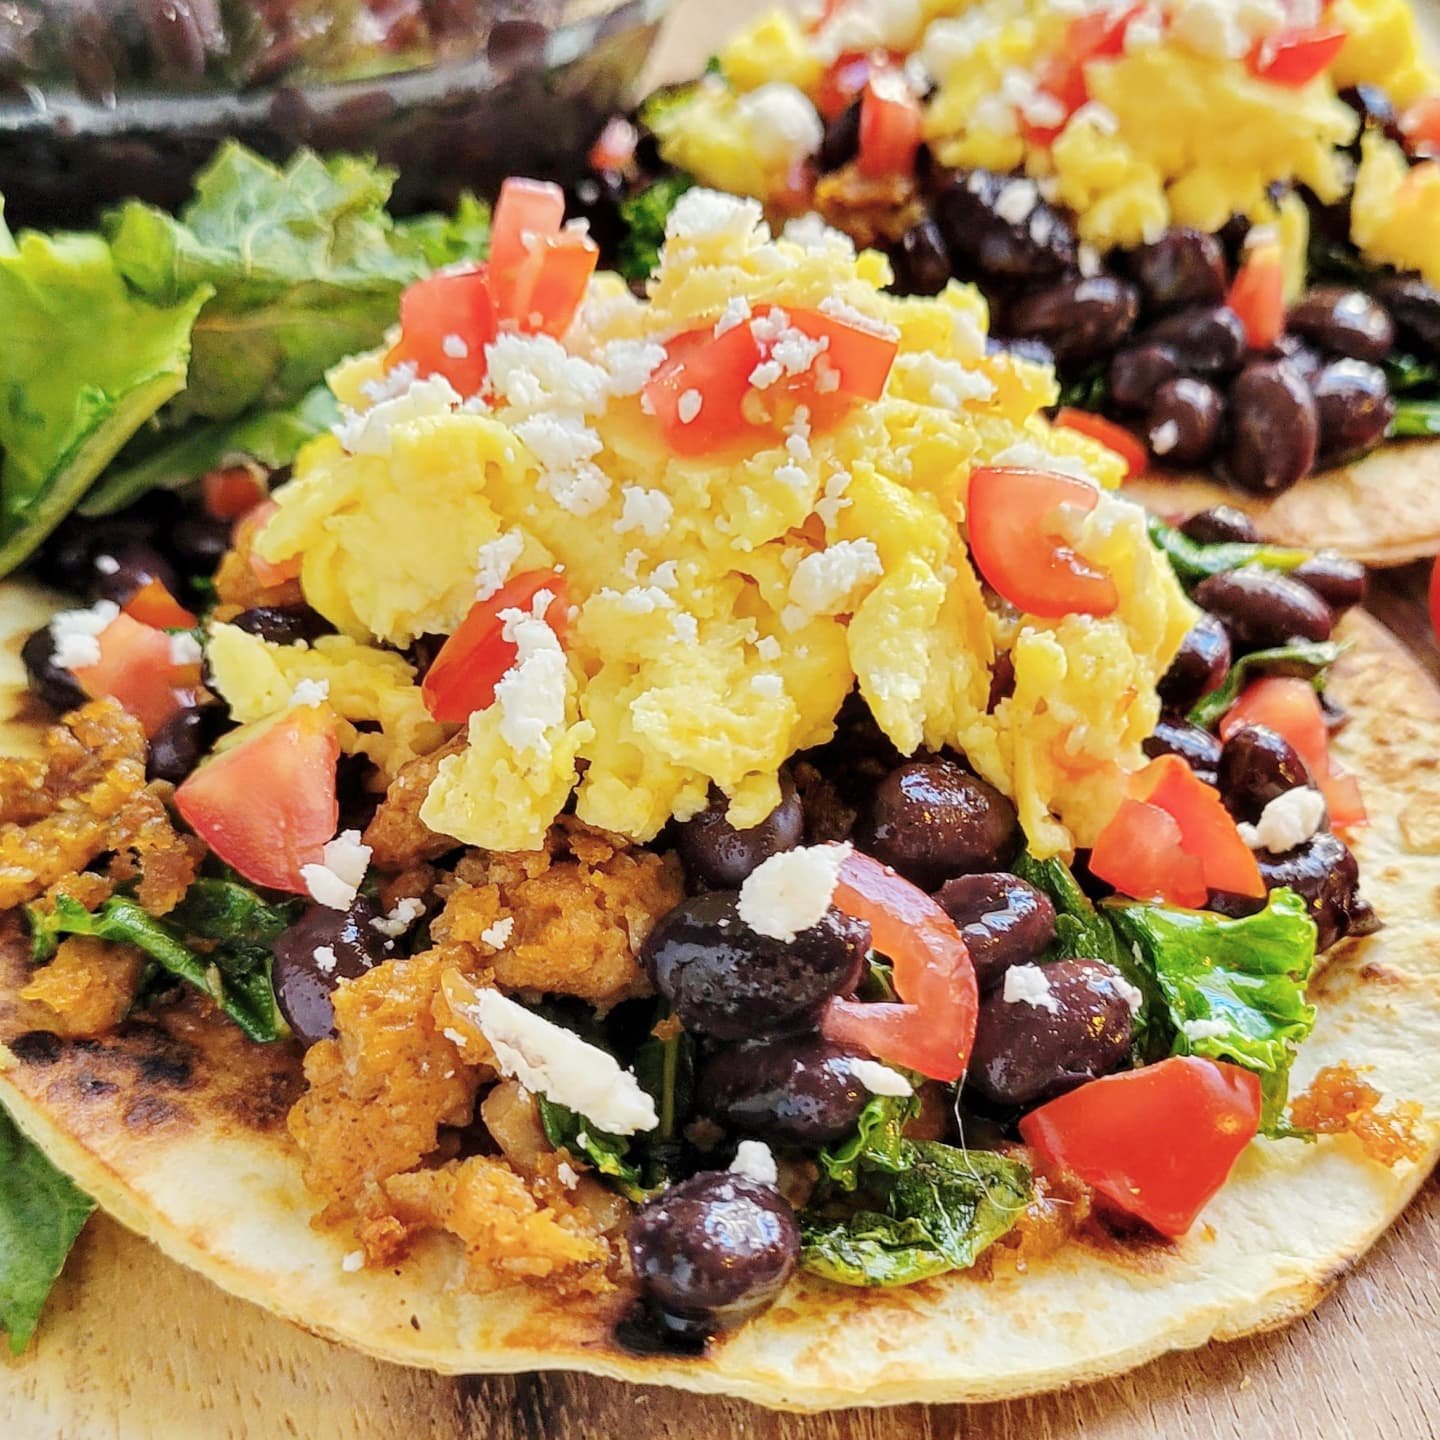
Vegan Huevos Rancheros Breakfast Tostadas with JustEgg
These Huevos Rancheros Breakfast Tostadas with vegan sausage, wilted kale, black beans, eggs, tomatoes, and feta, are the perfect way to kick off your weekend brunch! Topped with a drizzle of maple syrup, even the pickiest eaters will gobble them right up...yes, please! Using the JustEgg allows you to quickly and easily scramble up an egg substitute for these tostadas that even your non-vegan friends will love! (My pro tip: Just don’t tell them! Trust me, no one will even notice!)
These Huevos Rancheros Breakfast Tostadas with vegan sausage, wilted kale, black beans, eggs, tomatoes, and feta, are the perfect way to kick off your weekend brunch! Topped with a drizzle of maple syrup, even the pickiest eaters will gobble them right up...yes, please! Using the JustEgg allows you to quickly and easily scramble up an egg substitute for these tostadas that even your non-vegan friends will love! (My pro tip: Just don’t tell them! Trust me, no one will even notice!)
The best part about breakfast tostadas is that you can customize them for everyone’s individual likes! My favorite way to serve them is to honestly get all the topping ready and just let people choose what they want buffet style! Below is how I like mine…
What you are going to need to buy:
Tortillas, small
Plant-Based Sausage
Liquid Smoke
Olive Oil
Minced Garlic - (we like these jarred options from Spice World!)
Salt and Pepper, to taste
Smoked Paprika, to taste
Just Egg
Black Beans
Tomatoes, diced
Dairy-Free Feta Cheese
Fresh Kale
Maple Syrup
Hot Sauce, optional
What you are going to need to do:
To start, fry up your plant-based sausage with a little olive oil, a few dashes of liquid smoke, and some minced garlic. Once the sausage is almost done and getting a little crispy on the edges wilt in a handful of kale and stir to combine. Once the kale has softened and the sausage has finished cooking, remove and set aside.
Wipe out your skillet and use your JustEgg to make some scrambled eggs. Season with salt, pepper, and paprika, to taste. Remove and set aside.
Again, wipe out your skillet, and on medium-high heat, toast your tortillas until they take on some nice golden brown color…a little char around the edges never hurt anybody, either!
Assemble your tostadas by layering your sausage and kale mixture with the eggs, black beans, tomatoes, and cheese and topping with a drizzle of maple syrup and a splash of hot sauce (if you like a little kick!)
Customize your tostadas by adding avocado, sour cream, hot peppers, etc!

Healthy Chocolate Oatmilk Ice Cream - Only 5 Ingredients!
Not only is this Chocolate Oatmilk Ice Cream the one of the simplest summer recipes to make it also sneaks in an extra serving of veggies into your favorite summer snack by using avocados to make it extra creamy and dreamy! Only using 5 ingredients, most of which you probably alfready have in the house…it’s perfect for the kiddos because when it warms up it gets soft but never really "melts" making it much less of a mess for little mouths!
It's National Oat Milk Week and I'm celebrating with my friends over at Rise Brewing Co. using their Organic Chocolate Oatmilk to make this 5 ingredient dairy free ice cream!
Not only is this the one of the simplest summer recipes to make it also sneaks in an extra serving of veggies into your favorite summer snack by using avocados to make it extra creamy and dreamy!


Easily double or triple the recipe to serve a crowd. It's perfect for the kiddos because when it warms up it gets soft but never really "melts" making it much less of a mess for little mouths! Will definitely be serving this next weekend for Memorial Day!

Healthy Chocolate Oatmilk Ice Cream
Author: Sarah | April 19, 2021
Servings: 2-4
prep time: 15 minutes
freeze time: 3 hours - Overnight
total time: 8 hours
Ingredients: What You need to buy!
1 ripe avocado
1/4 c. Chocolate Oatmilk from Rise Brewing Co.
1/4 c. Cocoa Powder
3 tablespoons of Maple Syrup
Mini Chocolate Chips
Instructions: What You need to do!
Blend avocado, oatmilk, cocoa powder, and maple syrup until smooth.
Add a handful of chocolate chips and stir to combine
Freeze for 3 hours or up to overnight in a coverd bowl.
Serve with your favorite dairy free topping!
And…that’s it! See, I told you it was easy! Another of my favorite ways to enjoy this nice-cream is to make coffee floats! Simply use your favorite cold brew coffee, like the Nitro Original Black from the Rise Brewing Co. in place of root beer and top with a scoop of ice cream!
This recipe also happens to be the fastest and yummiest way to make dairy-free chocolate pudding! Simply skip the freezing step and refrigerate for about 30 minutes before serving! I really hope that you’ll try this Healthy Chocolate Oatmilk Ice Cream with Only 5 Ingredients this summer…and make sure to tag me when you do! @plantbasedgingr
Love, Light, and Lentils, my friends!
Sarah

Corn'd Beef Sandwich with Quick Pickl'd Collard Greens
While collard greens might not be the traditional way to top a corn'd beef sandwich, the fibrous texture of collards makes them the perfect green to pickle. Unlike some other, more delicate greens, collards are easily able to retain their texture and bring a
While collard greens might not be the traditional way to top a corn'd beef sandwich, the fibrous texture of collards makes them the perfect green to pickle. Unlike some other, more delicate greens, collards are easily able to retain their texture and bring a delicious sweet and tangy crunch that pairs perfectly with the salty corn'd beef of this famous sandwich.


Irish or not, we promise that it's so good, you'll definitely want to kiss someone! The best part? You can store these Quick Pickl'd Collard Greens in the fridge for up to a month!

Corn'd Beef Sandwich with Quick Pickl'd Collard Greens
Author: Sarah | April 19, 2021
Servings: 4
prep time: 15 minutes
cook time: 8 hours - Overnight
total time: 24 hours
Ingredients: What You need to buy!
2 c. of Palmetto Greens chopped collard greens, think the texture you'd use for the cabbage in coleslaw.
1/2 medium, white onion, diced
1 t. salt
1 t. black pepper
2 tsp. minced garlic
1 t. dill seeds
1 t. fennel seeds
1/2 c. white vinegar
1/2 c. of maple syrup
Ingredients: To make the Sandwich
Seeded Sourdough Bread
Dairy-Free Cream Cheese
Vegan Corn'd Beef
Quick Pickles Collard Greens
Dairy-Free Thousand Island Dressing
Instructions: What You need to do!
Pack the chopped collard greens and diced onion into a mason jar and add all spices.
In a microwave-safe measuring cup, mix the vinegar and maple syrup, and heat for 1 minute, until hot.
Pour the hot liquid over the greens/onion mixture, seal, and shake to combine/mix well.
Refrigerate for a minimum of 60 minutes, up to overnight, before using.
Lightly toast two pieces of Seeded Sourdough Bread either in a hot skillet or traditional toaster
Spread Dairy-Free Cream Cheese onto the bottom piece of the Seeded Sourdough Bread.
Layer Corn'd Beef and top with a generous portion of the Quick Pickl'd Collard Greens.
Spread Thousand Island Dressing onto the second piece of bread and top the sandwich!
Seriously, since I made these Quick Pickl'd Collard Greens I have been eating them on everything! I hope that you’ll try this simple, spring, recipe! Trust me, you won’t be disappointed! I’d love to see your kitchen creations! Remember to tag me on IG @plantbasedgingr to keep in touch!
Love, Light, and Lentils, my friends!
Sarah
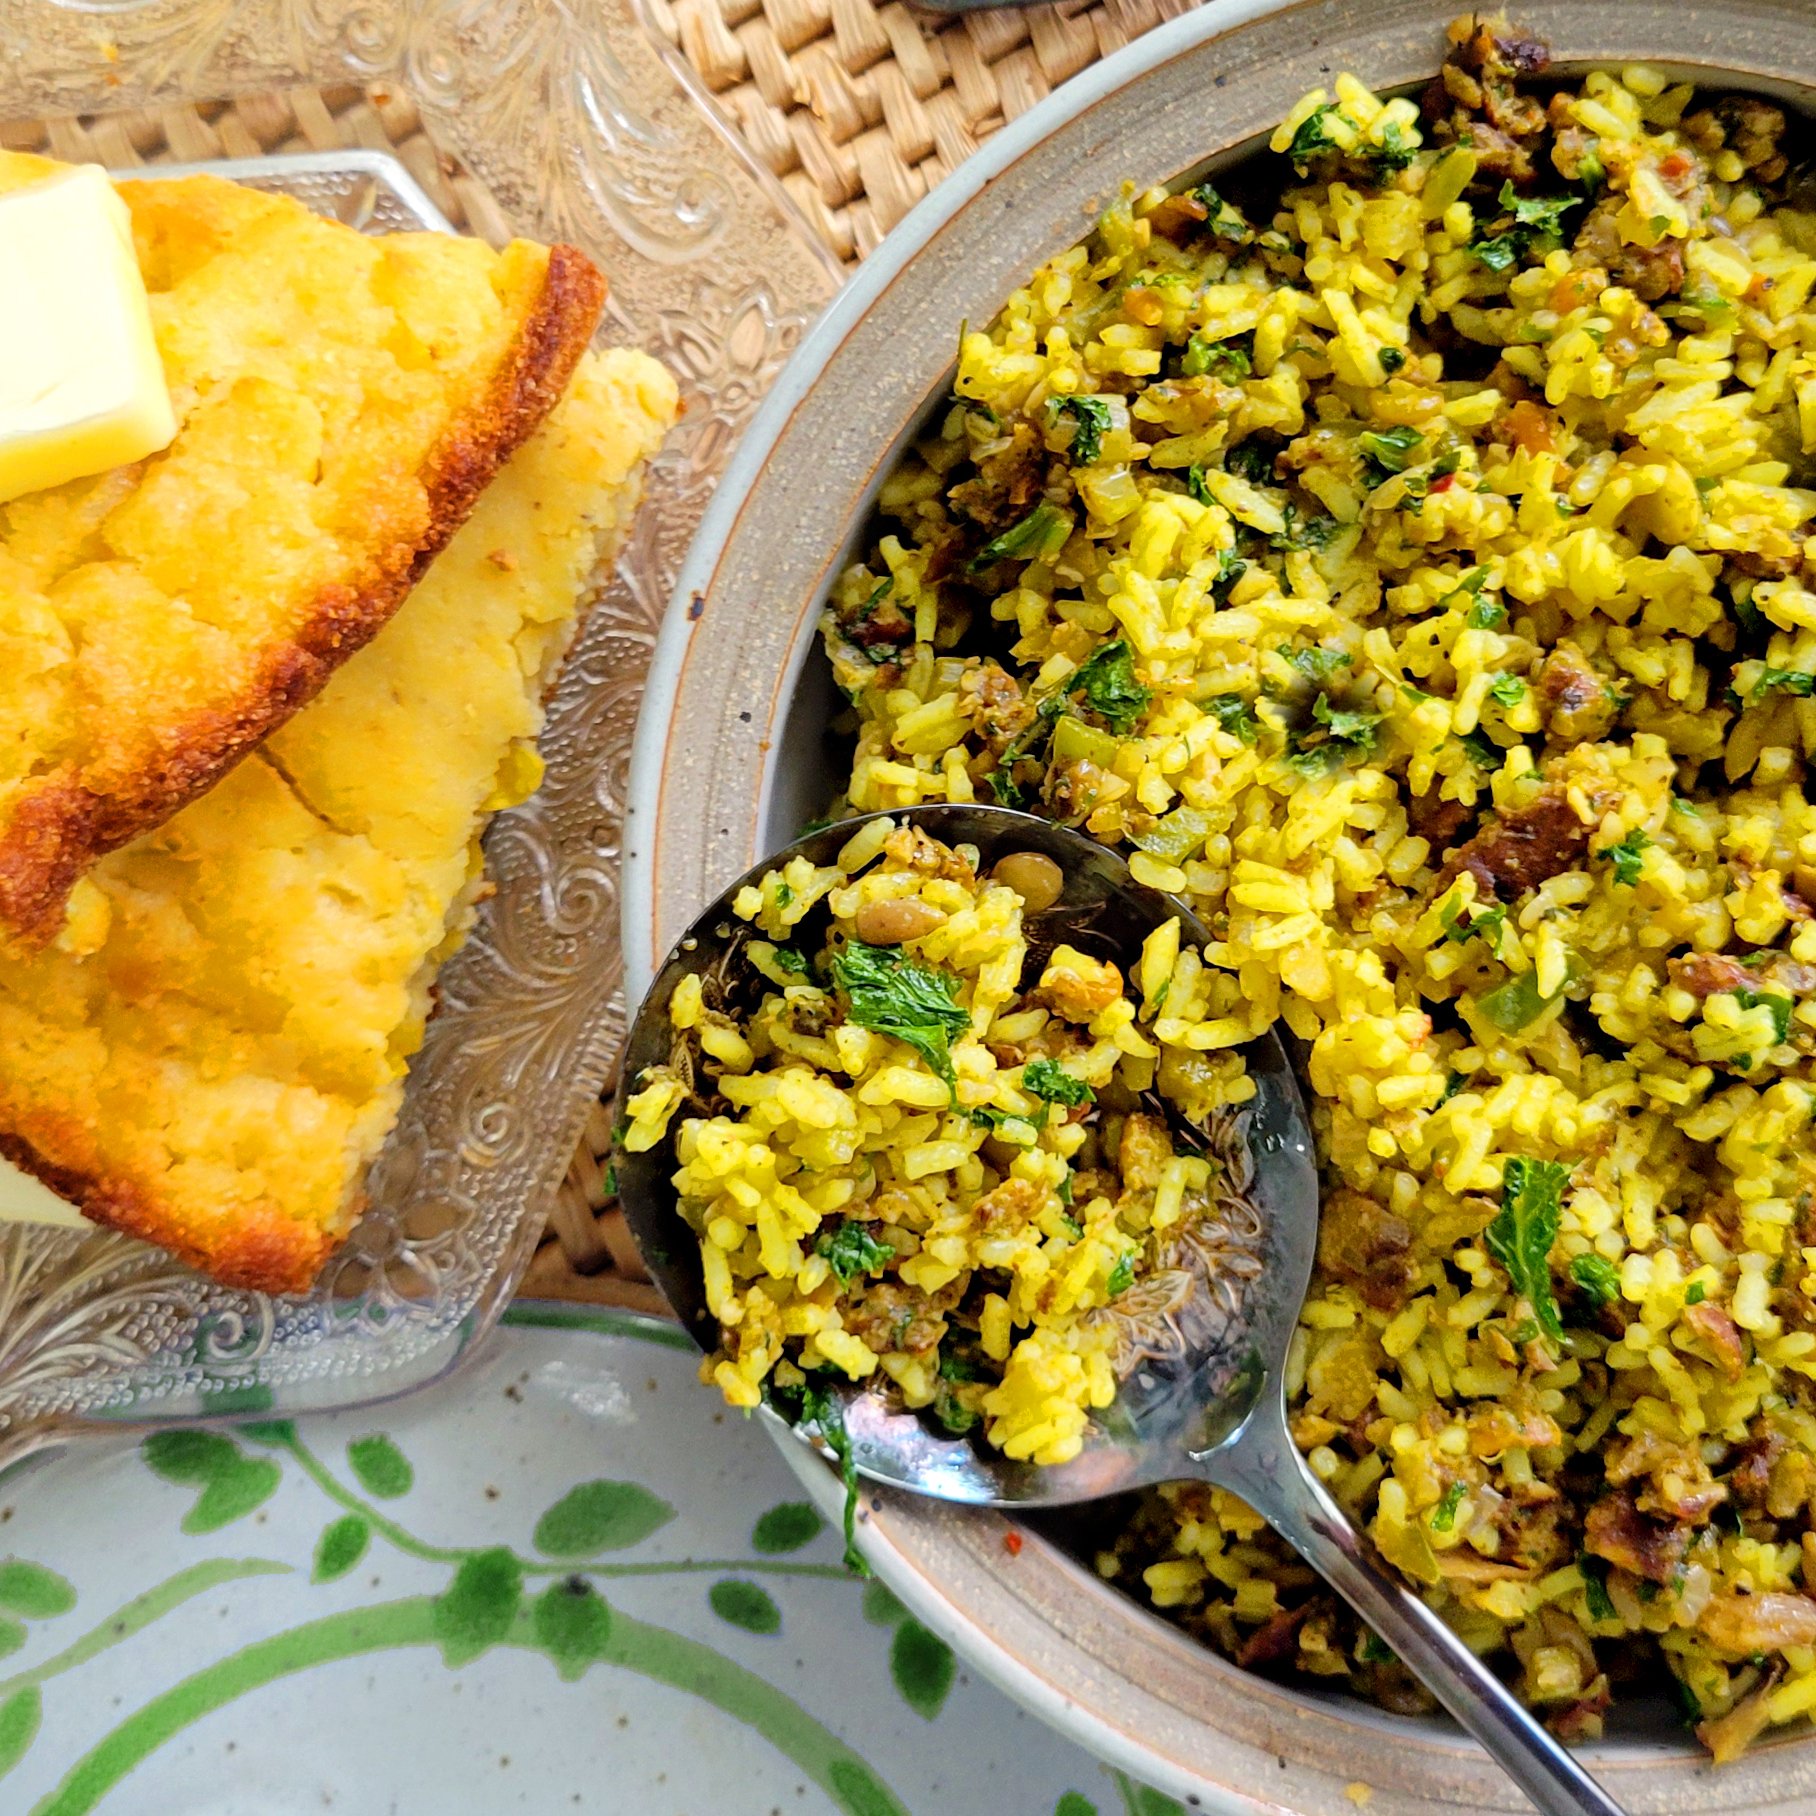
Vegan Dirty Rice with Mustard Greens
Easter is this weekend and if you're still looking for a comfortfood side-dish to round out your table...do I have a recipe for you...Vegan Dirty Rice with Mustard Greens! Whether you're new to cooking with greens or you grew up with them, you're going to love this new take on dirty rice! Hopefully the green beans and mashed potatoes don't get too jealous because, served with your favorite cornbread, this dish is going to be Easter's new favorite!
Did someone say Dirty Rice? Easter is this weekend and if you're still looking for a comfortfood side-dish to round out your table...do I have a recipe for you...Vegan Dirty Rice with Mustard Greens!
I know...I KNOW what you're thinking..."mustard greens, really, Sarah?" Yes, really! They are delicious and this WILL be the recipe that convinces you, I promise!

I used the chopped mustard greens from my good friends over Palmetto Gardens and picked them up at my local Publix.
Palmetto Gardens is a 3rd generation, family farm, local to the southeast, so I always know their greens are going to be fresh and delicious...
Whether you're new to cooking with greens or you grew up with them, you're going to love this new take on dirty rice! Hopefully the green beans and mashed potatoes don't get too jealous because, served with your favorite cornbread, this dish is going to be Easter's new favorite!
What you are going to need to buy:
1.5 cups Minute Rice
1.5 cups veggie stock
1 cup of mustard greens, chopped fine
1/2 cup diced green pepper
1/2 cup dices white onion
1/2 cup diced celery
2 tablespoons minced garlic
2 tablespoons Olive Oil
2 tablespoons Dairy-Free Butter
1 cup of meatless crumbles
1 tablespoon fresh parsley, chopped
1/2 tablespoon dried oregano
1 teaspoon dried thyme
1.5 teaspoon salt
1.5 teaspoon ground black pepper
Cayenne pepper, to taste
Chili powder, to taste
What you are going to need to do:
1. Saute' the chopped onion, celery, green pepper, and garlic in olive oil, on medium heat, in a large skillet.
2. Once the onions have become translucent, add the meatless crumbles and spices (parsley, oregano, thyme, salt and pepper, and cayenne and chili powder)
3. Cook mixture until warmed through and spices have become fragrant.
4. Remove from heat and fold in the chopped mustard green.
5. In a separate pot, cook rice per manufacturers instructions, replacing the water with veggie stock.
6. Once the rice is cooked and fluffy, stir in butter.
7. Gently stir the rice into the veggie mixture until well incorporated.
8, Taste for seasoning.
9. Serve with your favorite cornbread.
I’d love to hear if you try it! You can always tag me online at @plantbasedgingr
Love, Light, and Lentils, my friends!
Sarah

Couscous with Roasted Zucchini and Blistered Tomatos with a Tangy Garlic Crema
This quick and easy recipe is perfect for a mid-week lunch! If you’re working from home, like I do most days, you can put the veg into roast and keep working while it cooks. The couscous comes together in about 8-10 minutes and boom...chow time...but you can also always make this dish the night before and reheat the next day for lunch!
This quick and easy recipe is perfect for a mid-week lunch! If you’re working from home, like I do most days, you can put the veg into roast and keep working while it cooks. The couscous comes together in about 8-10 minutes and boom...chow time...but you can also always make this dish the night before and reheat the next day for lunch!

Now, if you’ve been following me for any length of time you’ll know what a fan if couscous that I am! Easy on the budget, filling, and you can top it with just about anything. But, I do have a couple tricks! I always toast it off in a hot pan before cooking and for the best flavor, I always use broth, never water, to cook my couscous!
What you are going to need to buy:
Pearled Couscous, 1 cup
Veggie Broth, 1.5 cups
1 small Zucchini, cut into 1/2” cubes
1 cup of Cherry or Grape Tomatoes, halved
2 tablespoons Nutritional Yeast
Olive Oil, 1 tablespoon
Salt and Pepper, to taste
1 tablespoon of Minced Garlic
1 teaspoon Onion Powder
3 tablespoon of Dairy Free Sour Cream
1 teaspoon Lemon Juice
1 teaspoon Garlic Salt
Scallions, sliced into small rings, for garnish
What you are going to need to do:
To start, preheat your oven to 375.
In a small bowl, coat the cubed zucchini with olive oil, nutritional yeast, garlic, onion powder, and a pinch of salt and pepper.
Spread out on a baking sheet and roast for 15 minutes.
After the zucchini has roasted for 15 minutes, add the halved tomatoes to the pan, cut side up, and roast both the zucchini and the tomatoes for another 10 minutes
Now, onto the Couscous!
PRO TIP: In a non-oiled, medium saucepan, on medium/low heat measure out the desired amount of couscous, according to the boxed directions, for the number of serving you need to make. Let the couscous toast in the warm pan, stirring or agitating the pan often so that the contents do not burn. After about 90 seconds you should see the couscous pearls begin to turn from blond to light brown. When this happens take the saucepan off the heat. It will continue to toast, from the residual heat but you don’t want it to burn.
After you have toasted your couscous, prepare according to your boxed directions (or if you’re like me…use veggie broth instead of water!)
In a small bowl, combine the sour cream, lemon juice, garlic salt and a pinch of salt and pepper.
To serve, present the couscous topped with the roasted veggies and drizzled with the crema. Add the scallions on-top, to finish!
And, that’s it. I love this recipe because not only is is quick and easy, it doesn’t make me feel like I’ll need a nap afterwards, plus, it’s great on the budget. This would also make a great addition to your Easter table this year! I’d love to hear if you try it! You can always tag me online at @plantbasedgingr
Love, Light, and Lentils, my friends!
Sarah

Leftover Alert: Mashed Potato Cakes with Creamy Dill Sour Cream Sauce
Let’s face it! Not all plant-based recipes are always healthy and sometimes you just need some old-fashioned comfort food and these Twice Baked Mashed Potato Cakes with Creamy Dill Sour Cream Sauce are just that. A great dish for your weekend holiday brunch or to use up the leftover mashed potatoes from Thanksgiving. The magic of this recipe is, for sure, the Creamy Dill Sour Cream Sauce…so don’t skip on that part of this delicious dish!

Looking for a way to use up those Thanksgiving Mashed Potatoes? These oven-baked mashed potato cakes with sauteed onions and vegan chorizo from No Evil turned out to be everything you love about mashed potatoes and crispy hash browns all in one dish. Topped with a rich and creamy vegan dill sour cream sauce...they are the perfect Holiday Weekend brunch food! Believe me, you won't be able to eat just one.
Let’s face it! Not all plant-based recipes are always healthy but sometimes you just need some old-fashioned comfort food and these Twice Baked Potato Cakes with Creamy Dill Sour Cream Sauce are just that. A great dish for your weekend brunch or to use up the leftover mashed potatoes. The magic of this recipe is, for sure, the Creamy Dill Sour Cream Sauce…so don’t skip on that part of this delicious dish!
What you are going to need to buy:
Left Over Mashed Potatoes (about 1/2 cup per Potato Cake you want to make!)
Chorizo - (We used the vegan chorizo from No Evil) Sweet Onion
Butter - (I love this plant-based butter from Earth Balance)
Oatmilk - (We used THIS ONE from Rise Brewing)
Minced Garlic - (the best is from Spice World!)
Fresh Chives
Just Egg, Egg Replacer (just a tablespoon or so for each serving/cake)
Fresh Dill
Sour Cream ( We used this vegan sour cream from our friends over at Tofutti)
Veggie Stock or Bullion Base
Flour
Salt & Pepper, to taste
What you are going to need to do:
Preheat your oven to 400 degrees.
In a small saucepan, saute’ your diced onions in olive oil or vegan butter with garlic until onions are translucent.
Incorporate the sauteed onions and garlic, along with pea-sized pieces of the plant-based chorizo. stir well to combine plus flour and a little egg replacer.
Add your chopped chives, salt and pepper, and additional garlic, to taste. If the mixture is too dry add some vegan cream or your preferred plant-based milk and/or butter.
If the mixture is still too thin, add some more flour.
You need the texture to be dry enough to hold together in cake form while baking. Think cookie dough consistency!
Using a ring mold or cookie cutter form your potato cakes. If you are not too terribly concerned about the looks or shape of the cakes, you can forgo the molds and use a large spoon and mound mixture onto a non-stick baking sheet.
Bake cakes at 400 degrees for about 20 minutes. You want to watch to make sure that they are not browning too quickly. If they do…simply spray a piece on tin foil with non stick cooking spray and gently lay over the top of the cakes!
While the cakes are baking you can make the Creamy Dill Sour Cream Sauce.
Making the Creamy Dill Sour Cream Sauce.
In the pot that you used to saute’ the onions add 2-3 tablespoons of butter and heat on medium/low until melted.
Sprinkle 2 tablespoons of white flour over the butter and whisk to make a roux. Let rue cook for 2-3 minutes. Slowly add 1/2 cup of veggie stock and 1/2 cup of Oat Milk and whisk constantly until the rue is dissolved into the stock. Let the mixture come to back up to a boil and allow to boil for 1 minute to thicken. If the mixture gets too thick you can add a bit more stock.
Remove from heat and let cool for 2-3 minutes. Stir into mixture 4 ounces of sour cream along with 1 tablespoon of chopped, fresh dill, and salt and pepper to taste. The sour cream will help to thin the mixture out but if it’s still too thick you can always add a bit of milk and/or butter. Additionally, you can melt your favorite vegan parmesan cheese into the sauce or even sprinkle in a bit of nutritional yeast if desired.
Check on the potatoes. They should be getting a crisp outer shell that is turning golden brown. Feel free to switch your oven to broil for the last 5 minutes that the cakes are in the oven to assist in browning but keep a close eye on them so they do not burn.
Allow the cakes to cool on the stove-top for 1-2 minutes before plating. Serve potato cakes topped with the
Creamy Dill Sour Cream Sauce and garnished with additional chopped chives.
Enjoy!

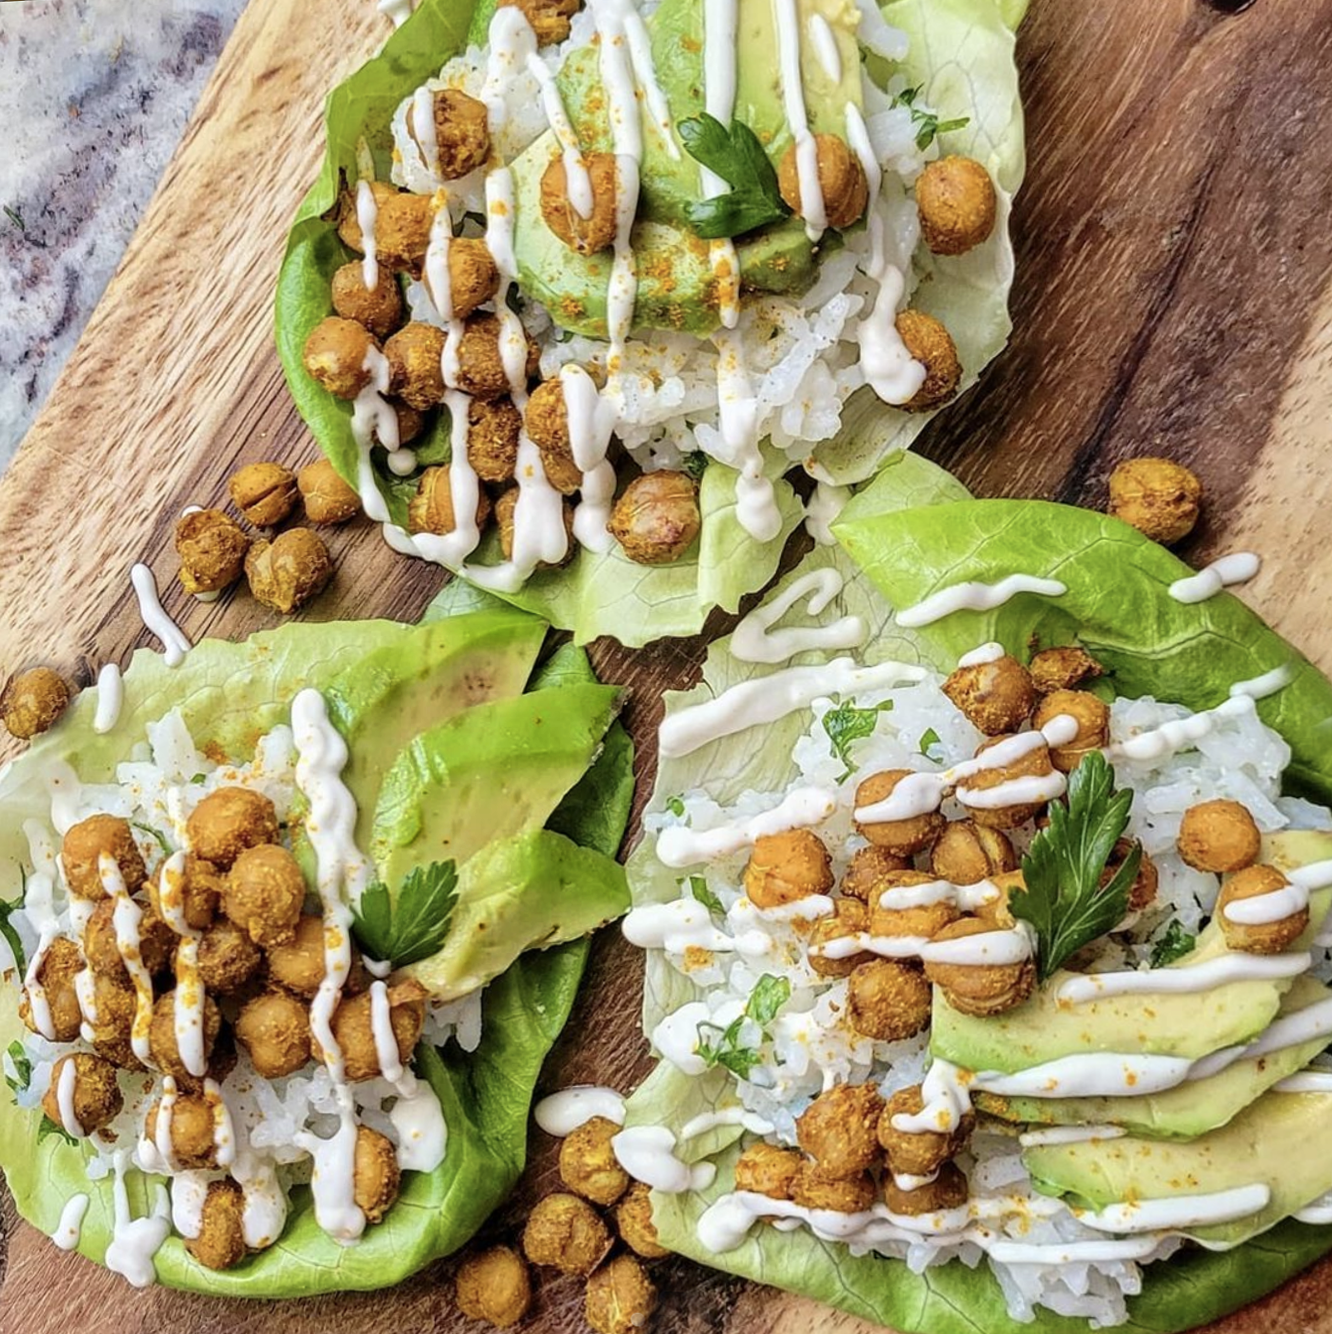
Coconut Curry Chickpea Lettuce Cups with BeanVivo!
If you are craving the flavors of curry but are short on time you are going to love these Curry Chickpea lettuce wraps! They are shockingly easy and even with roasting the chickpeas only take about 15 minutes to pull together with less than 10 ingredients that you probably already have in your panty! I used the lettuce as the “wrap” for this recipe but it would be equally as good wrapped in a tortilla or stuffed into a pita!
Are you ready for the easiest dinner you could whip together in 15 minutes with less than 10 ingredients? Thanks to our friends at BeanVivo these Coconut Curry Chickpea Lettuce Cups with with Cilantro Lime Rice and Pineapple are so simple to make and packed full flavor even the pickiest eaters in your house are sure to gobble them up!
If you’re not familiar with BeanVivo…you should be! Their mission was to develop tasty meals & snacks for people on-the-go, like you and me, by using simple organic ingredients. They combine one of nature’s most nutritious ingredients, not to mention one of my favorites, on our planet…beans, with tons of unique herbs and spices from around the world. Their ready to eat packs are sustainable, convenience (ready to eat in 60 seconds) and are totally gluten-free, and vegan! So…let’s cook!
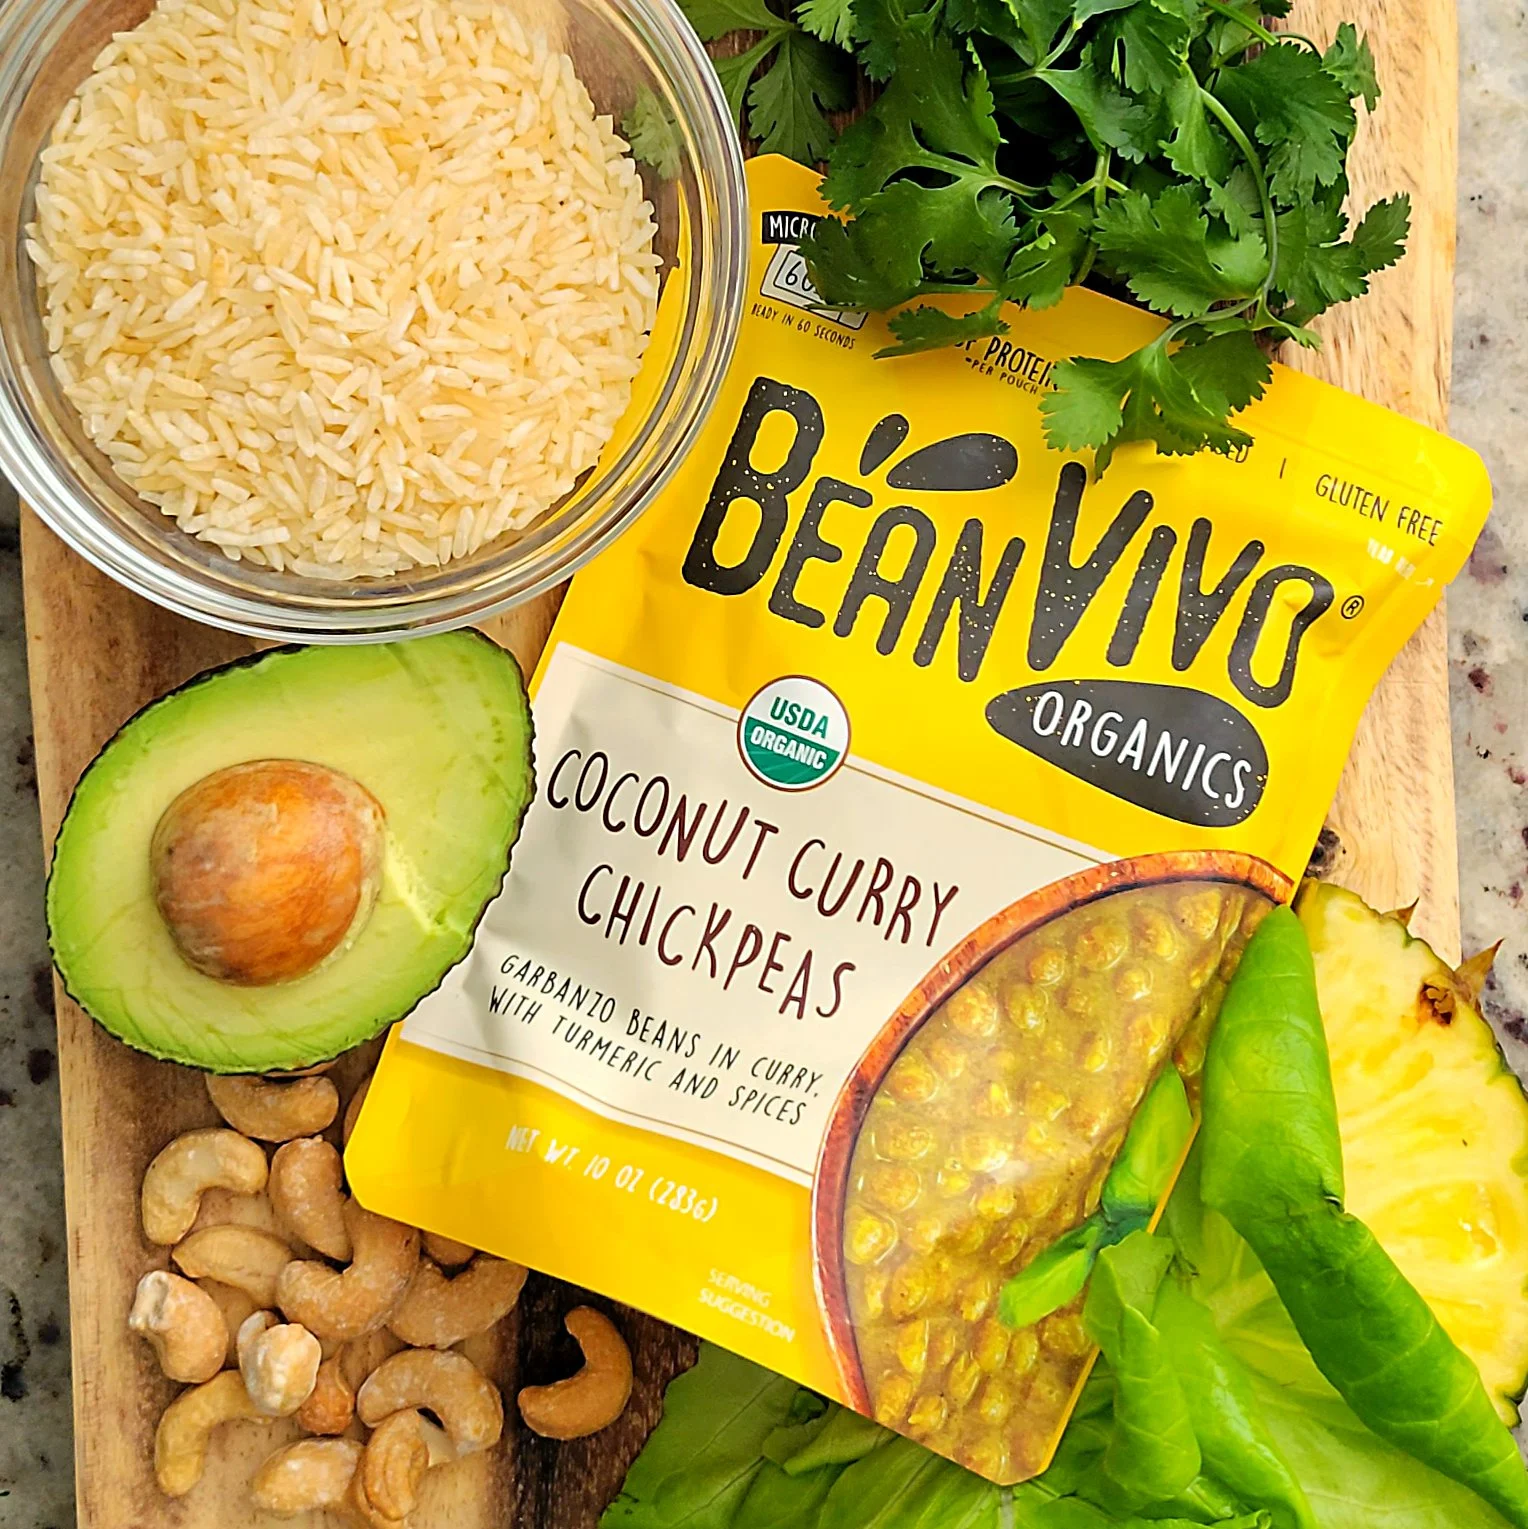


What you are going to need to buy:
Lettuce, use your favorite…I like butter lettuce
One packet of Coconut Curry Chickpeas from BeanVivo
Minute Rice
Dairy Free Butter
Lime Juice
Fresh Cilantro, chopped fine (or parsley, if you must!)
Avocado
Chopped Pineapple
Cashews
What you are going to need to do:
To begin, prepare your rice per the boxed directions allowing about 1/4 cup of cooked rice for each serving (3 lettuce cups, per serving)
Once the rice is finished cooking, stir in 1 teaspoon of butter, and add lime juice and cilantro (To taste…I like mine really lime-y)
Open and slice one small avocado.
Slice fresh pineapple into 1/4 inch chunks
Open your packet of Coconut Curry Chickpeas from BeanVivo . The best part is that you don’t even need to heat them! They are super delicious, right out of the packet!
Assembly!
Using your lettuce as your “shell” spoon your Coconut Curry Chickpeas from BeanVivo on top of a bed of the cilantro lime rice. Add avocado, diced pineapple, and cashews!
See, told you it was easy! Check out all the delicious combinations of BeanVivo products at their website HERE!

Spicy Buffalo Tofu Chick'n Sub
Can we say football food? Buffalo Chick'n Sub with feta, pickles, and spicy mayo! Made with crispy fried tofu, it's literally the best of a Publix Sub and a Popeyes Sandwich all rolled into one! Seriously these subs are so good that even your non plant-based friends with gobble them right up!
Can we say football food? Buffalo Chick'n Sub with feta, pickles, and spicy mayo! Made with crispy fried tofu, it's literally the best of a Publix Sub and a Popeyes Sandwich all rolled into one! Seriously these subs are so good that even your non plant-based friends with gobble them right up!

In all the years that I have been plant-based, I only recently started preparing tofu, using this method, to use as a chicken substitute, in dishes. This recipe turned out so good and flavorful and it’s honestly way easier than you may think!! The trick to these subs is the buffalo sauce and, of course slathering them in spicy mayo!
What you are going to need to buy:
Extra Firm Tofu
Vegan Butter - (This recipe used Earth Balance)
Flour
Corn Starch
Garlic Powder
Onion Powder
Salt and Pepper
Paprika
Buffalo Sauce, or make your own! (See below)
Dairy Free Mayo
Hot Sauce
Sub Rolls or Hot Dog Buns
Dill Pickles
Butter Lettuce
Dairy Free Feta Cheese
What you are going to need to do:
To start, crumble your extra firm tofu into 2” inch bite-sized pieces, or larger, if you like
In a bowl, mix together equal parts corn starch and flour, along with garlic powder, onion powder, salt and pepper (The quantities will vary based on the amount you’re making but the following should be enough for 4 portions.
1/3 cup of flower
1/3 cup of corn starch
1 teaspoon each of garlic powder, onion powder, salt and pepper
Dredge the tofu pieces into the dry mixture and coat well. The better you coat the pieces, the better, and more crisp they will be.
In a skillet, melt 3-4 tablespoons of vegan butter, on low heat and once the skillet is good and hot, pan fry the tofu, until a nice crust is formed.
Remove from heat and gently pour over your buffalo sauce: Be careful not to tear up your tofu while saucing
Buffalo Sauce is simply your favorite hot sauce, butter, a splash of white vinegar, and garlic! But, to be honest…I really like the Frank’s Brand Buffalo Sauce
In a small bowl, mix vegan mayo and your favorite hot sauce and paprika, to taste and slather your buns with the spicy mayo!
Top your buns with lettuce, pickles, tofu chick’n, and dairy free feta cheese and serve!

Orange Tofu Chick'n with Homemade Glaze
My mouth has been watering for Orange Chicken for weeks now, so I broke down and worked out an at-home version! This recipe turned out so good and flavorful and it’s honestly way easier than you may think!! The orange sauce is so much better than anything from a packet! It's remarkable how much better fresh, from scratch, flavors are!
There’s a lot of buzz about the new partnership with Beyond Meat and Panda Express’ Orange Chicken but down here in Central Florida we don’t have it yet…and my mouth has been watering for Orange Chicken for weeks now, so I broke down and worked out an at-home version!
In all the years that I have been plant-based, I only recently started preparing tofu, using this method, to use as a chicken substitute, in dishes. This recipe turned out so good and flavorful and it’s honestly way easier than you may think!! The orange sauce is so much better than anything from a packet! It's remarkable how much better fresh, from scratch, flavors are!


What you are going to need to buy:
Extra Firm Tofu
Vegan Butter - (This recipe used Earth Balance)
Flour
Corn Starch
Garlic Powder
Onion Powder
Salt and Pepper
Orange Juice
Red Bell Pepper, julienned
Maple Syrup
Soy Sauce
Cauliflower Rice
Fresh Kale
Minced Garlic
Paprika
Ginger Powder
Vinegar
Cayenne Pepper, optional
What you are going to need to do:
To start, crumble your extra firm tofu into 1.5” inch bite-sized pieces
In a bowl, mix together equal parts corn starch and flour, along with garlic powder, onion powder, salt and pepper (The quantities will vary based on the amount you’re making but the following should be enough for 4 portions.
1/3 cup of flower
1/3 cup of corn starch
1 teaspoon each of garlic powder, onion powder, salt and pepper
Dredge the tofu pieces into the dry mixture and coat well. The better you coat the pieces, the better, and more crisp they will be.
In a skillet, melt 3 tablespoons of vegan butter, on low heat and once the skillet is good and hot, pan fry the tofu, until a nice crust is formed. Remove from heat and set aside.
Wipe out your skillet and using another tablespoon of vegan butter, saute the red pepper and 1 tablespoon of minced garlic until the pepper begins to soften.
To the pepper and garlic, add orange juice, maple syrup, soy sauce, vinegar, ginger powder, paprika, and cayenne pepper. Again, depending on how much you are making these quantities can vary.
1 cup orange juice
1/3 cup of maple syrup
2-3 tablespoons of soy sauce
2 tablespoons of vinegar
1/2 teaspoon each of ginger powder and paprika
For a spicy glaze add cayenne pepper, to taste.
Stir to combine and increase heat to reduce the sauce. Allow to boil until the sauce is thick and sticky enough to coat the back of a spoon and able to cling to the tofu pieces. If you’d like to speed up this process you can make a slurry with 1 teaspoon of cornstarch and 2-3 tablespoons of water and add that to the sauce.
Once the glaze has thickened, add the crispy tofu pieces back into the orange glaze and turn heat down to warm.
I like to serve over butter cauliflower rice with some wilted kale!

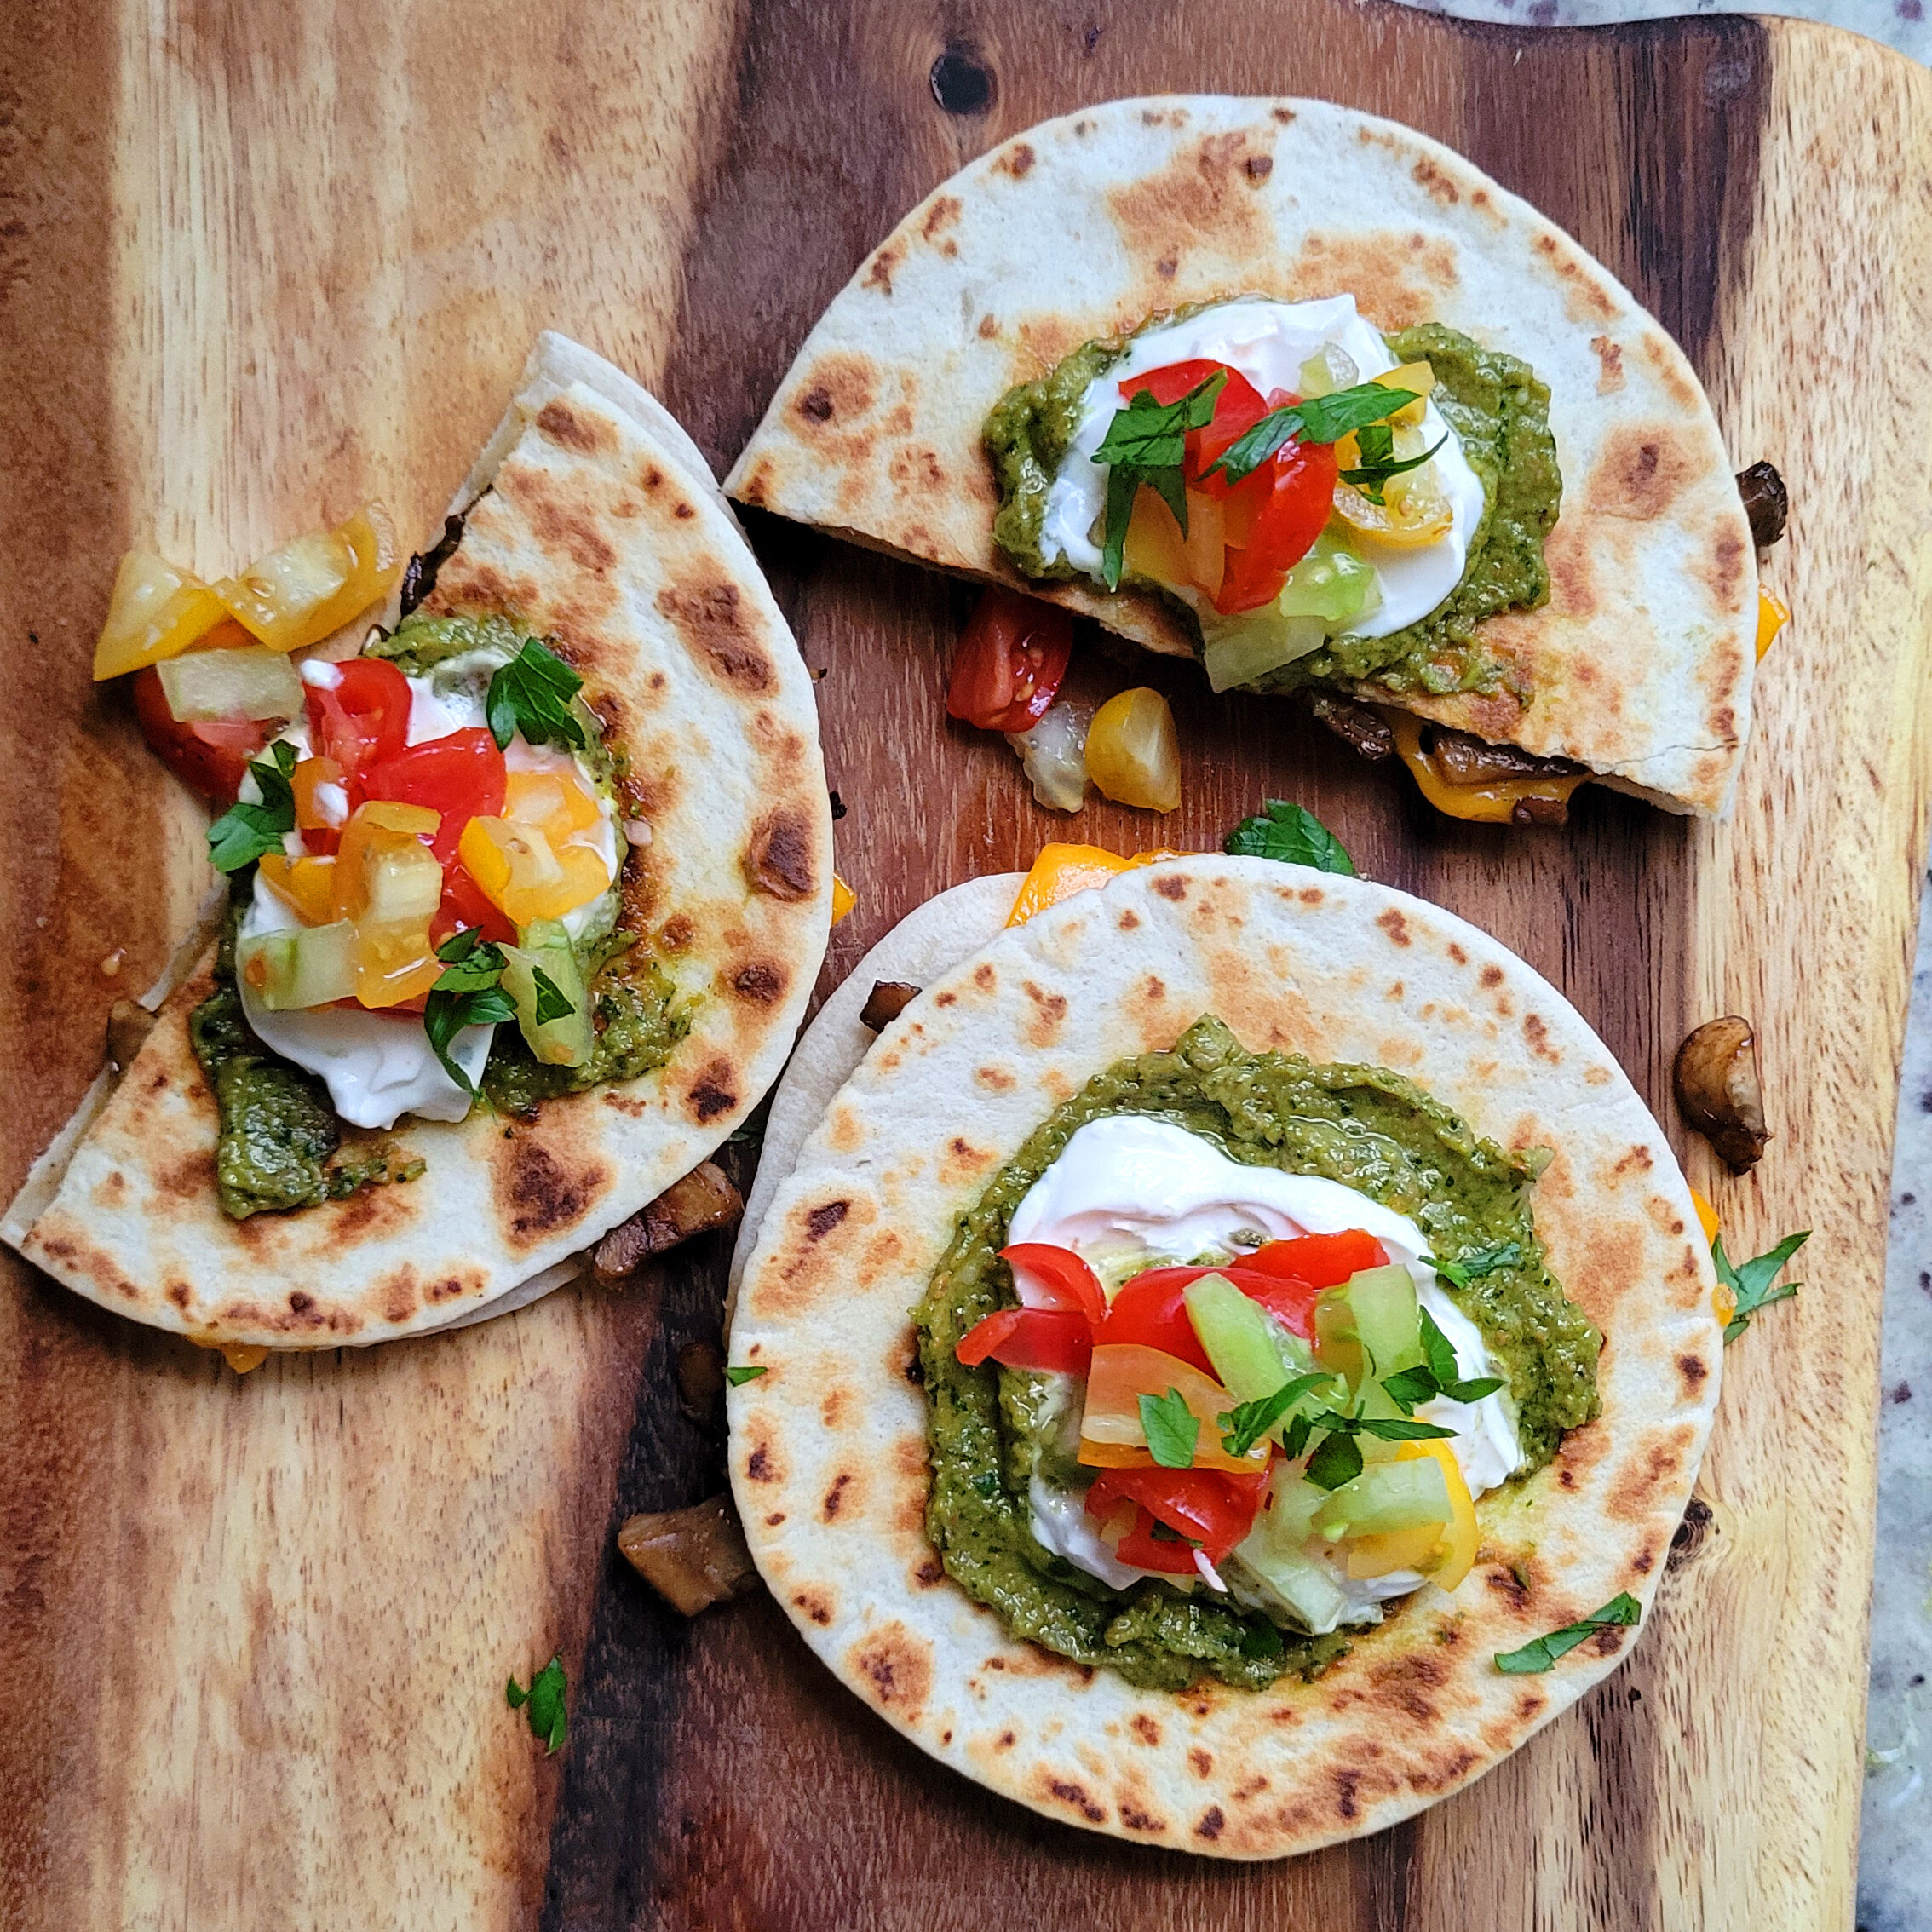
Copy Cat Taco Bell Supreme Quesadillas - Vegan
Let’s face it…no matter how good our intentions to eat healthy are, sometimes we just crave the kind of junk food that we know isn’t all that great for us? For me, that often tends to be Taco Bell! Don’t Judge! Is this a perfect vegan dupe for the steak and cheese supreme quesadilla from Taco Bell? Honestly, no! It's way WAY better!
Let’s face it…no matter how good our intentions to eat healthy are, sometimes we just crave the kind of junk food that we know isn’t all that great for us? For me, that often tends to be Taco Bell! Don’t Judge! Is this a perfect vegan dupe for the steak and cheese supreme quesadilla from Taco Bell? Honestly, no! It's way WAY better!
With American style slices from Follow Your Heart and the creamy tang of Tofutti sour cream no one would ever know these are Dairy Free! I do have a couple tips before we get rockin’ and rolling…
Dairy free cheese can get a bad wrap because it DOES take a longer time to melt than traditional cheese and if you’re not careful, in a recipe like this, or a grilled cheese, if you’re not careful you’ll end up burning the outside of the quesadilla or sandwich before the cheese inside is melted!
That’s where the microwave come in super handy! Simply take what will be the top of your quesadilla, place your cheese slices or shreds on it and pop it into the microwave for about 15 seconds! This is going give that dairy free cheese a little jump start on the melting. Simply flip over the tortillas and top your bottom tortilla and toppings that you have already started to cook…and continue to cook as normal!


What you are going to need to buy:
Mushrooms, diced (I buy what’s on sale. Don’t over think this. We are duping Taco Bell no need to for the wild, heritage, hand picked, expensive ones. White button mushrooms will work just fine.
Olive Oil
Liquid Smoke
Onion (white or yellow)
Minced Garlic - (we like these jarred options from Spice World!)
Salt and Pepper, to taste
Smoked Paprika, to taste
Tortillas - (We like the mini ones used for street tacos)
American Cheese - (love THESE SLICES from Follow Your Heart)
Pesto (for the homemade pesto recipe that I used…CLICK HERE)
Tomatoes
Sour Cream - (Our favorite is Tofutti)
You can really garnish this with whatever you like. A little lettuce? Sure. Some black olives? Why not? Got some leftover black beans? Go for it!
What you are going to need to do:
Begin by dicing your mushrooms and onions . The amount you need will depend on how many people you are feeding but remember that mushrooms lose a lot of volume when cooking. I’d plan for 1 cup (uncooked) per quesadilla.
In a medium skillet, with olive oil and a splash of Liquid Smoke, saute your veggies until soft.
After the mushrooms and onions have cooked 5-7 minutes, add your garlic and other spices so they do not burn. Cook another 1-2 minutes and remove from heat (Onto a paper plate or bowl)
Wipe out the skillet and assemble your quesadillas beginning with one tortilla topped with the mushroom/onion mixture.
This is where that cheese melting tip from the into comes in. Top your quesadilla with the 2nd tortilla (that you popped into the microwave to melt that cheese) cheese side down on top of the mushroom/onion mixture.
Griddle until tortillas is golden brown and crisp and flip to allow the other side to cook.
Remove from skillet and slice in half.
Top with your favorite, fresh, toppings and enjoy!

Vegan Watermelon "Tuna" Tartare
I don’t know what kind of vegan voodoo this is but I finally tried my hand at making #watermelontuna and holy avocado did is turn out...amazing! Not only did it LOOK like tuna but the taste and texture were shockingly similar!
Okay, I don’t know what kind of vegan voodoo this is but I finally tried my hand at making #watermelontuna and holy avocado did is turn out...amazing! Not only did it LOOK like tuna but the taste and texture were shockingly similar!
I decided to use my tuna to make a kind of tuna tartare or deconstructed sushi and it did not disappoint. I’m still trying to wrap my head around how this actually worked…but it totally did, and spoiler: it was actually really easy!


What you are going to need to buy:
To make the Tuna:
Watermelon - I used the pre-cubed watermelon that you can get in your local produce section. It ended up being about 12 chuncks of Watermelon
3 tablespoons Sesame Oil
2 tablespoon Soy Sauce
1/2 teaspoon Liquid Smoke
1/2 teaspoon each Salt and Pepper
Splash of Vinegar
Ingredients for the Tartare/Poke Bowl:
2 tablespoons Vegan Mayo
Hot Sauce, to taste
Rice
Edamame
Diced Mango
Sliced Avocado
(whatever else yo love in your sushi or poke bowl)
What you are going to need to do:
This recipe made 1 serving and you can scale it up, if you like. Don't worry too much about the measurements. As long as you have enough marinade to get each piece of watermelon coated, you should be good!
Start by preheating your oven to 375
The key to this recipe is having enough salt in the marinade when you are baking your watermelon that it balances the sweetness of the fruit.
Dunk all of the watermelon into the marinade until well coated. Let sit for 10 minutes.
Take your watermelon cubes (about 1.5” square”) and place them on a cookie sheet lined with a non-stick baking sheet, like a silpat mat OR onto parchment paper.
Bake for 30 minutes. After 30 minutes, turn the watermelon over on the baking sheet and rotate the sheet in the over 180 degrees. Brush the turned tops of the watermelon with any marinade that is left over.
Bake for another 30 minutes.
At the 1 hour mark yo should see something that really, really looks like tuna. It’s remarkable, really. I was shocked.
Remove from oven and let cool for 5 minutes.
And, that’s really all there is to it! See, told you it was easy! Now that you have your watermelon tuna, you can use it just lie you would use any tuna.
I diced mine into small pieces, mixed it with some vegan mayo, a splash of vinegar, a dash of hot sauce, more salt and pepper, to taste, and served it on top of rice, topped with diced mango, edamame, and spicy mayo.
This is where you can get creative? Did someone say vegan sushi?
Enjoy!

Curry Chickpea Lettuce Wraps with Cilantro Lime Rice
If you are craving the flavors of curry but are short on time you are going to love these Curry Chickpea lettuce wraps! They are shockingly easy and even with roasting the chickpeas only take about 15 minutes to pull together with less than 10 ingredients that you probably already have in your panty! I used the lettuce as the “wrap” for this recipe but it would be equally as good wrapped in a tortilla or stuffed into a pita!
Are you ready for the easiest lunch you could whip together in 15 minutes? I have legit been eating these Curry Chickpea Lettuce Wraps with Cilantro Lime Rice all of the time since I first made them a month or so ago!
If you are craving the flavors of curry but are short on time you are going to love these Curry Chickpea lettuce wraps! They are shockingly easy and even with roasting the chickpeas only take about 15 minutes to pull together with less than 10 ingredients that you probably already have in your panty! I used the lettuce as the “wrap” for this recipe but it would be equally as good wrapped in a tortilla or stuffed into a pita! Plus, the cilantro lime rice is so good you’re probably going to want to whip up a big batch to use in all kinds of dishes for the week!


What you are going to need to buy:
Lettuce
One can of Chickpeas
Curry Spice
White Minute Rice
Lime Juice
Fresh Cilantro, chopped fine (or parsley, if you must!)
Avocado
Dairy Free Sour Cream
What you are going to need to do:
Start by preheating your oven to 425
Open the can of chickpeas and drain. Do not rinse.
Keeping the chickpeas in the can add 1 tablespoon of curry spice to the can and swirl around so that all of the chickpeas get covered with the spices.
Place chickpeas on a baking tray with a silicone mat or lined with baking paper.
Bake for 15 minutes, rotating them on the pan about half-way through.
Prepare your rice per the boxed directions allowing 1/4 cup of cooked rice for each wrap you’re making.
Once the rice is finished cooking, add lime juice and cilantro (To taste…I like mine really lime-y)
Open and slice one small avocado.
Mix 3-4 tablespoons of sour-cream with a squeeze of lime juice, just to thin it out a little.
Assembly!
Using your lettuce as your “shell” place your roasted chickpeas on top of a bed of the cilantro lime rice. Add avocado and drizzle sour cream to finish. Garnish with more fresh herbs and a sprinkling of curry powder!
See, told you that was easy! Save any extra chickpeas to use in stews or just to eat as a salty and crunchy snack.
Enjoy!

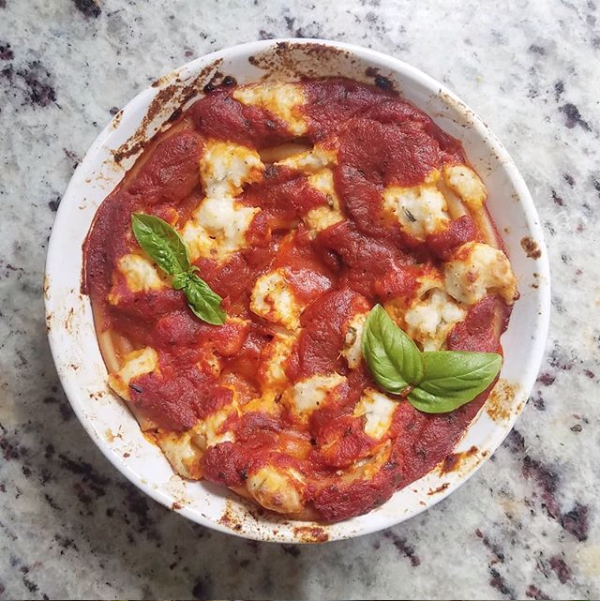
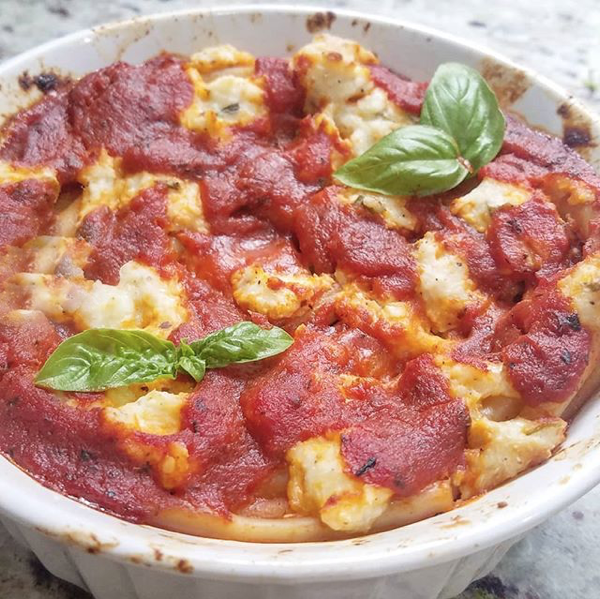
Poor Man's Vegan Chicken Parmesan Casserole
Who doesn’t love a good pasta dish? It’s the kind of comfort food that you crave when life get’s crazy and you don’t have any idea what else to make for dinner. Or, if you are like me, this week, it’s because you just need to go to the grocery store! This Poor Man's Vegan Chicken Parmesan Casserole is also the perfect way to use up the pasta that you have at home because just about any kind of noodle or shell will work for this dish.
Who doesn’t love a good pasta dish? It’s the kind of comfort food that you crave when life get’s crazy and you don’t have any idea what else to make for dinner. Or, if you are like me, this week, it’s because you just need to go to the grocery store! This Poor Man's Vegan Chicken Parmesan Casserole is also the perfect way to use up the pasta that you have at home because just about any kind of noodle or shell will work for this dish.
I have made several versions of a plant-based Chicken Parmesan dish over the years, but honestly, this is one of the easiest and everyone, even the meat eaters in my life, always love it. Part traditional Chicken Parmesan, part pasta casserole, it’s the best of both worlds when you’re craving some comfort food, plus because you’re not doing all the breading and frying it comes together in half the time, just about 30 minutes, total.


What you are going to need to buy:
Your favorite kind of pasta shell or small noodle. (Pictured here is cavatappi, or as my niece calls them, corkscrews!)
Red Sauce - (Make your own or use your favorite jarred brand. Trust me, either way, it’s going to be delicious.)
Vegan Parmesan - (We love the Follow Your Heart shredded Parmesan)
Vegan Mozzarella - (The Miyoko's Creamery has one that melts and browns up so nice that you’ll never know the difference)
Minced Garlic - (we like these jarred options from Spice World!)
Breaded Vegan Chicken Strips or Tenders - (Pictured here are the Gardein Crispy Tenders)
Salt and Black Pepper
Italian Seasoning or Fresh Herbs
What you are going to need to do:
To start, take your fingers out of the freezer so they can begin to thaw. (You can even pop them into the microwave for 30 seconds, or so…)
Preheat oven to 350 degrees
In a stock pot, bring salted water to a rolling boil to cook your desired pasta.
Once your pasta is cooked drained, mix in your pasta sauce and parmesan cheese. Amounts will vary based on how much past you have cooked and how many portions you are making. You want the pasta nice and covered in the sauce because you’re going to bake this dish and don’t want it to dry out.
I like to also mix in a bit of minced garlic to the pasta and the shells at this point.
Layer the pasta in a casserole dish, leaving room at the top for the Chicken.
Lay the chicken strips on top of the pasta. It’s best if these are at room temperate at this point and not frozen.
Place a heaping tablespoon of red sauce on top of the tenders and top with a thick slice of mozzarella.
Cover tightly with tin foil and bake for 15 minutes.
Uncover and turn your oven to broil. Broil, uncovered for 5 minutes to really melt that cheese and get some nice browning but keep your eye on it because it can go from brown and bubbly to burned real quick!
Let sit for 3-4 minutes before serving. Top with fresh herbs and serve with your favorite garlic bread!
Enjoy!

Carrot Bacon Topped Avocado Toast
If you have been in the veg community for any length of time, you’ve probably heard about the wonder that is, Carrot Bacon! And, while I can’t lay claim to this recipe nor the base idea, I do have enough people ask me about it when I post photos that feature it that I thought I would share with you all how I make my Carrot Bacon!
If you have been in the veg community for any length of time, you’ve probably heard about the wonder that is, Carrot Bacon! And, while I can’t lay claim to this recipe nor the base idea, I do have enough people ask me about it when I post photos that feature it that I thought I would share with you all how I make my Carrot Bacon!

I believe that the original recipe came from, the reigning vegan queen herself, Ms. Tabitha Brown, or at least that who I first saw share it! She uses a veggie peeler and an air fryer and my version uses a mandolin and the oven…just one more example of how most of cooking really is just good improv! Feel free to jump down to the end of the recipe if you just want my quick tips and tricks!
What you are going to need to buy:
Fresh Carrots
Liquid Smoke
Minced Garlic - (we like these jarred options from Spice World!)
Maple Syrup - (The good stuff, not pancake syrup.)
Garlic Powder, Paprika, Onion Powder
Salt & Pepper
Avocado
Sliced Vegan Cheese (like this ONE from Field Roast)
Tomato
Bread
Vegan Feta (this recipe uses the Block Feta from Violife!)
What you are going to need to do:
For the Carrot Bacon:
Using a mandolin or a veggie peeler slice your carrots into long thin strips/ribbons. This is why you want those fat carrots because they do tend to shirk up quite a bit in the oven.
Into a zip-top baggie that is large enough to hold your ribbons add:
1 -2 tablespoons of Liquid Smoke
1-2 tablespoons of Maple Syrup
1 teaspoon on minced garlic
1/2 teaspoon each of the spices. (Garlic Powder, Paprika, and Onion Powder, Salt and Pepper)
Let the carrot ribbons marinate for anywhere from 10-30 minutes.
Preheat your oven to 400 degrees.
On a baking tray lay out your carrot ribbons and place them in the oven to crisp up for 15-20 minutes. (Keep an eye on them, flipping after 10 minutes. You can also baste the reverse side with the leftover marinade when you flip them.
Feel free to turn on your broiler for the last 5 minutes or so to get your bacon extra crispy but watch is carefully so that it doesn’t burn…because it will!
Remove from oven and let sit for 1 -2 minutes until cool enough to handle.
The Assembly:
Apply your best practices for standard avocado toast preparation! I like mine to resemble a BLT and use tomato layered over some sliced vegan cheese and topped with dairy-free feta
Now, for the TIPS & TRICKS:
🌿 Use giant carrots...like really the fattest ones you can find. My local Asian Market has the biggest carrots I’ve ever seen!
🌿 Use a mandolin or a peeler because you won't be able to slice the carrots thin enough with a knife. I love my Pampered Chef Simple Slicer. I use it for everything!
🌿 The longer you can marinate the carrots, the better the flavor!
🌿 I bake mine on parchment because when that sticky marinade cooks onto your baking sheet at 400 degrees, it’s a pain to get off!
🌿 Use the leftover marinade to base when you flip the bacon half-way through cooking
🌿 Use the broil feature of your oven at the end to really crisp up the bacon but watch it carefully so it doesn’t burn! - I leave the oven door cracked so I can keep an eye on what’s happening!
Enjoy! And as Tabitha says…
“Hey, you have a good day, but if you can't, don't you go out messing up nobody else's.”

Thai Inspired Spicy Lime Peanut Sauce (Only SIX Ingredients!)
Perfect for everything from stir-fry and noodles to veggie wraps, or even as a dressing for a Asian inspired summer salad, this sauce is something you’ll want to have in your refrigerator this summer. I love this recipe because it looks and tastes fancy but it comes together with six simple pantry ingredients in just about 10 minutes.
Perfect for everything from stir-fry and noodles to veggie wraps, or even as a dressing for a Asian inspired summer salad, this sauce is something you’ll want to have in your refrigerator this summer. I love this recipe because it looks and tastes fancy but it comes together with simple pantry ingredients in just about 10 minutes.

I don’t know if you’re like me, but I have a hard time spending the money on sauces and dressings at the grocery store that I know I can make at home and this Thai Inspired Spicy Lime Peanut Sauce is no exception! And…bonus, it only takes SIX ingredients to whip up! This recipe makes about 4 - 5 servings, depending on what you are using it for and how thin you make it.
What you are going to need to buy:
Peanut Butter - (creamy is best)
Sesame Oil - (You can use another neutral oil, but the flavor will differ a bit)
Chili Oil - (If you don’t have Chili oil, you can use dried chili powder)
Soy Sauce
Maple Syrup
Lime Juice
Water, for thinning
What you are going to need to do:
This can be done on a bowl with the aid of the microwave, or on the stove-top in a small sauce pot.
Mix together the following
8 tablespoons of peanut butter
2 tablespoon of sesame oil
2 tablespoon of Soy Sauce
1 teaspoon of chili oil
Heat these ingredients until the peanut butter becomes soft enough to incorporate easily into the oils and whisk to combine. After well combined add:
2 tablespoon of maple syrup
2 tablespoon of lime juice
Salt and pepper, to taste
At this point, taste your sauce…want a bit more tang, add another splash of lime juice. Like things a but more spicy…more chili oil. Once you get the flavor you like use 2-3 tablespoons of water to thin sauce to desired consistency. I like mine about the thickness of a ranch dressing, thin enough to drizzle, but thick enough to stick to vegetables, noodles, or as a dressing for wraps.
To Serve/Store:
Drizzle peanut sauce on top of anything and everything. Store in the fridge for up to 2 weeks. (It won’t last that long, I promise!) Let sauce come to room temperature or warm slightly to re-serve. You can always add a bit more water if necessary after it’s been in the fridge a few days
Enjoy!

Noodles with Garlic Mushrooms and Peppers topped with Thai Inspired Spicy Lime Peanut Sauce
Raise your hand if you buy mushrooms, when they are on sale, and then spend the next week watching them turn to goo in your fridge because you’re uninspired as to what to do with them!? I’ve got you covered! The Thai inspired spicy lime peanut sauce is all you need to turn ramen and mushrooms into an amazing dinner! Make a little extra, because you’re going to want to put it on everything!
Sometimes you plan, shop for, and execute extravagant meals that look and taste like they should be served at the fanciest of restaurants and sometimes you haven’t been to the grocery store in a week and you’re trying to find way to level up ramen! This recipe is perfect because it looks and tastes fancy but it comes together with simple pantry ingredients and a small amount of produce, in less than 20 minutes!
Raise your hand if you buy mushrooms, when they are on sale, and then spend the next week watching them turn to goo in your fridge because you’re uninspired as to what to do with them!? I’ve got you covered! The Thai inspired spicy lime peanut sauce is all you need to turn ramen and mushrooms into an amazing dinner! Make a little extra, because you’re going to want to put it on everything!
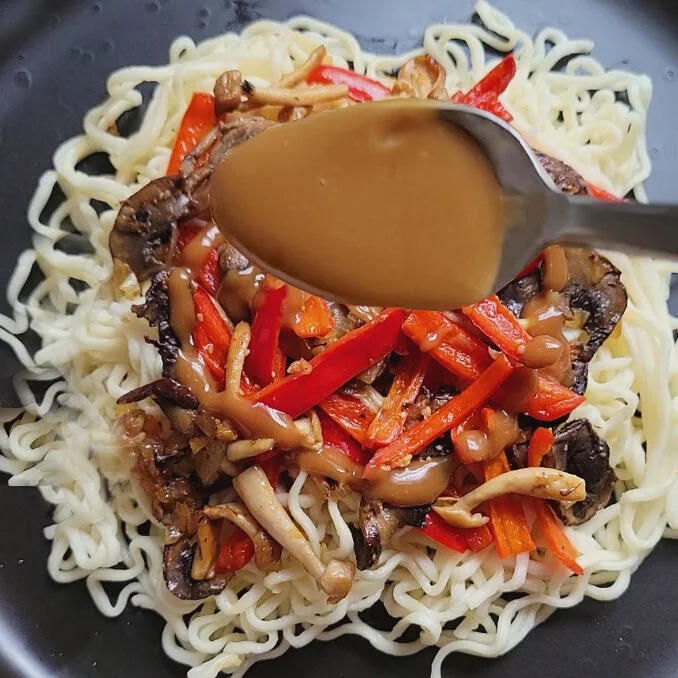


What you are going to need to buy:
Ramen - (the stuff you ate in college is fine, especially if you have some in the house BUT a trip to your local Asian market for a more authentic option is really going to make this dish!)
Vegan Butter - (This recipe used Earth Balance)
Mushrooms, sliced - (This recipe used a couple kinds because it’s what I had in the bottom on the crisper drawer, but use what you’ve got!)
Red Peppers, julienned (cut into strips)
Yellow Onion, diced
Minced Garlic - (we like these jarred options from Spice World!)
Olive Oil
Salt and Pepper, to taste
Peanut Butter - (creamy is best)
Sesame Oil - (You can use another neutral oil, but the flavor will differ a bit)
Chili Oil - (If you don’t have Chili oil, you can use dried chili powder)
Soy Sauce
Maple Syrup
Lime Juice
Water, for thinning
What you are going to need to do:
In a medium skillet, saute your mushrooms, onions, peppers and garlic in a little olive oil until soft.
Note: add the garlic about 1/2 way through cooking, once the onions have given up a little moisture into the pan, so that it doesn’t burn
Prepare your ramen, per the package directions BUT if your ramen comes with a flavor packet, do not use it. Once noodles are soft, drain well and stir in one teaspoon of butter, while the noodles are hot.
To Make the Spicy Lime Peanut Sauce: (This makes enough for two servings)
This can be done on a bowl with the aid of the microwave, or on the stove-top in a small sauce pot.
Mix together the following
4 tablespoons of peanut butter
1 tablespoon of sesame oil
1 tablespoon of Soy Sauce
1/2 teaspoon of chili oil
Heat these ingredients until the peanut butter becomes soft enough to incorporate easily into the oils and whisk to combine. After well combined add:
1 tablespoon of maple syrup
1 tablespoon of lime juice
Salt and pepper, to taste
At this point, taste your sauce…want a bit more tang, add another splash of lime juice. Like things a but more spicy…more chili oil. Once you get the flavor you like use 2-3 tablespoons of water to thin sauce to desired consistency. I like mine about the thickness of a ranch dressing, thin enough to drizzle, but thick enough to stick to the mushrooms and noodles.
To Serve:
Plate the noodles and top with the cooked mushrooms, peppers and onions.
Drizzle peanut sauce on top.
Garnish with chopped peanuts, if desired.
Enjoy!

Oven Roasted Garlic Potato Wedges
This recipe is so easy and simple you can make it as a side dish for any weeknight meal! Soft and pillowy on the outside with a nice satisfying crunch on the outside it’s hard not to eat the entire plateful. Best of all, while they do take a little time, they don’t need a lot of baby-sitting so they are super easy to do while you make the rest of the meal.
I’ve been on a bit of a burger kick the last couple of weeks since I picked up a couple of packages of Impossible Ground and you can’t have burgers without fries…but these Oven Roasted Garlic Potato Wedges are, for sure, the next best thing.
This recipe is so easy and simple you can make it as a side dish for any weeknight meal! Soft and pillowy on the outside with a nice satisfying crunch on the outside it’s hard not to eat the entire plateful. Best of all, while they do take a little time, they don’t need a lot of baby-sitting so they are super easy to do while you make the rest of the meal.


What you are going to need to buy:
Potatoes - I used some redskin potatoes I had on hand but use what you’ve got!
Bread Crumbs
Nutritional Yeast (Note: this is what makes these wedges vegan, but if that’s not a concern for you, feel free to use dry Parmesan or even your favorite powdered cheese blend.
Minced Garlic - (we like these jarred options from Spice World!)
Salt and Pepper, to taste
Paprika
Olive Oil
What you are going to need to do:
Preheat over to 400 degrees
Cut your potatoes into 1” wedges.
In a pot that will fit the amount of potatoes you plan to make, boil the wedges, in salted water, for 5-6 minutes until just fork tender. (This will save you lots of extra time in the oven.)
Drain the potatoes an let sit for 1 minute to make sure they are very dry! This step is what will help make them extra crispy when you make them.
In a sturdy ziplock bag (Freezer bags work great mix together your bread crumbs, nutritional yeast, minced garlic…(make sure to avoid getting too much oil that the garlic is packed in), salt and pepper, and paprika.
Honestly these measurements will depend on how many wedges you are making. I used 1 large potato in the photos you see and below are roughly the measurements that I used:
1/4 cup Bread Crumbs
2 tablespoons Nutritional Yeast
1 tablespoon Minced Garlic - (we like these jarred options from Spice World!)
1 teaspoon Paprika
Salt and Pepper, to taste
Lightly coat your potatoes in olive oil and then, take 2-3 wedges at a time, place them in the bag with the crust mixture and shake until coated. Repeat until all wedges are coated.
Bake on a cookie sheet for 15 minutes, turning over half-way through cooking to crisp both sides!
These Oven Roasted Garlic Potato Wedges happen to be amazing with the “Special Sauce” recipe from last week! You can find that HERE.
Enjoy!

Twice Baked Potato Cakes with Creamy Dill Sour Cream Sauce
Let’s face it! Not all plant-based recipes are always healthy but sometimes you just need some old-fashioned comfort food and these Twice Baked Potato Cakes with Creamy Dill Sour Cream Sauce are just that. A great dish for your weekend brunch or to use up the leftover baked potatoes from last nigh’s dinner. The magic of this recipe is, for sure, the Creamy Dill Sour Cream Sauce…so don’t skip on that part of this delicious dish!
Sometimes I even surprise myself at how well a recipe turns out. These oven-baked mashed potato cakes with sauteed onions and vegan chorizo from No Evil turned out to be everything you love about mashed potatoes and crispy hashbrowns all in one dish. Topped with a rich and creamy vegan dill sour cream sauce...believe me, you won't be able to eat just one.
Let’s face it! Not all plant-based recipes are always healthy but sometimes you just need some old-fashioned comfort food and these Twice Baked Potato Cakes with Creamy Dill Sour Cream Sauce are just that. A great dish for your weekend brunch or to use up the leftover baked potatoes from last nigh’s dinner. The magic of this recipe is, for sure, the Creamy Dill Sour Cream Sauce…so don’t skip on that part of this delicious dish!


What you are going to need to buy:
Medium Yukon Gold Potatoes - (Budget 1 medium potato per person you want to serve)
Chorizo - (We used the vegan chorizo from No Evil) Sweet Onion
Butter - (I love this plant-based butter from Earth Balance)
Milk or Cream - (We used this coconut and almond blend from Califa Farms)
Minced Garlic - (the best is from Spice World!)
Fresh Chives
Fresh Dill
Sour Cream ( We used this vegan sour cream from our friends over at Tofutti)
Veggie Stock or Bullion Cubes - (we like the “Not Chicken Bouillon” by Edward and Sons)
Flour
Salt & Pepper, to taste
What you are going to need to do:
Preheat your oven to 400 degrees.
This recipe starts by peeling and cubing your potatoes and bringing them to a rolling boil in salted water until they are fork-tender.
While the potatoes are boiling, in a small saucepan, saute’ your diced onions in olive oil or vegan butter with garlic until onions are translucent.
Once the potatoes are tender drain them well and then using a potato masher or the tines of a large fork begin to mash the potatoes. Continue to mash and incorporate the sauteed onions and garlic, along with pea-sized pieces of the plant-based chorizo. stir well to combine. This mixture will still be a bit lumpy and that’s okay…you don’t need it to be smooth like actual mashed potatoes, just break down the big potato chunks. Add your chopped chives, salt and pepper, and additional garlic, to taste. If the mixture is too dry add some vegan cream or your preferred plant-based milk and/or butter. You need the texture to be dry enough to hold together in cake form while baking.
Using a ring mold or cookie cutter form your potato cakes. If you are not too terribly concerned about the looks or shape of the cakes, you can forgo the molds and use a large spoon and mound mixture onto a non-stick baking sheet.
Bake cakes at 400 degrees for about 20 minutes. Watch to make sure that they are not browning too quickly.
While the cakes are baking you can make the Creamy Dill Sour Cream Sauce.
Making the Creamy Dill Sour Cream Sauce.
In the pot that you used to saute’ the onions add 2-3 tablespoons of butter and heat on medium/low until melted.
Sprinkle 2 tablespoons of white flour over the butter and whisk to make a roux. Let rue cook for 2-3 minutes. Slowly add 1 cup of veggie stock and whisk constantly until the rue is dissolved into the stock. Let the mixture come to back up to a boil and allow to boil for 1 minute to thicken. If the mixture gets too thick you can add a bit more stock.
Remove from heat and let cool for 2-3 minutes. Stir into mixture 4 ounces of sour cream along with 1 tablespoon of chopped, fresh dill, and salt and pepper to taste. The sour cream will help to thin the mixture out but if it’s still too thick you can always add a bit of milk and/or butter. Additionally, you can melt your favorite vegan parmesan cheese into the sauce or even sprinkle in a bit of nutritional yeast if desired.
Check on the potatoes. They should be getting a crisp outer shell that is turning golden brown. Feel free to switch your oven to broil for the last 5 minutes that the cakes are in the oven to assist in browning but keep a close eye on them so they do not burn.
Allow the cakes to cool on the stove-top for 1-2 minutes before plating. Serve potato cakes topped with the
Creamy Dill Sour Cream Sauce and garnished with additional chopped chives.
Enjoy!
7 Ingredient Creamy Pasta Casserole with Red Sauce
This vegan dish only requires 7 ingredients and is the perfect way to use up the pasta that you have at home because just about any kind of noodle or shell will work for this dish. While quick and almost embarrassingly easy, because of the baking time required for this recipe, this dish does not qualify as a 30 minute meal, however, because most of the time that this recipe demands is just “oven time” I think it still more than qualifies as a good option for a week night meal, especially for a crowd!
Who doesn’t love a good pasta casserole? It’s the kind of comfort food that you crave when life get’s crazy and you don’t have any idea what else to make for dinner. This vegan dish only requires 7 ingredients and is the perfect way to use up the pasta that you have at home because just about any kind of noodle or shell will work for this dish.
Admittedly, this is another one of those recipes that I hesitated to even type up and put on the blog because, well, it’s just so, so simple…BUT, my dear, sweet, Momma asked about it this week and wondered if I was going to share it, so here we are! While quick and almost embarrassingly easy, because of the baking time required for this recipe, this dish does not qualify as a 30 minute meal, however, because most of the time that this recipe demands is just “oven time” I think it still more than qualifies as a good option for a week night meal, especially for a crowd!
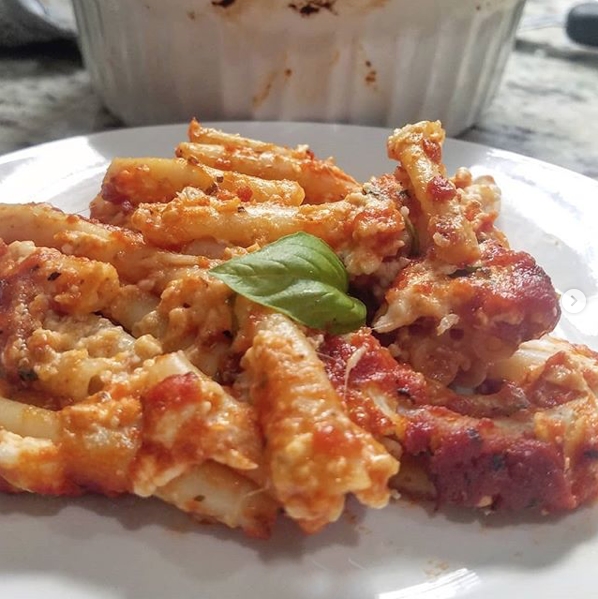

What you are going to need to buy:
Your favorite kind of thick pasta. (Really, anything will work but personally, I would stay away from stuff that is super thin like spaghetti or angel hair. I used some leftover pastitsio that I had on hand)
Red Sauce - (Make your own or use your favorite jarred brand. Trust me, either way, it’s going to be delicious)
Vegan Cream Cheese - (We love the plain cream cheese from Kite Hill Foods)
Vegan Parmesan - (We love the Follow Your Heart shredded Parmesan)
Minced Garlic - (we like these jarred options from Spice World!)
Salt and Black Pepper
Italian Seasoning or Fresh Herbs - (We used Rosemary and Basil)
What you are going to need to do:
In a stock pot, bring salted water to a rolling boil to cook your desired pasta.
Preheat oven to 350 degrees
Mix 1/4 cup of Vegan Cream Cheese with 1/4 Cup of Vegan Parmesan and one teaspoon of minced garlic, plus salt, pepper, and Italian Seasoning, to taste. Use these proportions for each “serving” you’d like to make. (ie: if you want to serve 4, then you will need approx. one cup of cream cheese, one cup of parmesan, etc…)
Optionally, you can use fresh herbs for this step and forgo the dried Italian Seasoning
Once your pasta is cooked drain and begin layering the casserole.
Begin with a barrier layer of red sauce on the bottom your oven safe casserole dish so that the pasta won’t stick and is less likely to burn.
Layer your pasta on top of the sauce and then top with evenly spaced teaspoonfulls of the cheese mixture.
Repeat layering with sauce, pasta, and cheese filling until you have reached the top of your casserole.
Bake at 350 degrees for 25 to 30 minutes, on medium rack, until the sauce is hot and bubbly. (Use a piece of tin foil to lightly cover the dish for the first 15 minutes of baking, if rack can not be moved to a center position and is too close to the upper heat coil in your oven.)
Let rest 10 to 15 minutes before serving. Garnish with minced fresh herbs and an additional sprinkle of parmesan cheese or nutritional yeast.
Pour your favorite glass of red wine and enjoy.

Sauteed Sweet Onion and Sundried Tomato Avocado Toast with Pistachios
Avocado Toast. Call me a hippie, call me granola, either way I love it. Pseudo healthy, super trendy, foolishly expensive, and something that yes, I happen to eat way, way too much of. I love this recipe because so many avocado toast recipes these days seem to be either served with cheese, in some form or fashion, or an egg but this one is sans both and with the complexity of flavors, I promise that you won’t miss either…even if you aren’t plant-based.
Avocado Toast. Call me a hippie, call me granola, either way I love it. Pseudo healthy, super trendy, foolishly expensive, and something that yes, I happen to eat way, way too much of. I’ll be the first to admit that avocado toast at home tends to get a little boring but not with this recipe! Perfect for a lazy Sunday brunch the entire dish takes about 15 minutes to make…but only about half that time to wolf it all down!
So, full disclosure…this recipe is a bit of a hack job that I may or may mot have ripped off from a local joint in my neighborhood! They have an avocado toast on their menu that, to the best that my taste buds can determine, is served with caramelized onions and sun-dried tomatoes. (All things that I happen to love.) I also love this recipe because so many avocado toast recipes these days seem to be either served with cheese, in some form or fashion, or an egg but this one is sans both and with the complexity of flavors, I promise that you won’t miss either…even if you aren’t plant-based.


What you are going to need to buy:
Your favorite loaf of crusty bread
Sun Dried Tomatoes - (We love California Sun Dried jarred tomoatoes)
Minced Garlic - (we like these jarred options from Spice World!)
1/4 Small Sweet Onion, Sliced
Olive Oil
Avocado, medium
Salt & Pepper
Lime Juice
Pistachios
What you are going to need to do:
This is the kind of recipe that feels a little silly to even type out and post…but here we go.
In a small skillet saute onions and garlic on medium heat until onions begin to turn translucent and take on a caramel color (6-8 minutes) After the onions have cooked 5 minutes or so, reduce heat to low and add in 2 or 3 tablespoons of the sun dried tomatoes (along with a little of the oil they are packed in) Cover skillet and let cook another 3 minutes or so. Stir occasionally. Be careful not to let the tomatoes burn.
Open and remove pit from your avocado.
Take one half of the avocado and gently mash with a pinch of salt and a teaspoon of lime juice until soft enough to spread.
Toast your bread.
Srpead the mashed avocado on the toast and top with the warm onion and tomato mixture.
Using the second half of the avocado, gentle slice in strips and fan over the top of the tomatoes and onions.
Garnish with crushed pistachios, a little more lime juice. Any oil left in the skillet can be drizzled over the top of the finished dish.
Enjoy.