


Banana and Peanut Butter Bread Pudding
What do you do with bananas that are on their way out and more sourdough bread than you can possibly finish? Banana and Peanut Butter Bread Pudding, of course! There is just something about this recipe that’s hard to beat! Great for a crowd, this vegan dish, that’s really more like dessert than breakfast is made with dairy free butter, oatmilk, and JustEgg and comes together in under an hour!
What do you do with bananas that are on their way out-the-door and more sourdough bread than you can possibly finish? Banana and Peanut Butter Bread Pudding, of course! If you’re a fan of “dump and bake” kinds of recipes you’re going to love this one. The most time-consuming part is simply cutting up the bread and slicing the bananas!

Now, cards on the table…I don’t particularly love either bananas OR bread pudding but there is just something about this recipe that’s hard to beat! Great for a crowd, this vegan dish, that’s really more like dessert than breakfast is made with dairy free butter, oatmilk, and JustEgg and comes together in under an hour!
What you are going to need to buy:
For the Bread Pudding
3-4 cups of crusty bread, cut into cubes
3 ripe bananas cut into slices
2 cups of oatmilk
JustEgg to replace 3 large eggs
1 tablepoon of cinnamon
1 teaspoon of nutmeg
1/2 cup brown sugar, more for sprinkling
1/2 teaspoon of salt
Splash of Vanilla
1/2 cup of peanut butter
1/2 cup of Walnuts
For the Icing1/2 stick Dairy Free Butter, melted
Powdered Sugar, 1 cup
Splash of Vanilla
Pinch of Salt
What you are going to need to do:
Layer your cubed bread and banana slices into a baking dish (I used an 8 x 10) sprayed with non-stick spray.
Combine the remaining ingredients (minus the nuts and brown sugar for sprinkling) and wisk until well combined. Don’t be too worried if the peanut butter doesn’t completely combine or there are still little pieces. They will melt when baked!
Pour mixture over the bread and bananas. Spoon any peanut butter that didn’t totally dissolve evenly over the top.
Top with walnuts and sprinkle with brown sugar.
Bake at 375 for 40 minutes. You can gently lay a piece of foil over the baking dish to keep the top from burning but keep sides loose and un-crimped. You don’t want your Bread Pudding to “steam” under the foil…it’s just to keep the top from getting too crispy! Remove the foil for the final 15 minutes of baking.
While the Bread Pudding is baking mix together 1/2 stick of melted vegan butter with 1 cup of powdered sugar, 1/2 teaspoon of vanilla and a pinch of salt. (Add more or less sugar depending on how thick you like your icing.)
At 40 minutes, remove from oven and let stand for 15 minutes before drizzling the top with icing and serving.
A couple of notes about this recipe: I know there are a lot of “egg-replacers” that vegan and non-dairy diets use in baking. I used the product JustEgg and it turned out wonderfully. I can’t guarantee that others will do the same…they may be great but I’ve not tested any others with this particular recipe.
Love chocolate? You could totally throw in a handful of chocolate chips to this recipe and it would be delicious!
Love, Light, and Lentils, my friends!
Sarah

Garlic Creamed Kale with a Parmesan Crust
Thanksgiving is right around the corner and while you might now typically think of kale as a food worthy of your holiday feasts, trust me, this recipe is going to win you over. A happy medium smack in the middle between a broccoli casserole and a green bean bake this unique side dish is packed with flavor the all the creamy goodness that you’re craving in your autumn inspired comfort foods!
Thanksgiving is right around the corner and while you might not typically think of kale as a food worthy of your holiday feasts, trust me, this recipe is going to win you over. A happy medium smack in the middle between a broccoli casserole and a green bean bake this unique side dish is packed with flavor the all the creamy goodness that you’re craving in your autumn inspired comfort foods!
One of the things that really upped my at-home cooking game in a big way was when I learned to master making a roux (pronounced rue)! Literally, the vault where all the soups and sauces you love are kept, is guarded by the culinary gatekeeper that is, roux. All it takes is a little butter and a little flour, some liquid and seasoning…once you get this down, you’ll never buy cream sauces or soups from the can or jar again. The cream sauce for this recipe is no exception and was literally whipped up with ingredients you probably already have in your pantry.


What you are going to need to buy:
Fresh Kale, about 4 cups, chopped into bite-sized pieces (1” - 2”)
4 tablespoons Minced Garlic - (we like these jarred options from Spice World!)
2 tablespoons of Flour
3 cups Original Oat Milk from Rise Brewing
4 tablespoons Butter - (We love THIS ONE from Earth Balance)
1/2 small white Onion, diced
1/2 cup of Vegan Mozzarella Cheese
1/2 cup Dairy Free Sour Cream
Salt and Pepper, to taste.
For the Crust/Topping
1/4 cup Bread Crumbs
1/4 cup Nutritional Yeast
1/4 cup of dairy free Parmesan
What you are going to need to do:
Preheat oven to 350 degrees.
To begin, in a high-walled skillet or saucepan, saute your onions and garlic with 3 tablespoons of butter until the onions are soft and have taken on just a little color.
Reduce heat to low and add another tablespoon of butter. Allow to melt.
Sprinkle 2 tablespoons of of flour over the top of the onions and the butter and with a large whisk, stir the flour into the onion until a paste is formed. Cook for 60 seconds and then gently add in 1 cup of oat milk, slowly, while you continue to whisk, so as not to get lumps.
Melt into mixture 1/2 cup of cream cheese and 1/2 cup of mozzarella cheese.
Stir in additional Oat Milk. You are looking for a consistency of a nice alfredo sauce.
Season to taste with salt and pepper.
If the sauce is too thin, allow to simmer until thickened. If the sauce seems too tick, add a little water.
Dump your chopped kale into the skillet and gently stir until combined.
Transfer your creamed kale to a small, oven safe, baking dish.
Top with your crust mixture that is equal parts bread crumbs, parmesan cheese, and nutritional yeast, spreading an even coat across the top of the baking dish.
Cover in foil and bake at 350 degrees for 20 minutes and then remove the foil and bake for another 10 minutes. Additionally, you can broil for a final 3-4 minutes so the top takes on nice color. (But watch it close so that it does not burn!)
Let sit for 10 minutes before serving.

Vegan Hamburger Helper with Homemade Cashew Free Cheese
f you’re an 80’s kid, like me, and you grew up in the States, you most definitely experienced Hamburger Helper as a part of your childhood. We had a lot of “boxed” meals growing up. This recipe is all the nostalgia of those family dinners without any of the meat or dairy! The best part of this recipe is that it makes use of a lot of left overs! Comfort food at it’s finest!
If you’re an 80’s kid, like me, and you grew up in the States, you most definitely experienced Hamburger Helper as a part of your childhood. My mother went back to nursing school the same year that I went to kindergarten and when my brother was just out of diapers so needless to say, she was juggling a lot. I guess it goes without saying that we had a lot of “boxed” meals growing up. This recipe is all the nostalgia of those family dinners without any of the meat or dairy!
If I’m honest, I was a little hesitant to post this as a recipe because it wasn’t one that I carefully sat down and planned out. Truth is, I was under the weather last week and wanted comfort food. This was thrown together with a lot of odds and ends but when I posted it on IG last week everyone went a little crazy, so here we are! Hope that you all enjoy.


What you are going to need to buy:
Pasta, I used orecchiette because I had it on hand but an small noodle will work. I do like this shape because they are like little noodle bowls for the sauce!
Your favorite plant-based ground meat - (I used the ground from Impossible Foods)
Small Sweet Onion, diced
Minced Garlic - (like this jarred options from Spice World!)
1/2 cup Vegetable Stock - Or half a cup of water and a veggie cube
Butter - (We love THIS ONE from Earth Balance)
Salt & Pepper
Liquid Smoke
Homemade Vegan Cheese Sauce! (Find that recipe HERE!)
What you are going to need to do:
To start, let’s make the sauce!
I make this cheese sauce every month or so and have it in the fridge to throw into all kinds of things, which is just exactly what happened with this recipe! Hope on over and make it! Will you have some left over? Yep. Is that a bad thing? Nope!
GO TO THE CHEESE SAUCE RECIPE HERE
Welcome back!
The rest is pretty easy.
In a medium saucepan, over medium heat, begin to cook down your plant-based meat, along with the diced onion. Once you put them in the pan try not to stir or move them around too much because you want to get some good color/char on the meat.
After about 1-2 minutes stir the mixture and add a tablespoon of dairy free butter, a tablespoon (or more if that’s your thing…) of minced garlic, a pinch of salt and pepper, 8-10 dashes of liquid smoke and continue to cook until the meat is done and the onions are nice and soft.
While the meat and onions cook, bring a pot of salted water to boil on the stove and when it’s ready, drop 4 servings of your pasta (follow the box directions for portions and cook time.)
Next, add your veggie stock to the meat and onions and using a wooden spoon, scrape up any of the little bits that have stuck to the bottom of the pan! This is where all the flavor is hiding!
Add in 1 cup of your cheese sauce and stir to combine.
A note about the cheese sauce: If you make the cheese sauce ahead of time, and I hope that you do because it stays good in the fridge for weeks…it will solidify a bit. It’s much easier to “melt” it back into your Hamburger helper if it’s runny so you can just scoop out what you need and toss it into the microwave for 10-20 seconds, stir, and that should do the trick!
Drain pasta, but save 1 cup of pasta water.
Add the pasta to the cheesy/meat mixture and stir to combine. If the dish is too dry and not all that “creamy” slowly add the pasta water to thin the mixture and help the sauce emulsify. You may not use all the water and that’s okay because if you get it too runny then you’ll need to cook it longer and let some of that liquid evaporate.
Taste for seasoning. Add salt, pepper, if necessary.
I like to top mine with fresh herbs to serve. Either thyme or rosemary work really well!
Enjoy!

Butternut Squash Shells Stuffed with Sage Sausage, Spinach, and Ricotta
Looking for a fall twist on an old comfort classic? While we’ve still got a couple more weeks until Autumn officially arrives but over here I was craving some fall flavors...and these Butternut Squash Shells stuffed with Sage Sausage, Spinach and Ricotta totally hit the spot! The best part of this recipe is that, while the flavor profile is different, the assembly is basically the same, so if you’ve ever successfully made stuffed shells in the past, these will be a snap.
Looking for a fall twist on an old comfort classic? While we’ve still got a couple more weeks until Autumn officially arrives…over here I was craving some fall flavors...and these Butternut Squash Shells stuffed with Sage Sausage, Spinach and Ricotta totally hit the spot!
The best part of this recipe is that, while the flavor profile is different, the assembly is basically the same, so if you’ve ever successfully made stuffed shells in the past, these will be a snap. The entire dish does take a bit of time to make because you’ve got to roast the butternut squash and make the sauce so I would recommend that you plan to make a couple of recipes with squash so you can do some prep for several meals at once! Once the sauce is made, (which can be done ahead of time) the rest of the dish comes together in less than an hour!


What you are going to need to buy:
Medium Butternut Squash
Jumbo Shells
Medium Sweet Onion, diced
Minced Garlic - (like this jarred options from Spice World!)
1 cup Plant-Based Milk
1.5 cups Vegetable Stock
Dairy-Free Ricotta
Dairy-Free Mozerella
1/2 lb Plant-Based Sausage
Fresh Spinach
Just Egg, egg alternative
Olive Oil
Butter - (We love THIS ONE from Earth Balance)
Salt & Pepper
Fresh Sage
Warming Spices (Allspice, Nutmeg, Cinnamon, Ginger)
What you are going to need to do:
To start, let’s make the sauce!
Preheat your oven to 400 degrees.
Chop your squash in half and scoop out the seeds. Liberally salt and pepper the cut side. Roast on a baking sheet for one hour, flipping halfway through, until the squash is fork-tender.
In a high-walled saucepan or medium pot, saute in butter, the diced onion and a tablespoon of garlic until soft and translucent. Reduce heat and set aside.
Scoop out the roasted squash from the skin and into the saucepan with the onion and garlic. Add the plant-milk and the vegetable stock. Bring the mixture to a simmer and add a teaspoon of each of the warming spices.
At this point, if you have a stick blender, it’s helpful to blend the mixture for a smoother texture but it’s not 100% necessary.
Let the sauce reduce until it’s the consistency of pasta sauce. Taste for seasoning. Add salt and pepper, to taste.
Now, onto the filling!
In a small saucepan, gently wilt one bag of spinach over medium heat.
In a large mixing bowl combine the following:
sausage (does not need to be cooked)
the wilted spinach
the equivalent of one egg
1.5 cups of ricotta cheese
1 tablespoon of minced garlic
2-3 tablespoons of minced, fresh, sage
salt and pepper, to taste
The Shells:
Preheat the oven to 350 degrees.
Follow your package directions and cook your jumbo shells in boiling water.
After the shells are boiled and tender, remove and drain.
In a large skillet or baking dish fill the bottom of the dish with the butternut squash sauce.
Stuff each shell with the ricotta mixture and place into the baking dish.
Depending on the size of your dish you should be able to fit 15-20 shells. Do not overcrowd the dish. You want the sauce mixture to be able to rise up around the shells on either side.
Sprinkle mozzarella onto the top of the shells and cover with tin foil.
Bake for 15-20 minutes covered. Remove the tin foil and bake another 15 minutes until the sauce and cheese are hot and bubbly.
Let sit for 10 minutes before serving.
While the shells are resting, fry up some sage leaves in Olive Oil until crispy and crumble the leaves onto the top of the shells for garnish.
Serve the extra sauce on the side.
Enjoy!
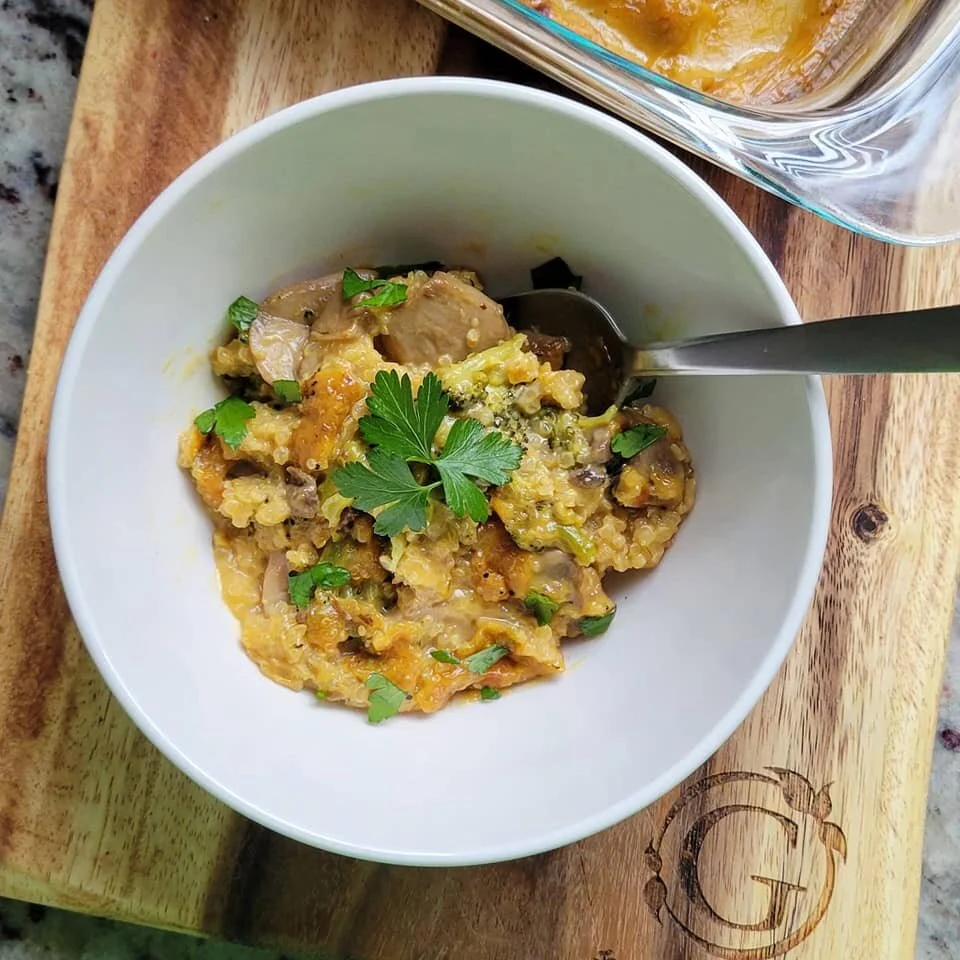
Cheesy Quinoa, Mushroom, and Broccoli Bake
Okay, friends...are you ready for your new favorite side dish? This Cheesy Quinoa, Mushroom and Broccoli Bake is my vegan take on a recipe from an all time favorite chef of mine Alton Brown! Part Mac n' Cheese, part, Broccoli Casserole...hopefully this updated plant based version does his original recipe justice...I'm not gonna lie, it's one of the best things that I have eaten in a long time! Yum!
Okay, friends...are you ready for your new favorite side dish? This Cheesy Quinoa, Mushroom and Broccoli Bake is my vegan take on a recipe from an all time favorite chef of mine Alton Brown! Part Mac n' Cheese, part, Broccoli Casserole...hopefully this updated plant based version does his original recipe justice...I'm not gonna lie, it's one of the best things that I have eaten in a long time! Yum!
Bonus: This recipe requires a killer cheese sauce, so two recipes in one!
One of the most frequent comment I get, from friends and strangers alike, when it comes to plant-based and dairy free recipes is “What about cheese?” The truth is…non-dairy cheeses have come A LONG way in the last several years. This recipe is proof of that! Here’s my bet…even your cheese loving friends will gobble it down!


What you are going to need to buy:
FOR THE CASSEROLE:
Dried Quinoa - (They do sell, ready to serve, quinoa in a bag…which I have never tried. If that’s your thing, give it a go!)
Fresh Broccoli - (You could honestly use frozen if you have it on hand in the freezer)
White Mushrooms, sliced
Non-Dairy Butter - (We used Earth Balance)
Veggie Stock or Bouillon Cubes - (We used THESE from Edward and Sons)
Minced Garlic - (We like the jarred kind from Spice World)
Balsamic Vinegar - (We get ours from this great little place here in Central Florida called The Ancient Olive)
Just Egg - (Or, your favorite egg replacer)
FOR THE CHEESE SAUCE:
Non-Dairy Butter - ( We used Earth Balance)
Flour
Your Favorite Plant Milk - (We love this Organic Oat Milk from RISE BREWING)
Non-Dairy Cheese Shreads - (We used THESE CHEDDAR SHREADS from VioLife!)
Yellow Mustard - (yes, just trust us!)
Salt and Pepper
Non-Dairy Sour Cream - (in our opinion Tofutti is the OG…and also the best!)
What you are going to need to do:
Start by cooking your quinoa. I used 3/4 a cup of dried quinoa in about 1.5 cups of liquid. Follow your package directions.
In another pot, with a little butter, garlic, and a splash of balsamic vinegar, cook your mushrooms (6-8 ounces) until they have reduced in size by about half, are soft, and they have taken on a nice, brown, color.
Chop your broccoli (5-6 ounces) into small florets.
At this point, add your cooked mushrooms, and fresh broccoli to the pot with the quinoa, (there should still be a little liquid left) reduce heat to warm and cover. The heat and steam in the pot will cook the broccoli.
Now, onto the cheese sauce!
Wipe out the pot that you were cooking your mushrooms in and, on low heat, melt about 2 tablespoons of butter. Gently allow butter to brown, but not burn, because we’re going to make a roux.
Sprinkle 2 tablespoons of flower on top of the melted butter and whisk to combine. Cook mixture for about 30 seconds and then slowly add 1.5 cups of oat milk, whisking the entire time so that no lumps form. Bring to a boil and let boil about 30 seconds.
Reduce heat and add the cheddar shreds, stirring to melt.
Add 1 tablespoon of yellow mustard…don’t be afraid, just do it! (You can use brown mustard, if you like it!)
Stir in 1/4 cup of sour cream.
Continue to stir, on low/medium heat, until everything is melted.
Add salt and pepper, to taste. It will take more salt than you think…a full teaspoon isn’t too much! (I also added some onion and garlic power to mine for this dish!)
…And, boom! vegan cheese sauce! If it seems thin, increase the heat and let simmer for 1-2 minutes, but remember it will tighten up as it cools.
Assembly:
Preheat your oven to 350.
Mix in the equivalent of ONE egg of your favorite egg replacer into the quinoa/mushroom, broccoli mixture.
Add the cheese sauce to the casserole mixture and stir gently to combine. Bake in a 9x9 casserole for 30 minutes at 350 and then broil on LOW for the last 5 minutes to add a nice brown color to the top. (Keep your eye on it for this last part…all ovens are different. Don’t burn it!
Total bake time, about 35 minutes.
Let rest for 10 minutes before serving. Garnish with herbs, if that’s your thing. I used some fresh, flat-leaf parsley.
Makes 4 side-dish sized servings, but full disclosure, I totally ate this last night for my legit dinner…dinner servings: 2-3ish
Enjoy!

Baked Brussel Sprouts with Onion and Herb Sauce
I typically don't use much frozen produce but Publix had Birdseye veggies on sale a couple weeks back so I grabbed a few bags. Topped with a creamy sauce made with sauteed onions, nutritional yeast, garlic, oat milk from the Rise Brewing Company, and some herbed cream cheese from Miyokos Creamery I honestly wouldn't have even known the difference between fresh and frozen.
I typically don't use much frozen produce but Publix had Birdseye veggies on sale a couple weeks back so I grabbed a few bags. Topped with a creamy sauce made with sauteed onions, nutritional yeast, garlic, oat milk from the Rise Brewing Company, and some herbed cream cheese from Miyokos Creamery I honestly wouldn't have even known the difference between fresh and frozen.
One of the things that really upped my at-home cooking game in a big way was when I learned to master making a roux (pronounced rue)! Literally, the vault of all the soups and sauces you love, is guarded by the culinary gatekeeper that is, roux. All it takes is a little butter and a little flour, some liquid and seasoning…once you get this down, you’ll never buy cream sauces or soups from the can or jar again. The cream sauce for this recipe is no exception and was literally whipped up with ingredients you probably already have in your pantry.


What you are going to need to buy:
Brussel Sprouts - (these were the ones used in this recipe)
One medium Onion, diced
Minced Garlic - (we like these jarred options from Spice World!)
Flour
Original Oat Milk from Rise Brewing
Nutritional Yeast - (If you don’t care about this recipe being vegan, you can use some grated parmesan.)
Butter - (We love THIS ONE from Earth Balance)
Herbed Cream Cheese from Miyokos Creamery
Salt & Pepper
Fresh Herbs, for garnish (pictured is Lemon Thyme)
What you are going to need to do:
Remove the brussel sprouts from the freezer and allow to begin to thaw.
Preheat over to 350 degrees.
To begin, in a medium skillet, saute your onions and garlic with a little butter until the onions are soft and have taken on just a little color. Add 3 tablespoons of nutritional yeast and mix well.
Reduce heat to low and add another tablespoon of butter. Allow to melt.
Sprinkle 2 tablespoons of of flour over the top of the onions and the butter and with a large whisk, stir the flour into the onion until a paste is formed. Cook for 60 seconds and then gently add in 1 cup of oat milk, slowly, while you continue to whisk, so as not to get lumps.
Melt into mixture 1/2 cup of cream cheese.
Season to taste with salt and pepper.
Remove sauce from heat.
Remove the brussel sprouts from the bag. If they are still too frozen to cut in half, just pop them into the microwave for one minute. Cut all of the brussel sprouts in half
No need to drain any liquid from them. You sauce has likely thickened up and the moisture from the brussel spouts will help loosen it back up when combined.
It’s okay that your brussel sprouts are still cold at this point, even still slightly frozen.
Into an oven safe baking dish, mix the brussel sprouts with the sauce and top with another tablespoon of nutritional yeast (or parm.)
Bake at 350 for 20 minutes until bubbly. Broil for the final 2-3 minutes so the top takes on nice color.
Let sit for 5 minutes before serving. Garnish with fresh herbs.

Poor Man's Vegan Chicken Parmesan Casserole
Who doesn’t love a good pasta dish? It’s the kind of comfort food that you crave when life get’s crazy and you don’t have any idea what else to make for dinner. Or, if you are like me, this week, it’s because you just need to go to the grocery store! This Poor Man's Vegan Chicken Parmesan Casserole is also the perfect way to use up the pasta that you have at home because just about any kind of noodle or shell will work for this dish.
Who doesn’t love a good pasta dish? It’s the kind of comfort food that you crave when life get’s crazy and you don’t have any idea what else to make for dinner. Or, if you are like me, this week, it’s because you just need to go to the grocery store! This Poor Man's Vegan Chicken Parmesan Casserole is also the perfect way to use up the pasta that you have at home because just about any kind of noodle or shell will work for this dish.
I have made several versions of a plant-based Chicken Parmesan dish over the years, but honestly, this is one of the easiest and everyone, even the meat eaters in my life, always love it. Part traditional Chicken Parmesan, part pasta casserole, it’s the best of both worlds when you’re craving some comfort food, plus because you’re not doing all the breading and frying it comes together in half the time, just about 30 minutes, total.


What you are going to need to buy:
Your favorite kind of pasta shell or small noodle. (Pictured here is cavatappi, or as my niece calls them, corkscrews!)
Red Sauce - (Make your own or use your favorite jarred brand. Trust me, either way, it’s going to be delicious.)
Vegan Parmesan - (We love the Follow Your Heart shredded Parmesan)
Vegan Mozzarella - (The Miyoko's Creamery has one that melts and browns up so nice that you’ll never know the difference)
Minced Garlic - (we like these jarred options from Spice World!)
Breaded Vegan Chicken Strips or Tenders - (Pictured here are the Gardein Crispy Tenders)
Salt and Black Pepper
Italian Seasoning or Fresh Herbs
What you are going to need to do:
To start, take your fingers out of the freezer so they can begin to thaw. (You can even pop them into the microwave for 30 seconds, or so…)
Preheat oven to 350 degrees
In a stock pot, bring salted water to a rolling boil to cook your desired pasta.
Once your pasta is cooked drained, mix in your pasta sauce and parmesan cheese. Amounts will vary based on how much past you have cooked and how many portions you are making. You want the pasta nice and covered in the sauce because you’re going to bake this dish and don’t want it to dry out.
I like to also mix in a bit of minced garlic to the pasta and the shells at this point.
Layer the pasta in a casserole dish, leaving room at the top for the Chicken.
Lay the chicken strips on top of the pasta. It’s best if these are at room temperate at this point and not frozen.
Place a heaping tablespoon of red sauce on top of the tenders and top with a thick slice of mozzarella.
Cover tightly with tin foil and bake for 15 minutes.
Uncover and turn your oven to broil. Broil, uncovered for 5 minutes to really melt that cheese and get some nice browning but keep your eye on it because it can go from brown and bubbly to burned real quick!
Let sit for 3-4 minutes before serving. Top with fresh herbs and serve with your favorite garlic bread!
Enjoy!

Mom's Burrito Pie (Deep Dish Mexican Pizza!)
I grew up eating this dish once a week. Well, maybe that’s n exaggeration, but for sure, twice a month, at least! My Momma always called it burrito pie but someone informed me on my Instagram this week that it’s also deep dish Mexican Pizza! Either way, it's one of the most simple dishes you can imagine and it's good every single time! Dare I say, it will stand up to ALL the pickiest eaters, and this vegan version with homemade refried beans is the perfect thing to serve to a crowd of “mixed eaters”!
I grew up eating this dish once a week. Well, maybe that’s an exaggeration, but for sure, twice a month, at least! My Momma always called it burrito pie but someone informed me on my Instagram this week that it’s also deep dish Mexican Pizza! Either way, it's one of the most simple dishes you can imagine and it's good every single time! Dare I say, it will stand up to ALL the pickiest eaters, and this vegan version with homemade refried beans is the perfect thing to serve to a crowd of “mixed eaters”!
This recipe uses the homemade refried beans that we made earlier in the week. Obviously, canned are just fine but be careful because if you’re wanting this recipe to be plant based…check the can! Unless it otherwise states “vegetarian” a lot of commercial refried beans contain lard, making them not vegan at all…and not even vegetarian! Aside from that, the best part of this recipe, like a lot of the things I like to make, is that it’s totally customizable to your pallet and the ingredients that you love (or hate, as the case may be.)


What you are going to need to buy:
Tortillas, size depends on the casserole dish you want to bake this in and how large a pie you are making.
Refried Beans
Olive Oil
Ground “Beef” - this recipe used the ground from Beyond Meat but you do end up crumbing it up, so the frozen crumbles work just as well.
Medium onion, diced
Minced Garlic - (we like these jarred options from Spice World!)
Taco Seasoning (or your preferred spices to season taco meat)
Red Sauce or Enchilada Sauce (Not tomato sauce, chili based)
Cheddar Shreds - (pictured are the Cheddar Shreds from Violife)
Sour Cream - (Tofutti is the best!)
Diced Tomatoes
Fresh Herbs, for garnish
What you are going to need to do:
Preheat over to 350 degrees.
In a pan, on medium heat, with 1 tablespoon of olive oil saute’ you onions and garlic until the onion is translucent.
Add into the pan your Beyond Meat cook until brown and crumbled. Add a splash of water and your taco seasoning (amount will depend on how much filling you are making.) Taste for seasoning. Remove from heat.
In a round casserole dish, roughly the size of your tortillas, pour about 3 tablespoons of the red sauce into the the dish, just to cover the bottom.
We’re basically making taco lasagna!
Holding a tortillas in your hand, or placing it on the counter-top, spread a nice thick layer of refried beans onto the tortilla and place in the dish.
Note: Do not try to spread the beans on the tortilla after you place it in the dish or you are just going to pull your hair out! Before, before, before…
Layer the meat filling on top of the beans, followed by a handful of cheese and another 3 tablespoons of red sauce.
Repeat this layering process until you reach the top of the baking dish. I typically get 3 layers.
Top off your Burrito Pie with a final tortilla and pour the remaining red sauce onto the top to cover the entire thing.
Top with cheese and cover loosely with tin foil or the lid to the casserole dish. (Do not let the cover touch the cheese.
Bake at 350 for 30 minutes. After 30 minutes, uncover, turn your over to broil, and bake another 3-5 minutes until cheese is nice and melted. Keep a close eye on it for the last 5 minutes. Every stove/broiler is different and you don’t want it to burn!
Remove from oven and let stand for 15-25 minutes before serving.
Top with sour cream, tomatoes, and fresh herbs (or whatever you like…guac, pico, olives, etc…)
Cut into wedges and enjoy!