


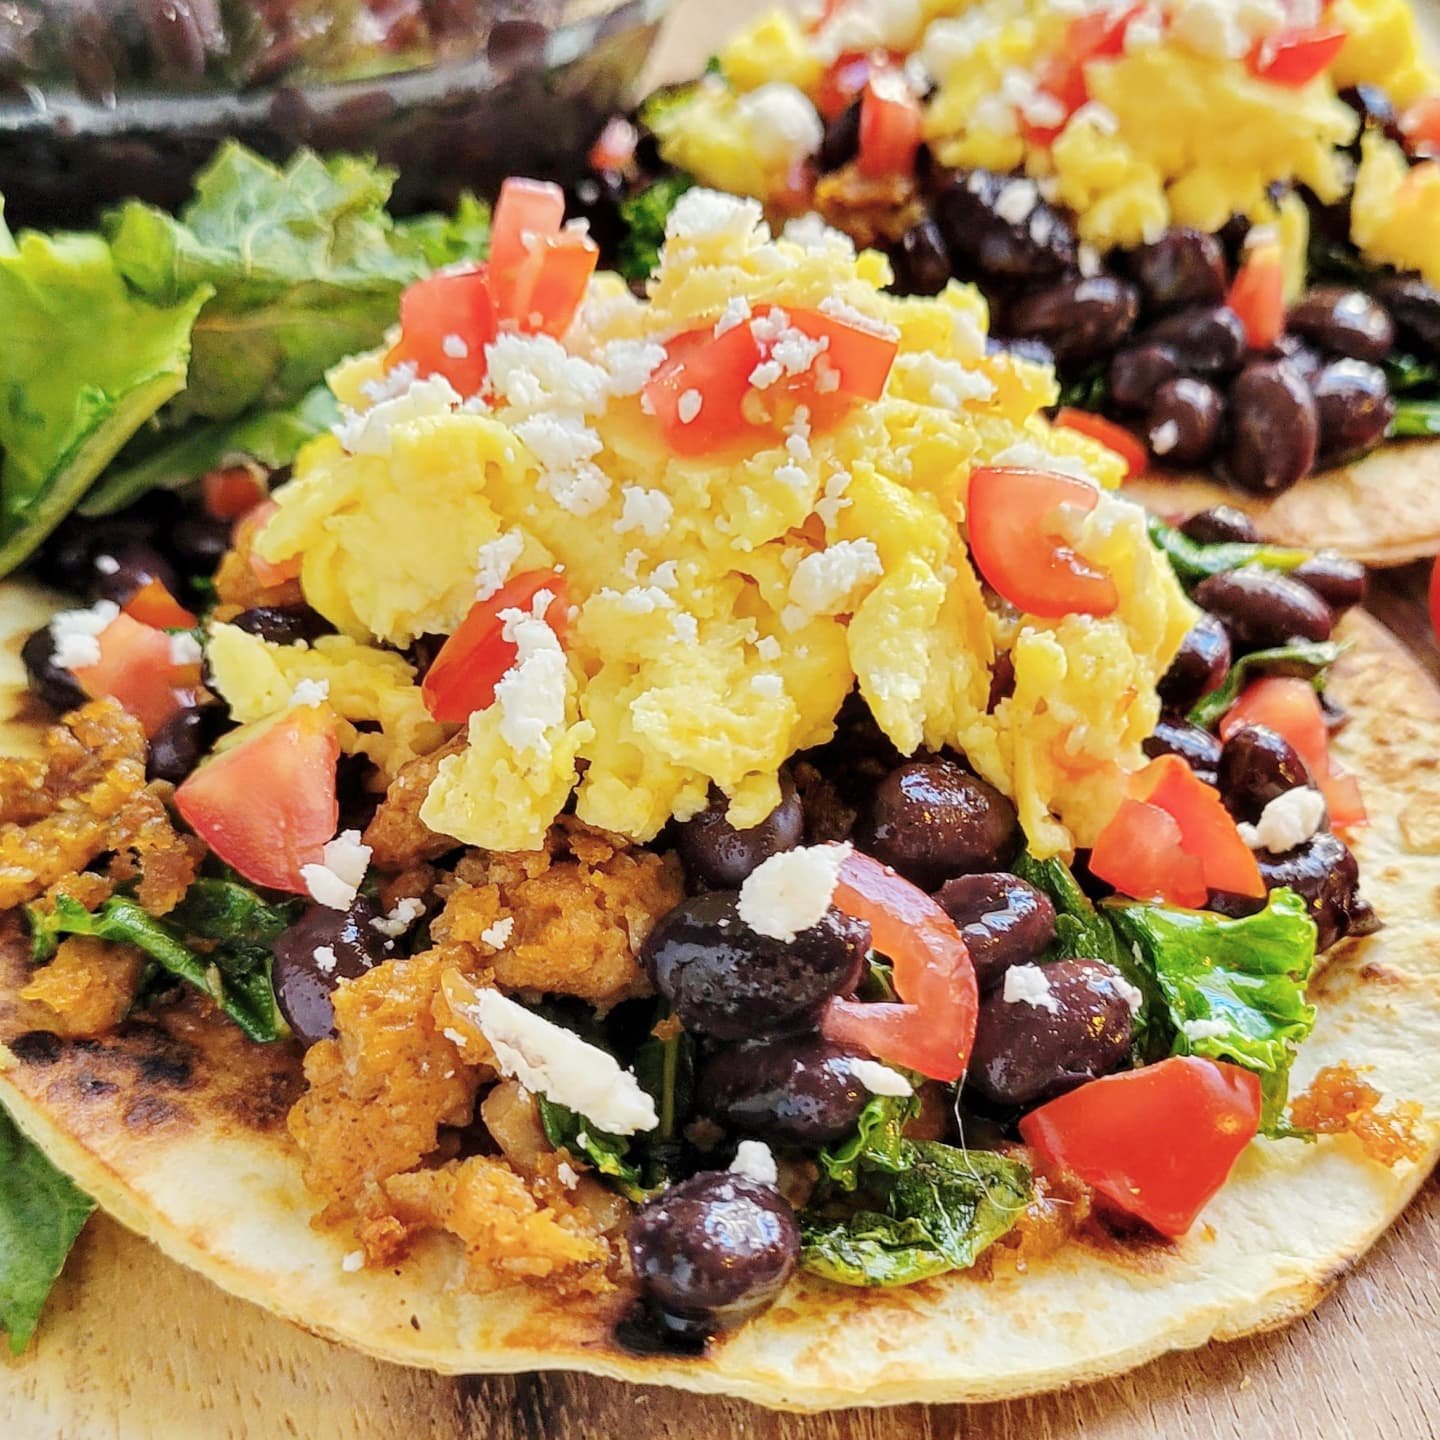
Vegan Huevos Rancheros Breakfast Tostadas with JustEgg
These Huevos Rancheros Breakfast Tostadas with vegan sausage, wilted kale, black beans, eggs, tomatoes, and feta, are the perfect way to kick off your weekend brunch! Topped with a drizzle of maple syrup, even the pickiest eaters will gobble them right up...yes, please! Using the JustEgg allows you to quickly and easily scramble up an egg substitute for these tostadas that even your non-vegan friends will love! (My pro tip: Just don’t tell them! Trust me, no one will even notice!)
These Huevos Rancheros Breakfast Tostadas with vegan sausage, wilted kale, black beans, eggs, tomatoes, and feta, are the perfect way to kick off your weekend brunch! Topped with a drizzle of maple syrup, even the pickiest eaters will gobble them right up...yes, please! Using the JustEgg allows you to quickly and easily scramble up an egg substitute for these tostadas that even your non-vegan friends will love! (My pro tip: Just don’t tell them! Trust me, no one will even notice!)
The best part about breakfast tostadas is that you can customize them for everyone’s individual likes! My favorite way to serve them is to honestly get all the topping ready and just let people choose what they want buffet style! Below is how I like mine…
What you are going to need to buy:
Tortillas, small
Plant-Based Sausage
Liquid Smoke
Olive Oil
Minced Garlic - (we like these jarred options from Spice World!)
Salt and Pepper, to taste
Smoked Paprika, to taste
Just Egg
Black Beans
Tomatoes, diced
Dairy-Free Feta Cheese
Fresh Kale
Maple Syrup
Hot Sauce, optional
What you are going to need to do:
To start, fry up your plant-based sausage with a little olive oil, a few dashes of liquid smoke, and some minced garlic. Once the sausage is almost done and getting a little crispy on the edges wilt in a handful of kale and stir to combine. Once the kale has softened and the sausage has finished cooking, remove and set aside.
Wipe out your skillet and use your JustEgg to make some scrambled eggs. Season with salt, pepper, and paprika, to taste. Remove and set aside.
Again, wipe out your skillet, and on medium-high heat, toast your tortillas until they take on some nice golden brown color…a little char around the edges never hurt anybody, either!
Assemble your tostadas by layering your sausage and kale mixture with the eggs, black beans, tomatoes, and cheese and topping with a drizzle of maple syrup and a splash of hot sauce (if you like a little kick!)
Customize your tostadas by adding avocado, sour cream, hot peppers, etc!

Curry Zucchini and Cauliflower Tacos
For a new spin on an old classic, why not try these Curry Zucchini Cauliflower Tacos? With the creamy and dreamy texture of the Curry Zucchini Spread you honestly won’t even miss the sour cream on these Cauliflower Tacos…the best part? The entire recipe comes together in just about 20 minutes!
Who doesn’t love tacos? For a new spin on an old classic, why not try these Curry Zucchini Cauliflower Tacos? This Curry Zucchini Spread from Growee Foods is so creamy and packed full of flavor it’s the perfect swap for sour cream, (plus loaded with a lot more flavor…) making these tacos the perfect dish for all your plant-based AND dairy-friends!


With the creamy and dreamy texture of the Curry Zucchini Spread you honestly won’t even miss the sour cream on these Cauliflower Tacos…the best part? The entire recipe comes together in just about 20 minutes!

Curry Zucchini and Cauliflower Tacos
Author: Sarah | April 24, 2021
Servings: 4
prep time: 10 minutes
cook time: 15 minutes
total time: 20 minutes
Ingredients: What You need to buy!
1 jar of Curry Zucchini Spread from Growee Foods
Soft Tortillas or Taco Shells
1 can of Refried Beans
1 cup of Roasted Corn
Fresh Radishes, sliced thin
Vegan Cheese - (I used feta)
Fresh Parsley or Cilantro
1 tsp. Paprika
1 tsp. Garlic Powder
1/2 tsp Salt
Pinch of Cayenne pepper
Non-Stick Cooking Spray
Instructions: What You need to do!
To start, preheat your oven to 400 degrees.
Break down your cauliflower into bite sized pieces and sprinkle with paprika, salt, garlic powder, and cayenne pepper, (if you like a little kick!)
Roast for 10-15 minutes or until the cauliflower has softened.
Then simply fill your tortillas with refried beans, roasted corn, radishes, and add the spicy cauliflower.
Top each taco with 1-2 tablespoons of the Curry Zucchini Spread from Growee Foods!
- Garnish with the vegan cheese and fresh herbs! The hardest part about this recipe is going to be trying to get these things closed! Better grab a fork, just in case!
What I really love about the spreads from Growee Foods is how they help you get all flavor with almost none of the prep! Fast food doesnt mean you need to sacrifice your nutrition! All of their plant-based blends are naturally rich in flavor and full of all the good stuff...free of all the bad! Real food with real flavor! Check out their website for more dinner inspiration!
Love, Light, and Lentils, my friends!
Sarah

"Big Moc" Handpies with Vegan Special Sauce!
These "Big Moc" hand pies stuffed with roasted potatoes, sauteed onions, cheese, and impossible ground mixed with my “Big Moc” Special Sauce turned out even better than I expected! Served with a little more sauce for dipping plus a couple pickles and chips! Not a particularly sophisticated dinner but tasted pretty great and trust me, your kiddos will love them!
These "Big Moc" hand pies stuffed with roasted potatoes, sauteed onions, cheese, and Impossible ground mixed with my “Big Moc” Special Sauce turned out even better than I expected! Served with a little more sauce for dipping plus a couple pickles and chips! Not a particularly sophisticated dinner but tasted pretty great and trust me, your kiddos will love them!
Some of you all will remember a few weeks back when my Pops requested a batch of my "Big Moc" sauce...well, there was just a bit of that batch left in the fridge when I was at their place over the weekend and I happened to have some Impossible Burgers in the freezer, but no burger buns and I was too lazy on a Saturday nignt to go run to the store to grab any so…these little babies were born!


What you are going to need to buy:
1 Frozen Pie Crust, thawed - (If you want your hand pies to be vegan you’re likely going to need to make your own crust, although Wholly Wholesome does make a vegan pie crust option!)
1 Plant Based Ground Beef - (I used an Impossible Burger)
1 cup of diced Potatoes
1/2 cup of diced Onions
1 teaspoon Minced Garlic - (we like these jarred options from Spice World!)
2 Dairy Free Cheese (Slices are easier for this)
Liquid Smoke, just a splash
Salt & Pepper, to taste
1/4 cup of “Big Moc” Special Sauce! (CLICK HERE FOR THAT RECIPE!) + more for dipping
What you are going to need to do:
Start by preheating your oven to 350
Filling will depend on how many pies you want to make. This recipe made two pies.
Dice your potatoes an onions into 1/2 inch pieces and saute on the stove-top until soft and golden, adding the minced garlic towards the end of cooking so it doesn’t burn, and salt and pepper, to taste.
In the same skillet, brown your plant-based ground beef with a little splash of Liquid Smoke. Set aside and let cool for a couple minutes.
Add your special sauce to the meat so the meat is well coated but not runny. The pies will dry out a bit in the oven so you can add a little more sauce than you think you’ll need as long as the meat isn’t going to run or drip out of the pie shell when you’re trying to close it.
Roll out your pie crust and cut four rectangles that are each roughly 3.5 x 6
Note: You can really use any shape that you like…even a circle is fine but I found that I have less waste by using rectangles.
Place both of the fillings into the center of the bottom crust making sure to leave a border around the edge so that you can seal the pies. Don’t be afraid to pile the filling pretty high because it will shrink down in cooking.
Top your fillings with a slice of your favorite dairy free vegan cheese. I found that a cheese slice worked best for this.
Run a wet finger around the border of the bottom crust to help with sealing the pie.
Gently place the top pie crust. If you have piled your filling pretty high it’s going to seem like it won’t fit, but you can gently pull on the crust and using the tines of a fork, crimp all edges to seal the entire pie.
Dock the top of each handpie with a fork several times to create some steam holes for cooking.
To make sure that the top crust browns nicely you can lightly mist the top of the pies with a cooking spray.
Loosely tent the pies, with tin foil, for the first 15 minutes of cooking so that the edges don’t get too dark before the rest of the crust as time to bake.
After 15 minutes, remove the foil and bake another 15 minutes uncovered.
At this point, it’s just a matter of watching your pies to see when the top has baked through and browned up nicely. Mine ended up baking for 18-19 minutes uncovered instead of the 15. Just keep your eye on them.
Let rest for about 2 minutes before serving. I like to serve mine with some extra special sauce on the side for dipping!
Enjoy!

Turnip Green and Broccolini Salad with Poppy Seed Dressing
This new spin on one of my Mom’s favorites, incorporates both turnip greens and broccolini, and is a great way to "sneak in" some extra greens for all the picky eaters out there! The addition of the diced turnip greens to this Spring Salad doesn’t change the flavor of this traditional Broccolini Salad but it DOES give you an extra boost of healthy greens. Paired with a sweet and tangy Poppy Seed Dressing and loaded with fresh blueberries and pumpkin (or sunflower seeds) it's sure to be the new hit your table!
It’s Mother’s Day this weekend and this Spring Turnip Green and Broccolini Salad with Poppy Seed Dressing is perfect for all your spring and early summer get-togethers!
This new spin on one of my Mom’s favorites, incorporates both turnip greens and broccolini, and is a great way to "sneak in" some extra greens for all the picky eaters out there! Paired with a sweet and tangy Poppy Seed Dressing and loaded with fresh blueberries and pumpkin (or sunflower seeds) it's sure to be the new hit your table!


The turnip greens from Palmetto Gardens are perfect for spring and summer pre-dressed salads like this one, delivering a refreshing crunch with ingredients that won't wilt or lose their texture!

Turnip Green and Broccolini Salad with Poppy Seed Dressing
Author: Sarah | May 4, 2022
Servings: 6 to 8 side-portion servings
prep time: 15 minutes
assembly time: 5 minutes
total time: 20 minutes
Ingredients: What You need to buy!
Ingredients: To make the Salad
1.5 cups of finely diced Palmetto Gardens Turnip Greens
1.5 cups of broccolini florets, chopped into small, bite-sized pieces
1 medium red onion, diced small
1 cup of fresh blueberries
1/3 cup of pumpkin seeds (or sunflower seeds)
3/4 cup of shredded cheddar cheese (I used a dairy-free version)
Ingredients: To make the Dressing
1/4 cup of Maple Syrup
3 tablespoons of Apple Cider Vinegar
1 tablespoon Minced Garlic
1/4 cup of Olive Oil
2 tablespoons of sour cream (I used a dairy-free version)
2 tablespoons of Poppy Seeds
Salt and Pepper, to taste
Instructions: What You need to do!
To begin, remove the broccolini from the stems so that you get small, bite-sized, pieces...about the size of a nickel.
Finely chop your Palmetto Gardens Turnip Greens so they easily incorporate into the broccolini.
Dice your red onion.
Into a large bowl combine the broccolini, chopped turnip greens, onion, blueberries, cheese, and pumpkin (or sunflower) seeds
Gently toss to incorporate.
To make the dressing, whisk the sour cream and maple syrup until well combined. Do this step first to avoid lumps.
Continue whisking and add in the apple cider vinegar and olive oil. Whisk until smooth.
Stir in the minced garlic and the poppy seeds, along with the salt and pepper.
Taste for seasoning. For a more tangy dressing add another splash of apple cider vinegar...or if you prefer a sweeter dressing, add a bit more maple syrup.
Gently pour the dressing over the salad and toss to combine well. Keep cold before serving.
If you’re like me, you might not eat a lot of turnip greens as a part of your regular diet, at least not raw. Most of the greens that I had growing up were always stewed or creamed…neither of which are my favorite! The addition of the diced turnip greens to this Spring Salad doesn’t change the flavor of this traditional Broccolini Salad but it DOES give you an extra boost of healthy greens, plus…it’s a super thrifty way to help stretch your produce and reduce kitchen waste! I do hope you’ll try it this delicious spring salad recipe! Make sure to tag me when you do so I can see all of your yummy creations! Until next time…
Love, Light, and Lentils, my friends!
Sarah

RubyFrost, White, and Blue Summer Apple Salad w/ Poppyseed Dressing
Summer is right around the corner and that means Summer Salads! Whether you’re looking for your next recipe for the family cookout or just an easy recipe that doesn’t require turning on the oven, this RubyFrost, White, and Blue Summer Apple Salad w/ Poppy Seed Dressing will easily become your new favorite!
Summer is right around the corner and that means Summer Salads! Whether you’re looking for your next recipe for the family cookout or just an easy recipe that doesn’t require turning on the stove this RubyFrost, White, and Blue Summer Apple Salad w/ Poppyseed Dressing will easily become your new favorite!
Featuring delicious, RubyFrost Apples, the base of this salad swaps out boring, old, lettuce for shredded Brussel Sprouts, (Shhh, don’t tell them, they’ll never know!) and is packed full of pretty delicious flavor! Bonus, the amazing colors in this salad make it the perfect way to kick off your Memorial Day Festivities next month!


Grown by 152 family farmers across New York State, RubyFrost Apples are the perfect balance of sweet and tart - deep and rich color with a great, crisp texture!
Because of their high levels of vitamin C they are slow to brown, making them the perfect apple for a summer salad like this one!

RubyFrost, White, and Blue Summer Apple Salad w/ Poppy Seed Dressing
Author: Sarah | April 28, 2022
Servings: 6-8 (side portions)
prep time: 10 minutes
assembly time: 10 minutes
total time: 20 minutes
Ingredients: What You need to buy!
2 RubyFrost Apples, cut into 1/2" pieces (Reverve 1/4 of one apple to slice for garnish, if desired)
16oz Brussle Sprouts, shredded
6oz fresh blueberries
1/2 - 3/4 cup of Walnuts
Crumbled, Dairy Free Feta
Ingredients: To make the Poppyseed Dressing
1/4 cup Maple Syrup
1/4 cup Apple Cider Vinegar
1/2 teaspoon of Salt
1/2 cup Olive Oil
1 tablespoon poppyseeds
Instructions: What You need to do!
To begin, cut your brussle sprouts, from top to bottom, into very thin slices and they will automatically "shread" into a cole-slaw consistency!
Cut your RubyFrost Apples into 1/2" pieces. (Reverve 1/4 of one apple to slice for garnish, if desired)
In a large bowl, toss your shreaded brussle sprouts with your cubed RubyFrost apples, walnuts, blueberries and crumbled feta.
To make the dressing, mix the maple syrup, vinegar, oil, and salt. I like to use a frother to quickly emulsify the dressing. Once well mixed, add poppyseeds.
Dress the salad just before serving.
If you know me well, you likely know that I lived within walking distance of an apple orchard for over a decade…needless to say, I’m pretty picky about apples but these RubyFrost Apples are, truthfully, pretty delicious!
I picked up my RubyFrost Apples at my local Fresh Market but you can follow @RubyFrostApples on Instagram to see if this pretty delicious apple is in a store near you.
I hope you all will give this RubyFrost, White, and Blue Summer Apple Salad w/ Poppy Seed Dressing a try…and I’d love to hear how you love these RubyFrost Apples!
Love, Light, and Lentils, my friends!
Sarah

Jackfruit Carnitas Tacos with Sweet Apple Onion Salsa
One of my favorite flavor profiles is built around something hot and spicy combined with something tart and crisp and these jackfruit carnitas tacos topped with a diced apple and red onion salsa definitely fit the bill. These tacos are fancy enough to serve for guests and easy enough for a Taco Tuesday at home with the family! Let’s make them!
Warning: Not your traditional tacos! If you’re craving tacos but are tired of the traditional “beef and cheese” then you’re going to love these Jackfruit Carnitas Tacos with Sweet Apple Onion Salsa. One of my favorite flavor profiles is built around something hot and spicy combined with something tart and crisp and these definitely fit the bill.


Layered on a bed of buttered and wilted, shaved, brussel sprouts and topped with a touch of creme these tacos are fancy enough to serve for guests and easy enough for a Taco Tuesday at home with the family! Let’s make them!

Jackfruit Carnitas Tacos with Sweet Apple Onion Salsa
Author: Sarah | April 26, 2022
Servings: 4
prep time: 10 minutes
cook time: 10 minutes
total time: 20 minutes
Ingredients: What You need to buy!
10oz Jackfruit (I like to use frozen but the canned will work just as well.)
6-8 Brussel Sprouts, shaved or shreaded
2 tablespoons vegan butter
1 Medium Apple (something tart and sweet works best, Gala, Fuji, or RubyFrost)
1/2 Medium Red Onion
Dairy Free Sour Cream
Tortillas
1 teaspoon dried oregano
1/2 teaspoon ground cumin
1/2 teaspoon smoked paprika
1 tablespoon olive oil
1 tablespoon minced garlic
1 teaspoon of liquid smoke
pinch of Chili Powder
Splash of Apple Cider Vinegar
Salt and Pepper, to tatse
Instructions: What You need to do!
Into a medium skillet with 1 tablesspoon of olive oil add your thawed and shreaded jackfruit and cook with the oregano, cumin, paprika, chili powder, apple cider vinegar, liquid smoke, and minced minced garlic until the jackfruit has heated through.
Add salt and pepepr, to tatse. You can add a tablespoon or two of water if it becomes too try! (Think pulled pork texture and consistency)
While your jackfruit is cooking, shave down your brussel sprouts by starting at the tip and making very tin cuts all the way down to the stem/base. They should naturally pull apart annd shred on their own. (Think coleslaw texture)
Remove the jackfriut from the skillet and store under foil to keep warm. In the same skillet add 2 tablespoons of vegan butter and your shreaded brussle sprouts. Sprinkle with 1 teaspoon seasalt.
The goal is to wilt the brussle sprouts not cook them all the way so keep your heat on mediu low and stir occationally. This should take about 5 mintes.
While your brussle sprouts are wilting, cut your apple and your onion into small 1/4" pieces. Combine in bowl with a splash of Apple Cider Vinegar. Using the back of a fork muddle the apple and onio together.
To serve tacos, layer the warm and wilted brussle sprouts onto the trotilla and top with the jackfriut and apple/onion salsa.
Garnish with a bit of dairy free sour cream...and sprinkle with just a dash of the smoked paprika.
If you’ve made it this far…I’m hoping that the list of unusual favors in this dish havn’’t scared you off! While I know that apples and brussel sprouts don’t seem like the traditional ingredients for a Taco Tuesday grocery run, something about how the buttery greens melt into the spiciness of the jackfruit and are complimented with that punch of crisp and tart apple onion salsa is just perfection. If you’re craving tacos but are tired of the traditional “beef and cheese” then you’re going to love these Jackfruit Carnitas Tacos with Sweet Apple Onion Salsa.
Make sure to tag me on social when you make them so I can see! @plantbasedgingr
Love, Light, and Lentils, my friends!
Sarah

Tofu and Chickpea Vegan "Egg Salad"
After over 22 years of being plant based...I think I've tried just about every version of vegan egg salad out there but even with the good ones, the great ones, there is always something not quite right...until now! Now, admitadly, there are a couple of steps to this recipe but nothing that’s going to take any longer than the time it would take to actually boil eggs!
After over 22 years of being plant based...I think I've tried just about every version of vegan egg salad out there but even with the good ones, the great ones, there is always something not quite right...until now! The trick to this recipe is getting your hands on some black salt (which isn’t black at all…it’s kind of pink!) and yes, I’m going to just say it now…you’re probably going to need to order it online!

Now, admittedly, there are a couple of steps to this recipe but nothing that’s going to take any longer than the time it would take to actually boil eggs!
Traditional egg salad has a couple of different textures going on, even if it might not seem so…the whites of a boiled egg are rubbery and even a bit bouncy while the yolks are crumbly and even a little chalky! In order to try and duplicate both textures we’re going to use both extra firm tofu and chickpeas for the filling.
What you are going to need to buy: Makes 2-3 servings
Extra Firm Tofu, 8 oz, crumbled
Drained Chickpeas, 1/2 cup, lightly mashed with a fork
Vegan Mayo
Yellow Mustard
Black Salt, tiny pinch
Minced Garlic (Optional)
Relish
Salt and Pepper, to taste
What you are going to need to do:
In a medium mixing bowl lightly mash the chickpeas with the tines of a fork until they become slightly creamy but there are still some lumps. Again, think of the texture of the yolks of boiled eggs.
Drain and lightly press your tofu to remove excess moisture. No need to press for any length of time, just between several paper towels for 30 seconds or so.
Crumble the tofu into the bowl. You want slightly larger pieces than you would expect to have when you dice hard boiled eggs because the tofu will crumble a bit more when you stir everything together.
Add a tiny pinch of the black salt. This is what is going to give you that sulfur or eggy flavor. JUST A PINCH…a little goes a long way and you can always add more.
Now, I’m not going to give measurements for the Mayo/Mustard/Relish situation because everyone likes their egg salad a bit different…but mix in your condiments, add salt and pepper, and taste for seasoning.
At this point you can add in a little more black salt if you like. Again…add sparingly.
Combine well and serve sandwich style with your favorite toppings. I love mine with tomato and lettuce on white bread.
And, there you have it! The search is over…perfect vegan egg salad! Remember to save your aquafaba to use in another recipe or froth it up with a splash of maple syrup and add to your morning coffee! I do hope that you’ll try this recipe! Tag me online when you at @plantbasedgingr so that I can see all of your delicious creations!
Love, Light, and Lentils, my friends!
Sarah

Couscous with Roasted Zucchini and Blistered Tomatos with a Tangy Garlic Crema
This quick and easy recipe is perfect for a mid-week lunch! If you’re working from home, like I do most days, you can put the veg into roast and keep working while it cooks. The couscous comes together in about 8-10 minutes and boom...chow time...but you can also always make this dish the night before and reheat the next day for lunch!
This quick and easy recipe is perfect for a mid-week lunch! If you’re working from home, like I do most days, you can put the veg into roast and keep working while it cooks. The couscous comes together in about 8-10 minutes and boom...chow time...but you can also always make this dish the night before and reheat the next day for lunch!

Now, if you’ve been following me for any length of time you’ll know what a fan if couscous that I am! Easy on the budget, filling, and you can top it with just about anything. But, I do have a couple tricks! I always toast it off in a hot pan before cooking and for the best flavor, I always use broth, never water, to cook my couscous!
What you are going to need to buy:
Pearled Couscous, 1 cup
Veggie Broth, 1.5 cups
1 small Zucchini, cut into 1/2” cubes
1 cup of Cherry or Grape Tomatoes, halved
2 tablespoons Nutritional Yeast
Olive Oil, 1 tablespoon
Salt and Pepper, to taste
1 tablespoon of Minced Garlic
1 teaspoon Onion Powder
3 tablespoon of Dairy Free Sour Cream
1 teaspoon Lemon Juice
1 teaspoon Garlic Salt
Scallions, sliced into small rings, for garnish
What you are going to need to do:
To start, preheat your oven to 375.
In a small bowl, coat the cubed zucchini with olive oil, nutritional yeast, garlic, onion powder, and a pinch of salt and pepper.
Spread out on a baking sheet and roast for 15 minutes.
After the zucchini has roasted for 15 minutes, add the halved tomatoes to the pan, cut side up, and roast both the zucchini and the tomatoes for another 10 minutes
Now, onto the Couscous!
PRO TIP: In a non-oiled, medium saucepan, on medium/low heat measure out the desired amount of couscous, according to the boxed directions, for the number of serving you need to make. Let the couscous toast in the warm pan, stirring or agitating the pan often so that the contents do not burn. After about 90 seconds you should see the couscous pearls begin to turn from blond to light brown. When this happens take the saucepan off the heat. It will continue to toast, from the residual heat but you don’t want it to burn.
After you have toasted your couscous, prepare according to your boxed directions (or if you’re like me…use veggie broth instead of water!)
In a small bowl, combine the sour cream, lemon juice, garlic salt and a pinch of salt and pepper.
To serve, present the couscous topped with the roasted veggies and drizzled with the crema. Add the scallions on-top, to finish!
And, that’s it. I love this recipe because not only is is quick and easy, it doesn’t make me feel like I’ll need a nap afterwards, plus, it’s great on the budget. This would also make a great addition to your Easter table this year! I’d love to hear if you try it! You can always tag me online at @plantbasedgingr
Love, Light, and Lentils, my friends!
Sarah

Cashew Free VEGAN Cheese Sauce!
Let’s be real…what’s the best part of nachos if it isn’t the cheese sauce? The main comment I hear from folks who are just transitioning into a plant-based lifestyle or who are simply trying to eat less dairy is, “…but, I just love cheese so much!” Me, too, my friends! Me, too! The dairy free cheese sauce that I used on this dish also makes a great sauce to top Mac ‘n Cheese or to make your own at home hamburger-helper casserole. And this cashew free version is even safe for our friends with allergies!
Let’s be real…what’s the best part of nachos if it isn’t the cheese sauce? The main comment I hear from folks who are just transitioning into a plant-based lifestyle or who are simply trying to eat less dairy is, “…but, I just love cheese so much!” Me, too, my friends! Me, too! The dairy free cheese sauce that I used on this dish also makes a great sauce to top Mac ‘n Cheese or to make your own at home hamburger-helper casserole. And this cashew free version is even safe for our friends with allergies!
The world of plant based cheese has come a long way in the past 20 years since I stopped eating meat…A LONG way but so many of the cheese sauces at restaurants and available in stores contain cashews but this recipe, made with some of my favorite ingredients from brand like Violife, Earth Balance, Tofutti, and Rise Brewing is safe for our friends with nut allergies and is still 100% plant based!


What you are going to need to buy:
Non-Dairy Butter - ( We used Earth Balance)
Flour
Organic Oat Milk from RISE BREWING - (Can you use something else…um, yeah, but why?)
Non-Dairy Cheese Shreds - (We used THESE CHEDDAR SHREADS from VioLife!)
Non-Dairy Sour Cream - (in our opinion Tofutti is the OG…and also the best!)
Yellow Mustard - (yes, just trust us!)
Salt and Pepper, to taste
Garlic and Onion Powder, to taste
What you are going to need to do:
Okay, let’s tackle this cheese sauce first: This recipe is probably going to make way more sauce than you’ll need unless you’re making nachos for a party BUT trust me, you’ll find all kind of other uses for it and it keeps in the fridge just fine!
In a medium pot, on low heat, melt about 2 tablespoons of butter and gently allow butter to brown, but not burn, because we’re going to make a roux.
Sprinkle 2 tablespoons of flower on top of the melted butter and whisk to combine. Cook mixture for about 30 seconds and then slowly add 1.5 - 2 cups of oat milk, whisking the entire time so that no lumps form. Bring to a boil and let boil about 30 seconds.
Stir in 1/3 cup of sour cream.
Add 1 tablespoon of yellow mustard…don’t be afraid, just do it! (You can use brown mustard, if you like it!)
Reduce heat and add the cheddar shreds (yes, the whole bag), stirring to melt.
Continue to stir, on low/medium heat, until everything is melted.
Add salt and pepper, and garlic/onion powder to taste. It will take more salt than you think…a full teaspoon isn’t too much!
…And, boom! vegan cheese sauce! If it seems thin, increase the heat and let simmer for 1-2 minutes, but remember it will tighten up as it cools.
A note about ingredients and brands: I’ve been plant-based for 20 years and believe me, I’ve seen quite the evolution of dairy-free products, particularly, when it comes to milks and cheeses! The products and brands that I recommend for this recipe are not sponsors and I don’t get paid to promote them…they are, simply, in my opinion, the best options, for this dish! Can you use something different? Sure. Can you substitute one brand for another? Of course…but this is legit the best cheese sauce that I’ve had, plus…it’s quick, easy, and also cashew free, so if you want to make THIS delicious version, in your home kitchen, I’d say, stick with these brands!
…And do NOT worry about making too much because you can keep this cheese sauce in the fridge for up to two weeks and simply reheat it when you need it! It will thicken back up when it’s cool, but not to worry…portion out what you want to use and pop it into the microwave in 20 second bursts, stirring in-between, and it will melt right back down! It’s perfect for mac n’ cheese, casseroles, to top burgers, or just to eat with chip!

Hibachi Vegetables with Toasted Couscous and Homemade Yum Yum Sauce
This is a great recipe for a special occasion, or, like a traditional hibachi restaurant, serving a crowd because you can, make a huge batch of the couscous and veggies and then, if you are feeding meat eaters, just cook up some protein separate for them! Fridge to table in just about 30 minutes! Cheers to Publix for their tri-colored carrots...makes for a pretty plate if I do say so myself!
Confession Time: I love hibachi...and I have been craving it for months now so tonight was Hibachi at Home night complete with homemade vegan Yum Yum sauce. I don't love fried rice and at the risk of the wrath of the international food gods for mixing cultures and cuisines...I do love couscous so I had my hibachi veggies over a bed of toasted couscous.
This is a great recipe for a special occasion, or, like a traditional hibachi restaurant, serving a crowd because you can, make a huge batch of the couscous and veggies and then, if you are feeding meat eaters, just cook up some protein separate for them! Fridge to table in just about 30 minutes! Cheers to Publix for their tri-colored carrots...makes for a pretty plate if I do say so myself!


What you are going to need to buy:
Couscous - (Here’s my secret! I typically buy the boxed stuff and my favorite brand happens to be THESE from from the brand Near East)
Butter - (I love this plant based butter from Earth Balance)
Minced Garlic - (we like these jarred options from Spice World!)
Vegetables - (I used potatoes, carrots, snap peas, green beans, broccoli, green beans and mushrooms…but really use what you love!)
Soy Sauce
Mayo (Vegan)
Ketchup
Apple Cider Vinegar
Maple Syrup
Garlic Powder
Smoked Paprika (or whatever paprika you have on hand)
Salt & Pepper, to taste
What you are going to need to do:
If you want to get this meal on the table quick, then this is a two pot meal. You’ll need a medium saucepan to cook your couscous and a larger skillet to cook the veggies.
Let’s start with the couscous. It’s pretty straight forward and I would say that you can prepare per your box’s instructions with ONE EXCEPTION! The trick to really flavorful couscous is to toast it before cooking! If you’ve been here awhile you’ll be familiar with this but if not…(See Below)
PRO TIP: In a non-oiled, medium saucepan, on medium/low heat measure out the desired amount of couscous, according to the boxed directions, for the number of serving you need to make. Let the couscous toast in the warm pan, stirring or agitating the pan often so that the contents do not burn. After about 90 seconds you should see the couscous pearls begin to turn from blond to light brown. When this happens take the saucepan off the heat. It will continue to toast, from the residual heat but you don’t want it to burn.
Roasting the vegetables is really more of a timing thing than anything! If you’ve been to a traditional hibachi you’ll remember that they cook things in stages and the same principle works here but unlike a hibachi you probably want to serve your guests a finished plate all at once so you’ll need to stagger your veggies.
In your large skillet, melt a good amount of butter…3 tablespoons, or so, and wait until it is sizzling. Here is a “rough” order of cooking for the veggies that I used:
Carrots & Potatoes (They are the most dense and starchy and take the longest.)
Mushrooms & Soy Sauce - Don’t add the Soy Sauce right away because you want a little crispness on your potatoes and with too much moisture in the pan they will cook, but not get crispy.
Broccoli, Green Beans & Garlic
Snap Peas (They go last…they are so delicate they will burn easy, if you are not careful)
Note: Cooking the veggies is cumulative, so you just keep adding to the same skillet until you’ve added everything. This way, they all finish cooking at roughly the same time.
You can make the Yum Yum Sauce while the veggies are cooking: but keep your eye on them, and your couscous so nothing begins to burn.
Making the Yum Yum Sauce
This will be measurements per serving, simply multiply the recipe for the number of people you are cooking for. Combine all ingredients in a bowl. It’s not that precise, to be honest!
1/4 cup of Mayo
1 heaping tablespoon of Ketchup
1 tablespoon of Apple Cider Vinegar
1 teaspoon of Maple Syrup
1 teaspoon Garlic Powder
1 teaspoon Paprika
Salt & Pepper, to taste
(If you like a runner “restaraunt style” sauce simply add 1 teaspoon of water at a time until you reach the desired consistency.
Serve the veggies, piled high, on top of a bed of fluffy couscous with your homemade Yum Yum Sauce on the side. Enjoy!

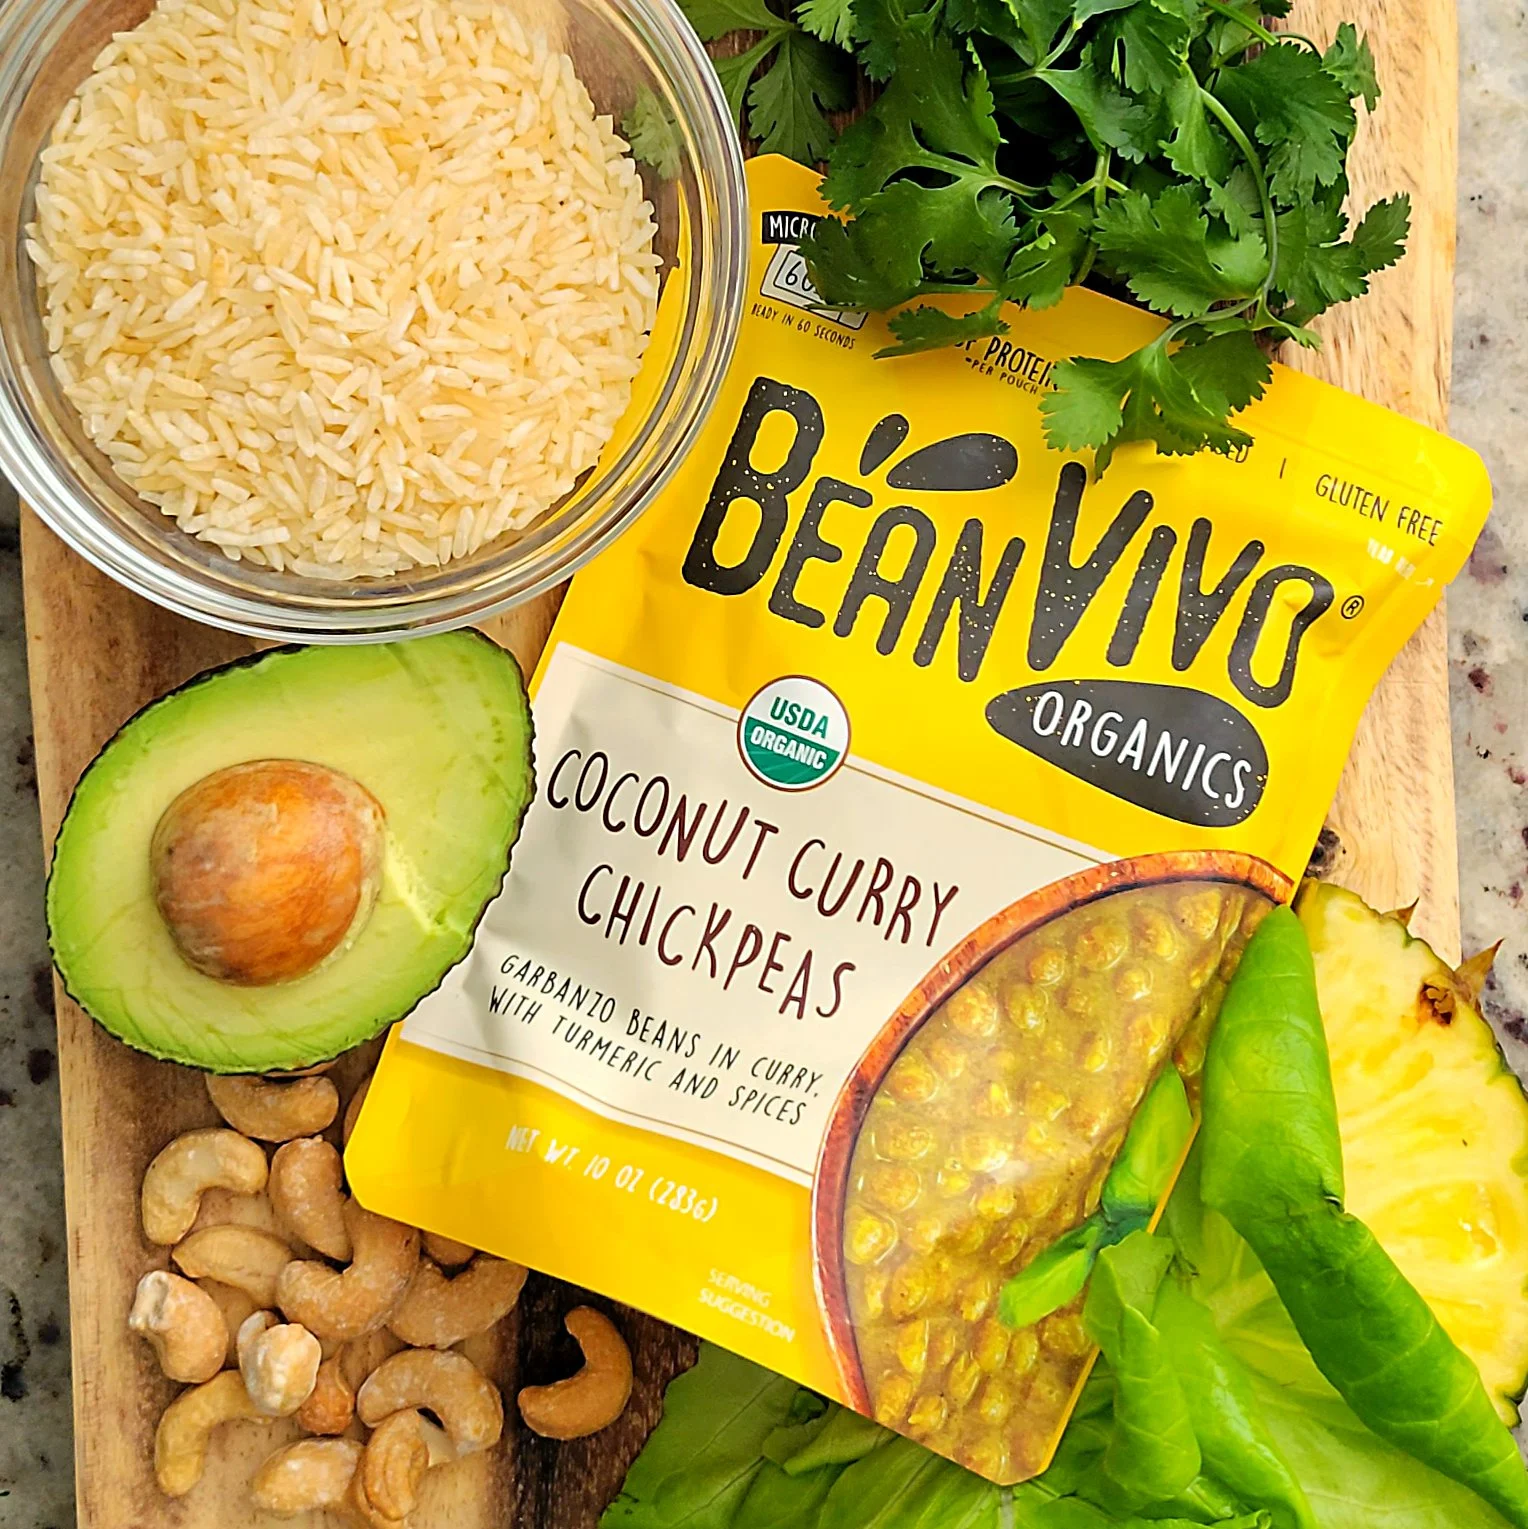
Coconut Curry Chickpea Lettuce Cups with BeanVivo!
If you are craving the flavors of curry but are short on time you are going to love these Curry Chickpea lettuce wraps! They are shockingly easy and even with roasting the chickpeas only take about 15 minutes to pull together with less than 10 ingredients that you probably already have in your panty! I used the lettuce as the “wrap” for this recipe but it would be equally as good wrapped in a tortilla or stuffed into a pita!
Are you ready for the easiest dinner you could whip together in 15 minutes with less than 10 ingredients? Thanks to our friends at BeanVivo these Coconut Curry Chickpea Lettuce Cups with with Cilantro Lime Rice and Pineapple are so simple to make and packed full flavor even the pickiest eaters in your house are sure to gobble them up!
If you’re not familiar with BeanVivo…you should be! Their mission was to develop tasty meals & snacks for people on-the-go, like you and me, by using simple organic ingredients. They combine one of nature’s most nutritious ingredients, not to mention one of my favorites, on our planet…beans, with tons of unique herbs and spices from around the world. Their ready to eat packs are sustainable, convenience (ready to eat in 60 seconds) and are totally gluten-free, and vegan! So…let’s cook!


What you are going to need to buy:
Lettuce, use your favorite…I like butter lettuce
One packet of Coconut Curry Chickpeas from BeanVivo
Minute Rice
Dairy Free Butter
Lime Juice
Fresh Cilantro, chopped fine (or parsley, if you must!)
Avocado
Chopped Pineapple
Cashews
What you are going to need to do:
To begin, prepare your rice per the boxed directions allowing about 1/4 cup of cooked rice for each serving (3 lettuce cups, per serving)
Once the rice is finished cooking, stir in 1 teaspoon of butter, and add lime juice and cilantro (To taste…I like mine really lime-y)
Open and slice one small avocado.
Slice fresh pineapple into 1/4 inch chunks
Open your packet of Coconut Curry Chickpeas from BeanVivo . The best part is that you don’t even need to heat them! They are super delicious, right out of the packet!
Assembly!
Using your lettuce as your “shell” spoon your Coconut Curry Chickpeas from BeanVivo on top of a bed of the cilantro lime rice. Add avocado, diced pineapple, and cashews!
See, told you it was easy! Check out all the delicious combinations of BeanVivo products at their website HERE!

Spicy Buffalo Tofu Chick'n Sub
Can we say football food? Buffalo Chick'n Sub with feta, pickles, and spicy mayo! Made with crispy fried tofu, it's literally the best of a Publix Sub and a Popeyes Sandwich all rolled into one! Seriously these subs are so good that even your non plant-based friends with gobble them right up!
Can we say football food? Buffalo Chick'n Sub with feta, pickles, and spicy mayo! Made with crispy fried tofu, it's literally the best of a Publix Sub and a Popeyes Sandwich all rolled into one! Seriously these subs are so good that even your non plant-based friends with gobble them right up!

In all the years that I have been plant-based, I only recently started preparing tofu, using this method, to use as a chicken substitute, in dishes. This recipe turned out so good and flavorful and it’s honestly way easier than you may think!! The trick to these subs is the buffalo sauce and, of course slathering them in spicy mayo!
What you are going to need to buy:
Extra Firm Tofu
Vegan Butter - (This recipe used Earth Balance)
Flour
Corn Starch
Garlic Powder
Onion Powder
Salt and Pepper
Paprika
Buffalo Sauce, or make your own! (See below)
Dairy Free Mayo
Hot Sauce
Sub Rolls or Hot Dog Buns
Dill Pickles
Butter Lettuce
Dairy Free Feta Cheese
What you are going to need to do:
To start, crumble your extra firm tofu into 2” inch bite-sized pieces, or larger, if you like
In a bowl, mix together equal parts corn starch and flour, along with garlic powder, onion powder, salt and pepper (The quantities will vary based on the amount you’re making but the following should be enough for 4 portions.
1/3 cup of flower
1/3 cup of corn starch
1 teaspoon each of garlic powder, onion powder, salt and pepper
Dredge the tofu pieces into the dry mixture and coat well. The better you coat the pieces, the better, and more crisp they will be.
In a skillet, melt 3-4 tablespoons of vegan butter, on low heat and once the skillet is good and hot, pan fry the tofu, until a nice crust is formed.
Remove from heat and gently pour over your buffalo sauce: Be careful not to tear up your tofu while saucing
Buffalo Sauce is simply your favorite hot sauce, butter, a splash of white vinegar, and garlic! But, to be honest…I really like the Frank’s Brand Buffalo Sauce
In a small bowl, mix vegan mayo and your favorite hot sauce and paprika, to taste and slather your buns with the spicy mayo!
Top your buns with lettuce, pickles, tofu chick’n, and dairy free feta cheese and serve!

Orange Tofu Chick'n with Homemade Glaze
My mouth has been watering for Orange Chicken for weeks now, so I broke down and worked out an at-home version! This recipe turned out so good and flavorful and it’s honestly way easier than you may think!! The orange sauce is so much better than anything from a packet! It's remarkable how much better fresh, from scratch, flavors are!
There’s a lot of buzz about the new partnership with Beyond Meat and Panda Express’ Orange Chicken but down here in Central Florida we don’t have it yet…and my mouth has been watering for Orange Chicken for weeks now, so I broke down and worked out an at-home version!
In all the years that I have been plant-based, I only recently started preparing tofu, using this method, to use as a chicken substitute, in dishes. This recipe turned out so good and flavorful and it’s honestly way easier than you may think!! The orange sauce is so much better than anything from a packet! It's remarkable how much better fresh, from scratch, flavors are!


What you are going to need to buy:
Extra Firm Tofu
Vegan Butter - (This recipe used Earth Balance)
Flour
Corn Starch
Garlic Powder
Onion Powder
Salt and Pepper
Orange Juice
Red Bell Pepper, julienned
Maple Syrup
Soy Sauce
Cauliflower Rice
Fresh Kale
Minced Garlic
Paprika
Ginger Powder
Vinegar
Cayenne Pepper, optional
What you are going to need to do:
To start, crumble your extra firm tofu into 1.5” inch bite-sized pieces
In a bowl, mix together equal parts corn starch and flour, along with garlic powder, onion powder, salt and pepper (The quantities will vary based on the amount you’re making but the following should be enough for 4 portions.
1/3 cup of flower
1/3 cup of corn starch
1 teaspoon each of garlic powder, onion powder, salt and pepper
Dredge the tofu pieces into the dry mixture and coat well. The better you coat the pieces, the better, and more crisp they will be.
In a skillet, melt 3 tablespoons of vegan butter, on low heat and once the skillet is good and hot, pan fry the tofu, until a nice crust is formed. Remove from heat and set aside.
Wipe out your skillet and using another tablespoon of vegan butter, saute the red pepper and 1 tablespoon of minced garlic until the pepper begins to soften.
To the pepper and garlic, add orange juice, maple syrup, soy sauce, vinegar, ginger powder, paprika, and cayenne pepper. Again, depending on how much you are making these quantities can vary.
1 cup orange juice
1/3 cup of maple syrup
2-3 tablespoons of soy sauce
2 tablespoons of vinegar
1/2 teaspoon each of ginger powder and paprika
For a spicy glaze add cayenne pepper, to taste.
Stir to combine and increase heat to reduce the sauce. Allow to boil until the sauce is thick and sticky enough to coat the back of a spoon and able to cling to the tofu pieces. If you’d like to speed up this process you can make a slurry with 1 teaspoon of cornstarch and 2-3 tablespoons of water and add that to the sauce.
Once the glaze has thickened, add the crispy tofu pieces back into the orange glaze and turn heat down to warm.
I like to serve over butter cauliflower rice with some wilted kale!

Creamy Dairy Free Buffalo Mac 'n Cheese | Cashew Free with Rise OatMilk
Is the OatMilk from Rise Brewing the most versatile ingredient in my plant-based fridge? It just might be! This ultra-creamy Mac ‘n Cheese is just another recipe that uses it! And, the best part is that this recipe is also cashew free…sometimes hard to come by in the vegan cheese world, for all of our allergy sensitive friends! This dairy free Creamy Buffalo Mac n’ Cheese is the answer for when the comfort food cravings come a knocking!
The main comment I hear from folks who are just transitioning into a plant-based lifestyle or who are simply trying to eat less dairy is, “…but, I just love cheese so much!” Me, too, my friends! Me, too! This dairy free Creamy Buffalo Mac n’ Cheese is the answer for when the comfort food cravings come a knocking!
Is the OatMilk from Rise Brewing the most versatile ingredient in my plant-based fridge? It just might be! This ultra-creamy Mac ‘n Cheese is just another recipe that uses it! And, the best part is that this recipe is also cashew free…sometimes hard to come by in the vegan cheese world, for all of our allergy sensitive friends! (Yes, I’m looking at you, Jess!)


What you are going to need to buy:
Pasta - (whatever kind you prefer for your Mac!)
Non-Dairy Butter - ( We used Earth Balance)
Flour
Organic Oat Milk from RISE BREWING - (Can you use something else…um, yeah, but why?)
Non-Dairy Cheese Shreds - (We used THESE CHEDDAR SHREADS from VioLife!)
Non-Dairy Sour Cream - (in our opinion Tofutti is the OG…and also the best!)
Yellow Mustard - (yes, just trust us!)
Salt and Pepper, to taste
Garlic and Onion Powder, to taste
Hot Sauce - (Frank’s is our favorite!
Feta Cheese - (We like this BLOCK FETA from VioLife)
Fresh Dill and Diced Tomato for garnish, if that’s your thing! (And, it totally should be, because it’s delicious!)
What you are going to need to do:
The Cheese Sauce:
In a medium pot, on low heat, melt about 2 tablespoons of butter and gently allow butter to brown, but not burn, because we’re going to make a roux.
Sprinkle 2 tablespoons of flower on top of the melted butter and whisk to combine. Cook mixture for about 30 seconds and then slowly add 1.5 cups of oat milk, whisking the entire time so that no lumps form. Bring to a boil and let boil about 30 seconds.
Stir in 1/3 cup of sour cream.
Add 1 tablespoon of yellow mustard…don’t be afraid, just do it! (You can use brown mustard, if you like it!)
Reduce heat and add the cheddar shreds (yes, the whole bag), stirring to melt.
Continue to stir, on low/medium heat, until everything is melted.
Add salt and pepper, and garlic/onion powder to taste. It will take more salt than you think…a full teaspoon isn’t too much!
…And, boom! vegan cheese sauce! If it seems thin, increase the heat and let simmer for 1-2 minutes, but remember it will tighten up as it cools.
A note about ingredients and brands: I’ve been plant-based for 20 years and believe me, I’ve seen quite the evolution of dairy-free products, particularly, when it comes to milks and cheeses! The products and brands that I recommend for this recipe are not sponsors and I don’t get paid to promote them…they are, simply, in my opinion, the best options, for this dish! Can you use something different? Sure. Can you substitute one brand for another? Of course…but this is legit the best cheese sauce that I’ve had, plus…it’s quick, easy, and also cashew free, so if you want to make THIS delicious version, in your home kitchen, I’d say, stick with these brands!
Assembly:
Boil your preferred pasta based on the boxed instructions. Drain pasta and add cheese sauce to coat. Serve with a dash of hot sauce…or several, crumbled feta, diced tomatoes, and dill.
Feta Tip: If you put your block feta in the freezer for just a few minutes before serving and let it get nice and cold, you can run the tines of a fork across the top of the block and it crumbles beautifully!
Unless you are serving a crowd, you are likely going to have cheese sauce left over. It keeps in the fridge just fine and re-melts like a dream! Use it to make your own version of a plant-based hamburger helper or cheesy potatoes!
Enjoy!

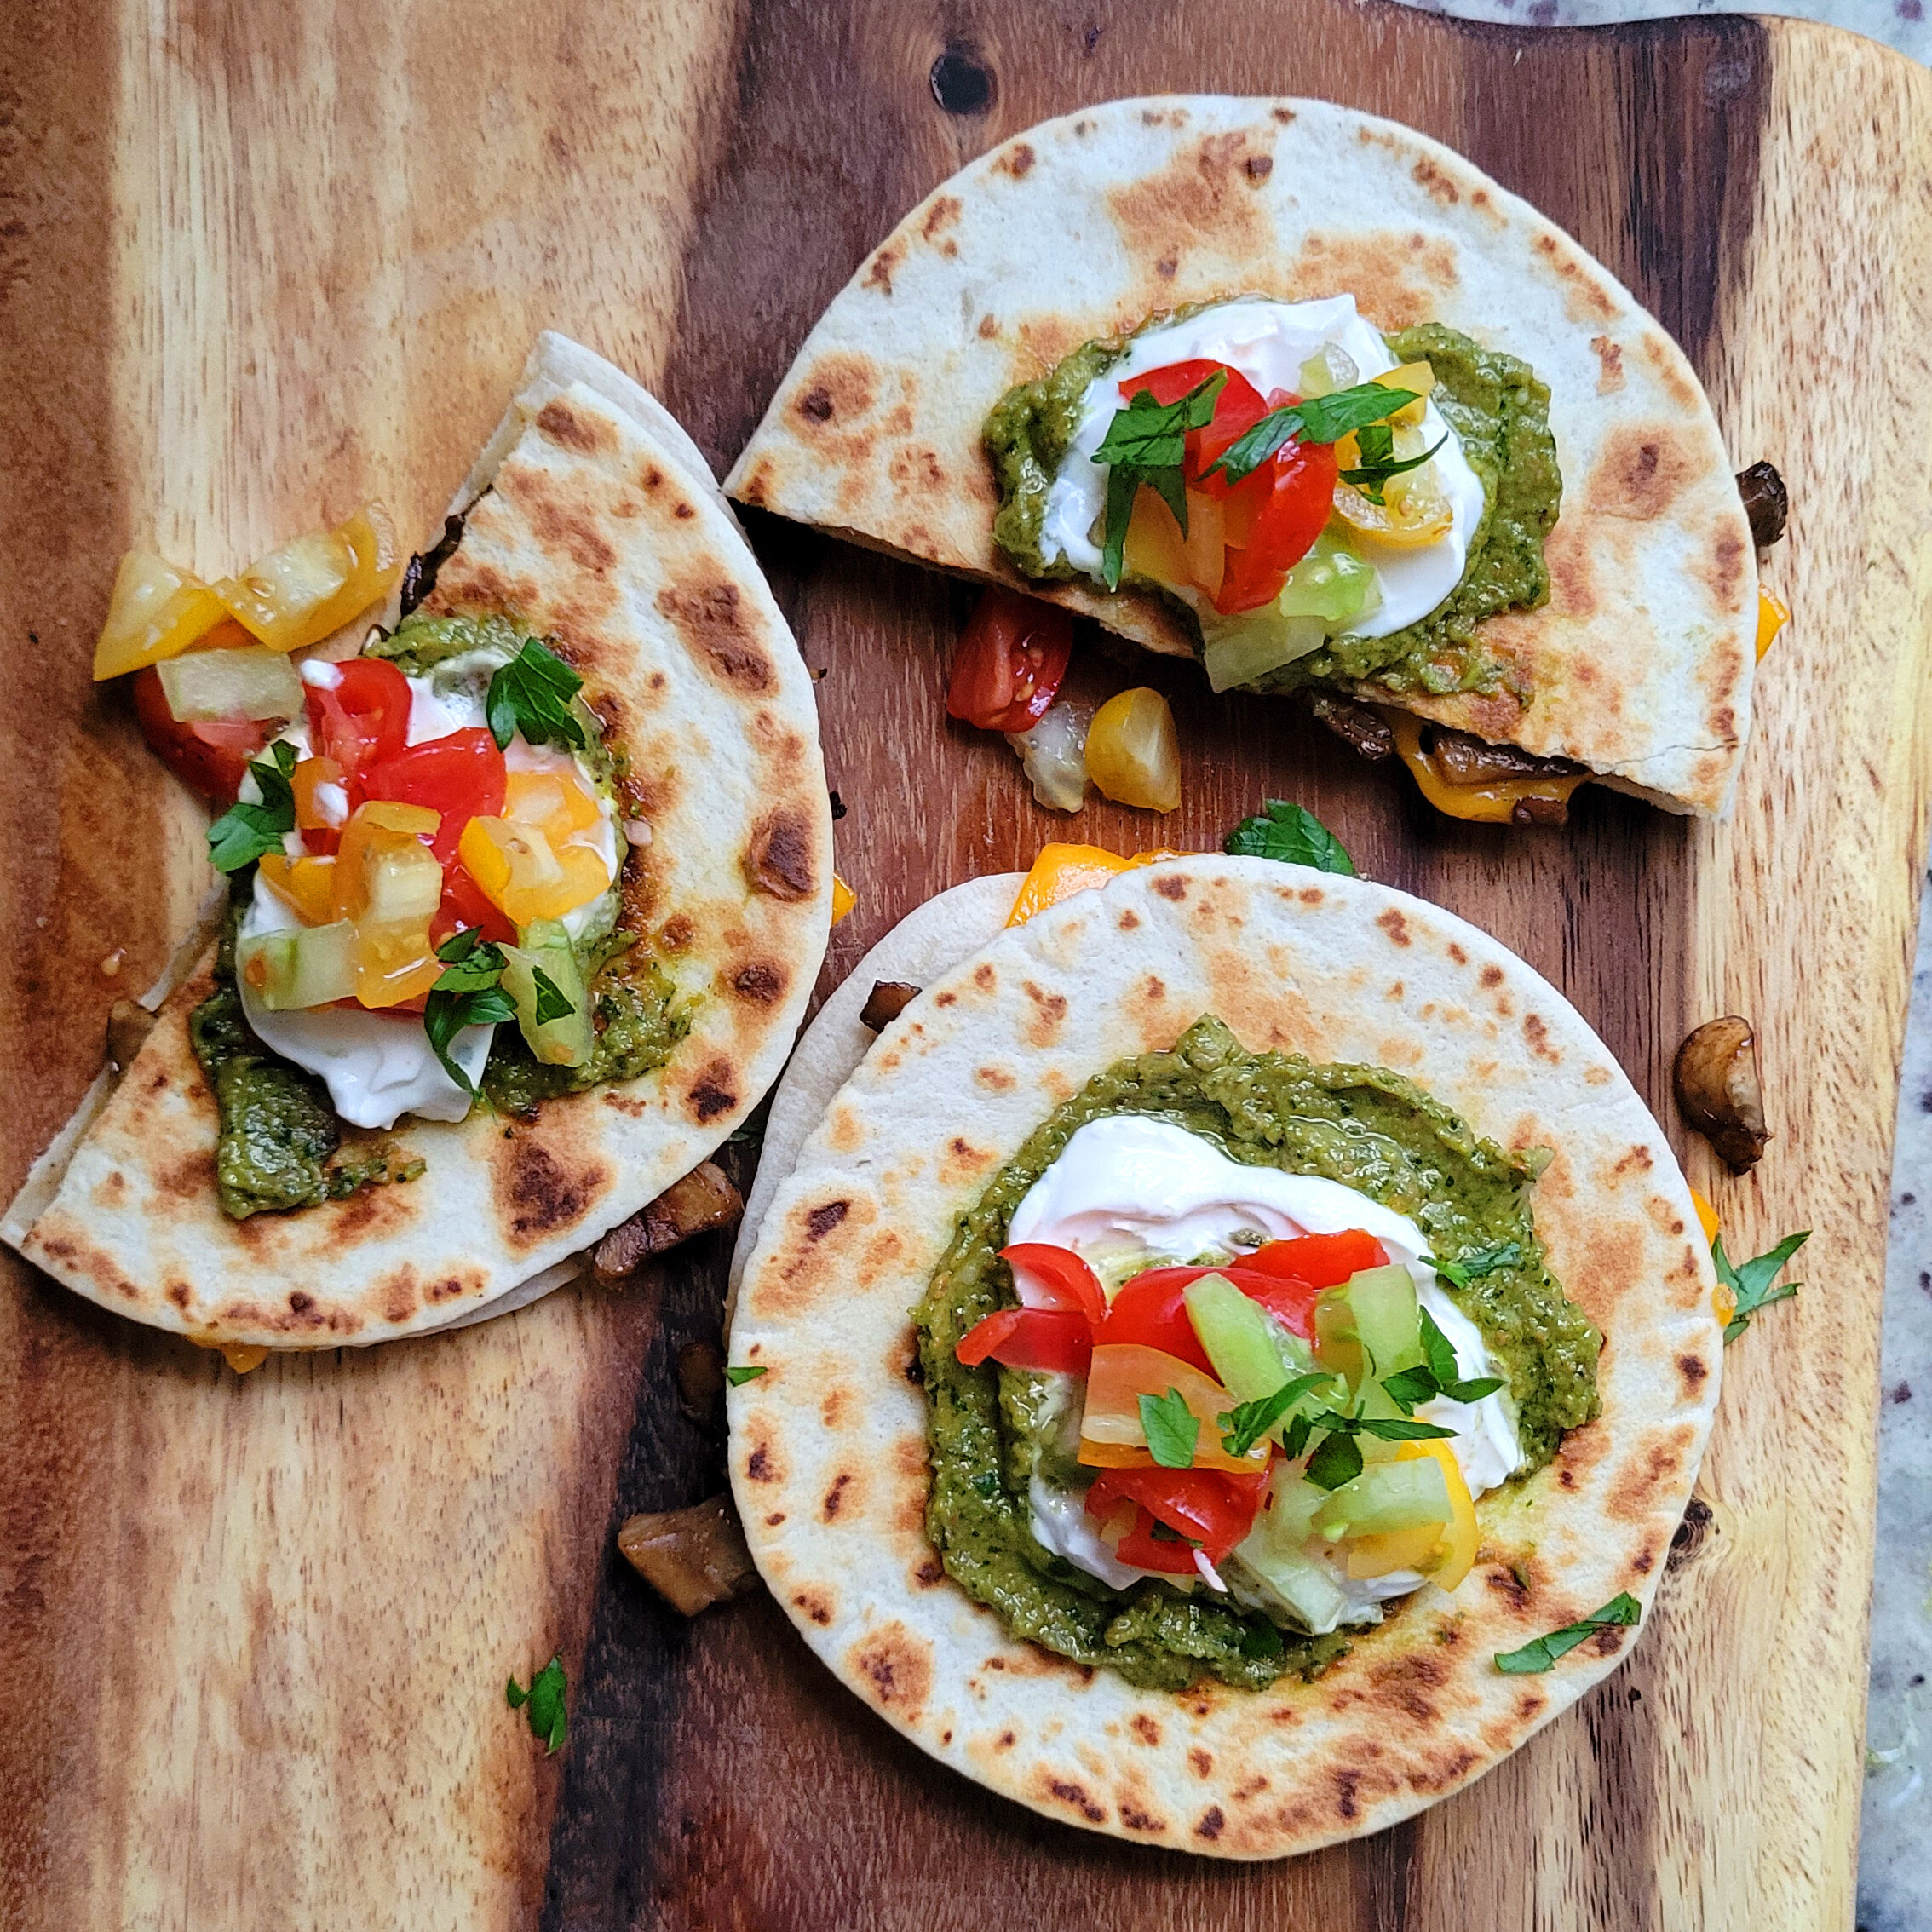
Copy Cat Taco Bell Supreme Quesadillas - Vegan
Let’s face it…no matter how good our intentions to eat healthy are, sometimes we just crave the kind of junk food that we know isn’t all that great for us? For me, that often tends to be Taco Bell! Don’t Judge! Is this a perfect vegan dupe for the steak and cheese supreme quesadilla from Taco Bell? Honestly, no! It's way WAY better!
Let’s face it…no matter how good our intentions to eat healthy are, sometimes we just crave the kind of junk food that we know isn’t all that great for us? For me, that often tends to be Taco Bell! Don’t Judge! Is this a perfect vegan dupe for the steak and cheese supreme quesadilla from Taco Bell? Honestly, no! It's way WAY better!
With American style slices from Follow Your Heart and the creamy tang of Tofutti sour cream no one would ever know these are Dairy Free! I do have a couple tips before we get rockin’ and rolling…
Dairy free cheese can get a bad wrap because it DOES take a longer time to melt than traditional cheese and if you’re not careful, in a recipe like this, or a grilled cheese, if you’re not careful you’ll end up burning the outside of the quesadilla or sandwich before the cheese inside is melted!
That’s where the microwave come in super handy! Simply take what will be the top of your quesadilla, place your cheese slices or shreds on it and pop it into the microwave for about 15 seconds! This is going give that dairy free cheese a little jump start on the melting. Simply flip over the tortillas and top your bottom tortilla and toppings that you have already started to cook…and continue to cook as normal!


What you are going to need to buy:
Mushrooms, diced (I buy what’s on sale. Don’t over think this. We are duping Taco Bell no need to for the wild, heritage, hand picked, expensive ones. White button mushrooms will work just fine.
Olive Oil
Liquid Smoke
Onion (white or yellow)
Minced Garlic - (we like these jarred options from Spice World!)
Salt and Pepper, to taste
Smoked Paprika, to taste
Tortillas - (We like the mini ones used for street tacos)
American Cheese - (love THESE SLICES from Follow Your Heart)
Pesto (for the homemade pesto recipe that I used…CLICK HERE)
Tomatoes
Sour Cream - (Our favorite is Tofutti)
You can really garnish this with whatever you like. A little lettuce? Sure. Some black olives? Why not? Got some leftover black beans? Go for it!
What you are going to need to do:
Begin by dicing your mushrooms and onions . The amount you need will depend on how many people you are feeding but remember that mushrooms lose a lot of volume when cooking. I’d plan for 1 cup (uncooked) per quesadilla.
In a medium skillet, with olive oil and a splash of Liquid Smoke, saute your veggies until soft.
After the mushrooms and onions have cooked 5-7 minutes, add your garlic and other spices so they do not burn. Cook another 1-2 minutes and remove from heat (Onto a paper plate or bowl)
Wipe out the skillet and assemble your quesadillas beginning with one tortilla topped with the mushroom/onion mixture.
This is where that cheese melting tip from the into comes in. Top your quesadilla with the 2nd tortilla (that you popped into the microwave to melt that cheese) cheese side down on top of the mushroom/onion mixture.
Griddle until tortillas is golden brown and crisp and flip to allow the other side to cook.
Remove from skillet and slice in half.
Top with your favorite, fresh, toppings and enjoy!

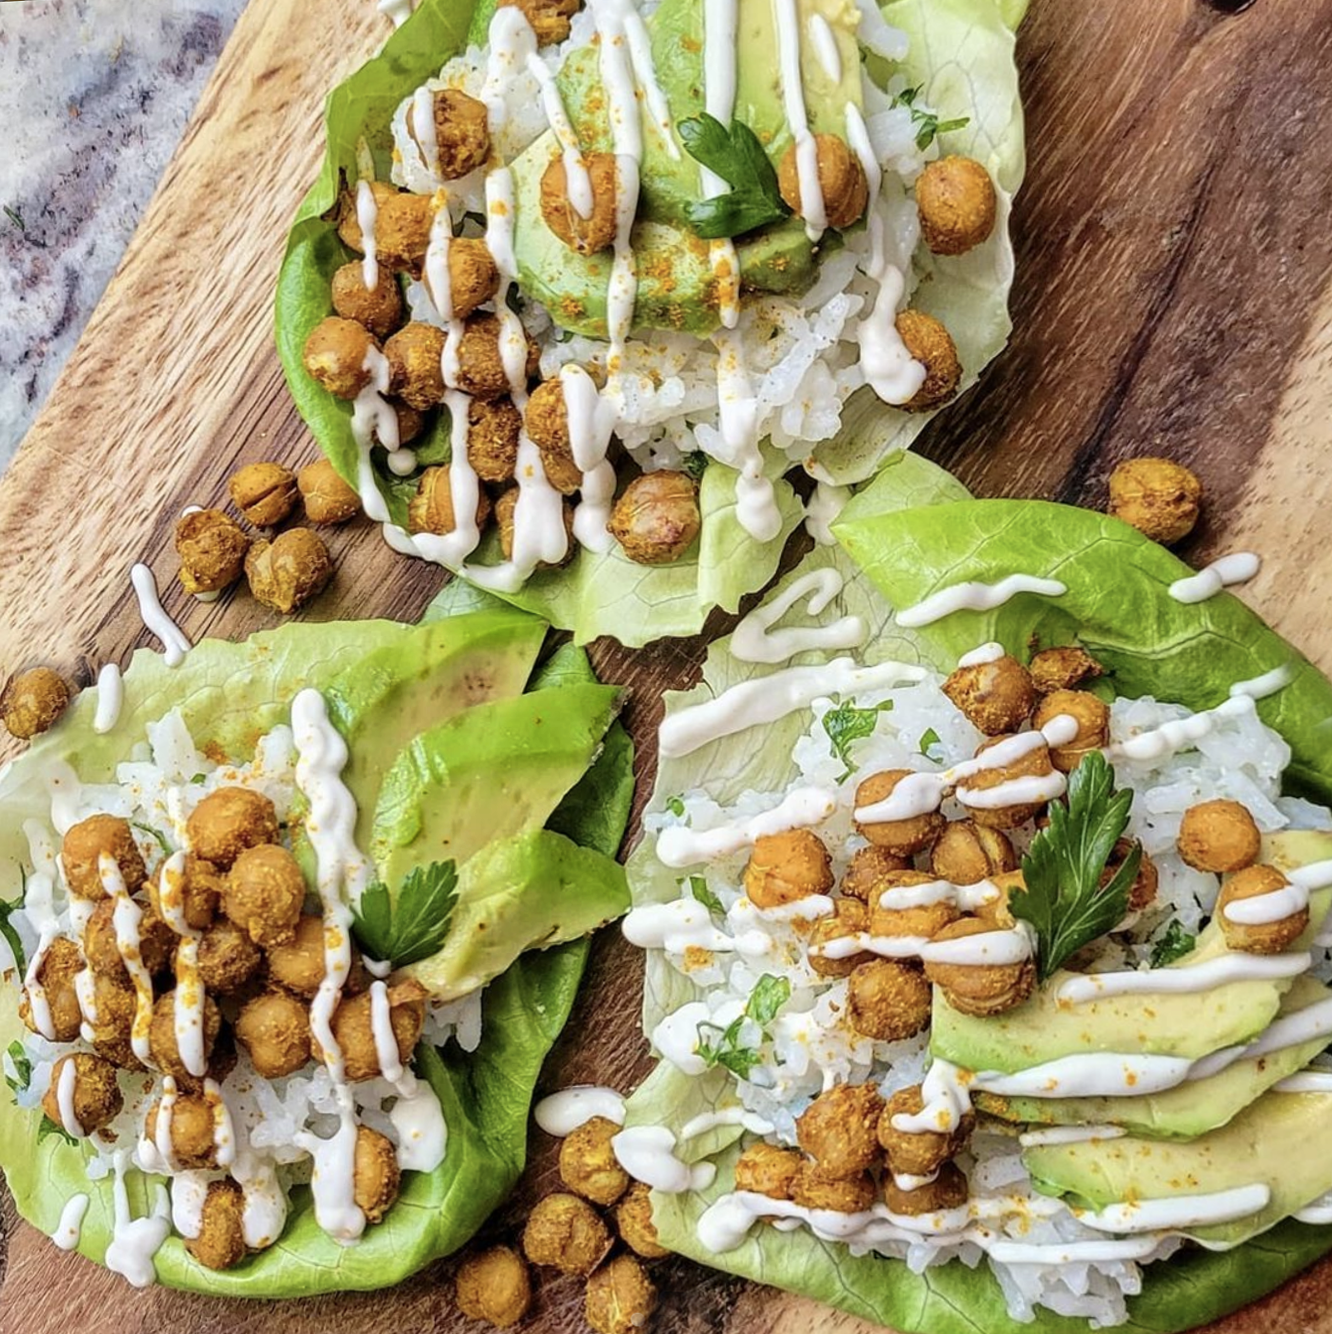
Curry Chickpea Lettuce Wraps with Cilantro Lime Rice
If you are craving the flavors of curry but are short on time you are going to love these Curry Chickpea lettuce wraps! They are shockingly easy and even with roasting the chickpeas only take about 15 minutes to pull together with less than 10 ingredients that you probably already have in your panty! I used the lettuce as the “wrap” for this recipe but it would be equally as good wrapped in a tortilla or stuffed into a pita!
Are you ready for the easiest lunch you could whip together in 15 minutes? I have legit been eating these Curry Chickpea Lettuce Wraps with Cilantro Lime Rice all of the time since I first made them a month or so ago!
If you are craving the flavors of curry but are short on time you are going to love these Curry Chickpea lettuce wraps! They are shockingly easy and even with roasting the chickpeas only take about 15 minutes to pull together with less than 10 ingredients that you probably already have in your panty! I used the lettuce as the “wrap” for this recipe but it would be equally as good wrapped in a tortilla or stuffed into a pita! Plus, the cilantro lime rice is so good you’re probably going to want to whip up a big batch to use in all kinds of dishes for the week!


What you are going to need to buy:
Lettuce
One can of Chickpeas
Curry Spice
White Minute Rice
Lime Juice
Fresh Cilantro, chopped fine (or parsley, if you must!)
Avocado
Dairy Free Sour Cream
What you are going to need to do:
Start by preheating your oven to 425
Open the can of chickpeas and drain. Do not rinse.
Keeping the chickpeas in the can add 1 tablespoon of curry spice to the can and swirl around so that all of the chickpeas get covered with the spices.
Place chickpeas on a baking tray with a silicone mat or lined with baking paper.
Bake for 15 minutes, rotating them on the pan about half-way through.
Prepare your rice per the boxed directions allowing 1/4 cup of cooked rice for each wrap you’re making.
Once the rice is finished cooking, add lime juice and cilantro (To taste…I like mine really lime-y)
Open and slice one small avocado.
Mix 3-4 tablespoons of sour-cream with a squeeze of lime juice, just to thin it out a little.
Assembly!
Using your lettuce as your “shell” place your roasted chickpeas on top of a bed of the cilantro lime rice. Add avocado and drizzle sour cream to finish. Garnish with more fresh herbs and a sprinkling of curry powder!
See, told you that was easy! Save any extra chickpeas to use in stews or just to eat as a salty and crunchy snack.
Enjoy!

Copy Cat Vegan Big Mac Special Sauce!
One thing about my Pops is how much he loves burgers...specifically Big Macs, so I knew if I was going to convince him to try a plant-based burger it would be my "Big Moc" that would do the trick. Let's just say it was a huge success...so much so that he requested I make him a bulk batch of my "Moc Sauce" to keep in the fridge.
Two all beef patties, special sauce, lettuce cheese, pickles, onions…all on a sesame seed bun! Who else remembers that little McD’s jingle from the late 80’s? Although it’s been two decades since I’ve had a Big Mac I can still remember the first one that I ate…on a Saturday morning, with my dad and my brother circa 1990…but let’s be real, all we really wanted to do was play on the playground!
One thing about my Pops is how much he loves burgers...specifically Big Macs, so I knew if I was going to convince him to try a plant-based burger it would be my "Big Moc" that would do the trick. Let's just say it was a huge success...so much so that he requested I make him a bulk batch of my "Moc Sauce" to keep in the fridge. #plantbasedwin


What you are going to need to buy:
Vegan Mayo - (We like THIS ONE from Hellman’s…who knew?)
Ketchup
Mustard
Relish, chopped fine
Minced Garlic - (we like these jarred options from Spice World!)
Salt & Pepper, to taste
Vinegar (Optional)
White Sugar (Optional)
Onion Powder
What you are going to need to do:
You guys, this is so easy! In a bowl combine the following ingredients!
1/3 cup of Mayo
3 tablespoons of Ketchup
1 tablespoon of Mustard
2 tablespoons of relish
1/2 teaspoon of minced garlic plus a splash of the oil/juice that the garlic is packed in
Onion Powder, salt and pepper, to taste.
Note: Depending on how you like your sauce you can also add a splash of vinegar and some white sugar. I preferred to add a bit more relish if I wanted it more sweet or a bit more mustard if I wanted it more tangy!
Store in the fridge, in an airtight jar or container, for up to 3 weeks…but trust me, it won’t last that long!
Enjoy!

Creamy Roasted Garlic Tomato Soup
The summer is fading fast into fall but if you’re like me you probably still have a bunch of tomatoes hanging around. If you’re looking for an easy and quick recipe to help you transition in to soup season this dish does the trick! So flavorful and creamy even your non-veggie family and friends will ask for seconds! Bonus: canning this soup is super easy and because it’s tomato based doesn’t require any extra processing to safely preserve!
This Tomato Soup is so easy and delicious you will wonder how you ever tolerated the canned stuff! The trick to really amazing tomato soup is super-ripe, almost mushy, tomatoes! The more ripe they are the sweeter and more complex their flavor, and the more tomato-y your soup will turn out.
The summer will soon be fading fast into fall but if you’re like me you probably still have a bunch of tomatoes hanging around. If you’re looking for an easy and quick recipe to help you transition in to soup season this dish does the trick! So flavorful and creamy even your non-veggie family and friends will ask for seconds! Bonus: canning this soup is super easy and because it’s tomato based doesn’t require any extra processing to safely preserve!


What you are going to need to buy:
Tomatoes - 8 small to medium vine ripened tomatoes will make abut 2 servings of soup. I recommend roasting 4 small - medium (think between the the size of a medium plum) for each serving
Sweet Onion
Olive Oil
Balsamic Vinegar
Sugar or Maple Syrup
Minced Garlic - (we like these jarred options from Spice World!)
Veggie Stock - 1 cup, per desired serving
Your favorite Vegan Cream Cheese - (We used this one from Kite Hill Foods)
Cayenne Pepper, to taste
Salt & Pepper, to taste
Paprika, to taste
Basil, Chives, Oregano (optional)
What you are going to need to do:
Preheat oven to 400 degrees
Start my chopping an onion (1/2 for 2 servings or a whole onion for 4 servings)
Lightly oil a large skillet, (one with deep sides works the best)
Cut tomatoes in half. and arrange in skillet cut side down along with onions and 2-3 tablespoons of garlic.
Sprinkle with 2 tablespoons of sugar and drizzle with 2 tablespoons of Balsamic Vinegar and a pinch of Cayenne Pepper.
Saute’ on medium/high heat until the onions are translucent and the mixture is bubbling.
Transfer your skillet to the oven and roast the mixture for 15-20 minutes checking occationally. If it’s looking too dry you can add 1/4 cup of water to the skillet to make sure that the mixture does not burn.
After 20 minutes remove the onions and tomatoes from the oven and add to the pot your veggie stock.
Simmer on the stove-top for another 10 minutes. You can also add any herbs you’d like at this time.
Using a stick blender, blend soup until smooth! No need to worry about small seeds and skins, they all get blended together. Optionally, if you don’t have a stick blender, carefully transfer the soup to a stand blender and blend until smooth.
Stir in the cream cheese 1/4 to1/2 cup depending on number of servings.
Add salt, pepper, and paprika to taste. You can also add a touch more cayenne at this time, if desired. If you like a sweeter tomato soup add another tablespoon of sugar or maple syrup at this time.
This soup is great garnished with toasted pine nuts and sun dried tomatoes!
Enjoy!

Loaded Impossible Nachos with Homemade Cashew Free Cheese Sauce!
Let’s be real…what’s the best part of nachos if it isn’t the cheese sauce? The main comment I hear from folks who are just transitioning into a plant-based lifestyle or who are simply trying to eat less dairy is, “…but, I just love cheese so much!” Me, too, my friends! Me, too! The dairy free cheese sauce that I used on this dish also makes a great sauce to top Mac ‘n Cheese or to make your own at home hamburger-helper casserole. And this cashew free version is even safe for our friends with allergies!
Let’s be real…what’s the best part of nachos if it isn’t the cheese sauce? The main comment I hear from folks who are just transitioning into a plant-based lifestyle or who are simply trying to eat less dairy is, “…but, I just love cheese so much!” Me, too, my friends! Me, too! The dairy free cheese in this recipe is something you’re going to just want to make and have on hand…so you can drizzle it on everything. Trust me!
The world of plant based cheese has come a long way in the past 20 years since I stopped eating meat…A LONG way but so many of the cheese sauces at restaurants and available in stores contain cashews but this recipe, made with some of my favorite ingredients from brand like Violife, Earth Balance, Tofutti, and Rise Brewing is safe for our friends with nut allergies and is still 100% plant based!


What you are going to need to buy:
For the Nachos:
White of Yellow Onion, diced (Some to cook with the meat and some raw to sprinkle on top)
Liquid Smoke
Olive Oil
Minced Garlic - (we like these jarred options from Spice World!)
Nacho/Taco Chips - (I used these from GOOD & GATHER)
Tomatoes, Diced
Sour Cream - (I’m a pretty die-hard Tofutti fan, so that’s what I always use!)
Salt and Pepper, to taste
Optional: Avocado, Black Olive, Fresh Herbs (Whatever else you like on your Nachos)
Fresh Lime
For the Cheese Sauce:
Non-Dairy Butter - ( We used Earth Balance)
Flour
Organic Oat Milk from RISE BREWING - (Can you use something else…um, yeah, but why?)
Non-Dairy Cheese Shreds - (We used THESE CHEDDAR SHREADS from VioLife!)
Non-Dairy Sour Cream - (in our opinion Tofutti is the OG…and also the best!)
Yellow Mustard - (yes, just trust us!)
Salt and Pepper, to taste
Garlic and Onion Powder, to taste
What you are going to need to do:
Okay, let’s tackle the cheese sauce first: This recipe is probably going to make way more sauce than you’ll need unless you’re making nachos for a party BUT trust me, you’ll find all kind of other uses for it and it keeps in the fridge just fine!
In a medium pot, on low heat, melt about 2 tablespoons of butter and gently allow butter to brown, but not burn, because we’re going to make a roux.
Sprinkle 2 tablespoons of flower on top of the melted butter and whisk to combine. Cook mixture for about 30 seconds and then slowly add 1.5 cups of oat milk, whisking the entire time so that no lumps form. Bring to a boil and let boil about 30 seconds.
Stir in 1/3 cup of sour cream.
Add 1 tablespoon of yellow mustard…don’t be afraid, just do it! (You can use brown mustard, if you like it!)
Reduce heat and add the cheddar shreds (yes, the whole bag), stirring to melt.
Continue to stir, on low/medium heat, until everything is melted.
Add salt and pepper, and garlic/onion powder to taste. It will take more salt than you think…a full teaspoon isn’t too much!
…And, boom! vegan cheese sauce! If it seems thin, increase the heat and let simmer for 1-2 minutes, but remember it will tighten up as it cools.
A note about ingredients and brands: I’ve been plant-based for 20 years and believe me, I’ve seen quite the evolution of dairy-free products, particularly, when it comes to milks and cheeses! The products and brands that I recommend for this recipe are not sponsors and I don’t get paid to promote them…they are, simply, in my opinion, the best options, for this dish! Can you use something different? Sure. Can you substitute one brand for another? Of course…but this is legit the best cheese sauce that I’ve had, plus…it’s quick, easy, and also cashew free, so if you want to make THIS delicious version, in your home kitchen, I’d say, stick with these brands!
Now, for the rest of the nachos: In a skillet on medium heat saute your diced onions and garlic in a little olive oil. Once the onions get a little soft (2-3 minutes) add your Impossible Ground and a splash of liquid smoke and cook meat until brown. (Don’t be afraid to let some of the meet get a little “well-done” - those little crispy bits are delicious!)
Add the salt and pepper, to taste, and remove from heat.
The rest is pretty standard nacho assembly. Start with a layer of chips. Layer the meat on top, followed by drizzling your homemade cheese-sauce. Next comes the fresh toppings, (ie: tomatoes, onions, olives, avocado) and finished off with sour cream and fresh herbs! I like a fresh squeeze of lime juice over the top of mine…and enjoy!

Greek Inspired Impossible Kebabs with Tabouli and Tzatziki Sauce!
Need a dish that cooks up quickly, tastes amazing, and looks super impressive on the plate? You’ve got to try these Greek-inspired Impossible Kebabs served on a bed of Tabouli and topped with my homemade Tzatziki Sauce! And, no...you don’t need a grill to make a great kabob! These cooked up, quick and easy, in about 20 minutes...the whole meal is on the table in just 30 minutes!
Need a dish that cooks up quickly, tastes amazing, and looks super impressive on the plate? You’ve got to try these Greek-inspired Impossible Kebabs served on a bed of Tabouli and topped with my homemade Tzatziki Sauce! And, no...you don’t need a grill to make a great kabob! These cooked up, quick and easy, in about 20 minutes...the whole meal is on the table in just 30 minutes!
Now, full disclosure, the tabouli in this recipe isn’t traditional. Typically tabouli would include diced tomatoes. For these kabobs, I knew that I wanted to use tomatoes on the actual kabobs so I decided to use olives in the tabouli instead. That’s honestly one of the most fun parts about cooking…don’t let yourself get too stressed about of ingredients and swapping out certain flavors for something else that you might prefer.


What you are going to need to buy:
Impossible Ground - (or whatever brand of plant-based meat you love)
Minced Garlic - (we like these jarred options from Spice World!)
Liquid Smoke
Tomatoes
Onions
Flat Leaf Parsley
Fresh Mint
Black Kalamata Olives
Balsamic Vinegar (a white balsamic will be better for this recipe)
Olive Oil
Lemon Juice
Salt & Pepper, to taste
These ingredients are for the Kabobs and the Tabouli - you can find the recipe for my homemade Tzatziki sauce HERE!
What you are going to need to do:
Preheat your oven to 400 degrees.
If you are using wood kabob sticks, make sure to soak them in water…you can do this while you make the pesto.
To start, in a medium bowl mix together your plant-based ground, minced garlic, to taste, a tablespoon, or so and a tablespoon of liquid smoke. Mix well.
For these kabobs, I formed my plant-based ground into little ‘bricks about 1 inch by 2 inches.
In a skillet, on medium heat, with a little olive oil, sear the little bricks on all sizes to get a nice color and some good char.
After all of the ground has been seared, you can begin to assemble your kabobs, alternating the meat and the tomatoes (or your choice of veg.
Place the kabobs onto a baking sheet and bake for 15 minutes, turning halfway through.
In the meantime…let’s make some Tabouli
It’s pretty straightforward and mainly just involves some chopping. You could even use a food processor if you’re not comfortable with all the dicing.
The trick to good tabouli, in my opinion, is making sure that everything is chopped/diced very fine.
Chop your parsley and mint into a very fine mixture. To the herbs add your finely diced tomatoes, some minced garlic. and finely chopped olives. Note: using olives in tabouli isn’t traditional. Typically you would use diced tomatoes. For these kabobs, I knew that I wanted to use tomatoes on the actual kabobs so I decided to use olives in the tabouli.
To your herbs and diced veg add balsamic vinegar, olive oil, and a splash of lemon juice.
Now, CLICK HERE for the instructions to make the Vegan Tzatziki Sauce to top these kabobs.
Serving!
Serve these kabobs on a bed of fresh tabouli and topped with your vegan tzatziki sauce.
Enjoy!