


"Big Moc" Handpies with Vegan Special Sauce!
These "Big Moc" hand pies stuffed with roasted potatoes, sauteed onions, cheese, and impossible ground mixed with my “Big Moc” Special Sauce turned out even better than I expected! Served with a little more sauce for dipping plus a couple pickles and chips! Not a particularly sophisticated dinner but tasted pretty great and trust me, your kiddos will love them!
These "Big Moc" hand pies stuffed with roasted potatoes, sauteed onions, cheese, and Impossible ground mixed with my “Big Moc” Special Sauce turned out even better than I expected! Served with a little more sauce for dipping plus a couple pickles and chips! Not a particularly sophisticated dinner but tasted pretty great and trust me, your kiddos will love them!
Some of you all will remember a few weeks back when my Pops requested a batch of my "Big Moc" sauce...well, there was just a bit of that batch left in the fridge when I was at their place over the weekend and I happened to have some Impossible Burgers in the freezer, but no burger buns and I was too lazy on a Saturday nignt to go run to the store to grab any so…these little babies were born!


What you are going to need to buy:
1 Frozen Pie Crust, thawed - (If you want your hand pies to be vegan you’re likely going to need to make your own crust, although Wholly Wholesome does make a vegan pie crust option!)
1 Plant Based Ground Beef - (I used an Impossible Burger)
1 cup of diced Potatoes
1/2 cup of diced Onions
1 teaspoon Minced Garlic - (we like these jarred options from Spice World!)
2 Dairy Free Cheese (Slices are easier for this)
Liquid Smoke, just a splash
Salt & Pepper, to taste
1/4 cup of “Big Moc” Special Sauce! (CLICK HERE FOR THAT RECIPE!) + more for dipping
What you are going to need to do:
Start by preheating your oven to 350
Filling will depend on how many pies you want to make. This recipe made two pies.
Dice your potatoes an onions into 1/2 inch pieces and saute on the stove-top until soft and golden, adding the minced garlic towards the end of cooking so it doesn’t burn, and salt and pepper, to taste.
In the same skillet, brown your plant-based ground beef with a little splash of Liquid Smoke. Set aside and let cool for a couple minutes.
Add your special sauce to the meat so the meat is well coated but not runny. The pies will dry out a bit in the oven so you can add a little more sauce than you think you’ll need as long as the meat isn’t going to run or drip out of the pie shell when you’re trying to close it.
Roll out your pie crust and cut four rectangles that are each roughly 3.5 x 6
Note: You can really use any shape that you like…even a circle is fine but I found that I have less waste by using rectangles.
Place both of the fillings into the center of the bottom crust making sure to leave a border around the edge so that you can seal the pies. Don’t be afraid to pile the filling pretty high because it will shrink down in cooking.
Top your fillings with a slice of your favorite dairy free vegan cheese. I found that a cheese slice worked best for this.
Run a wet finger around the border of the bottom crust to help with sealing the pie.
Gently place the top pie crust. If you have piled your filling pretty high it’s going to seem like it won’t fit, but you can gently pull on the crust and using the tines of a fork, crimp all edges to seal the entire pie.
Dock the top of each handpie with a fork several times to create some steam holes for cooking.
To make sure that the top crust browns nicely you can lightly mist the top of the pies with a cooking spray.
Loosely tent the pies, with tin foil, for the first 15 minutes of cooking so that the edges don’t get too dark before the rest of the crust as time to bake.
After 15 minutes, remove the foil and bake another 15 minutes uncovered.
At this point, it’s just a matter of watching your pies to see when the top has baked through and browned up nicely. Mine ended up baking for 18-19 minutes uncovered instead of the 15. Just keep your eye on them.
Let rest for about 2 minutes before serving. I like to serve mine with some extra special sauce on the side for dipping!
Enjoy!

Corn'd Beef Sandwich with Quick Pickl'd Collard Greens
While collard greens might not be the traditional way to top a corn'd beef sandwich, the fibrous texture of collards makes them the perfect green to pickle. Unlike some other, more delicate greens, collards are easily able to retain their texture and bring a
While collard greens might not be the traditional way to top a corn'd beef sandwich, the fibrous texture of collards makes them the perfect green to pickle. Unlike some other, more delicate greens, collards are easily able to retain their texture and bring a delicious sweet and tangy crunch that pairs perfectly with the salty corn'd beef of this famous sandwich.


Irish or not, we promise that it's so good, you'll definitely want to kiss someone! The best part? You can store these Quick Pickl'd Collard Greens in the fridge for up to a month!

Corn'd Beef Sandwich with Quick Pickl'd Collard Greens
Author: Sarah | April 19, 2021
Servings: 4
prep time: 15 minutes
cook time: 8 hours - Overnight
total time: 24 hours
Ingredients: What You need to buy!
2 c. of Palmetto Greens chopped collard greens, think the texture you'd use for the cabbage in coleslaw.
1/2 medium, white onion, diced
1 t. salt
1 t. black pepper
2 tsp. minced garlic
1 t. dill seeds
1 t. fennel seeds
1/2 c. white vinegar
1/2 c. of maple syrup
Ingredients: To make the Sandwich
Seeded Sourdough Bread
Dairy-Free Cream Cheese
Vegan Corn'd Beef
Quick Pickles Collard Greens
Dairy-Free Thousand Island Dressing
Instructions: What You need to do!
Pack the chopped collard greens and diced onion into a mason jar and add all spices.
In a microwave-safe measuring cup, mix the vinegar and maple syrup, and heat for 1 minute, until hot.
Pour the hot liquid over the greens/onion mixture, seal, and shake to combine/mix well.
Refrigerate for a minimum of 60 minutes, up to overnight, before using.
Lightly toast two pieces of Seeded Sourdough Bread either in a hot skillet or traditional toaster
Spread Dairy-Free Cream Cheese onto the bottom piece of the Seeded Sourdough Bread.
Layer Corn'd Beef and top with a generous portion of the Quick Pickl'd Collard Greens.
Spread Thousand Island Dressing onto the second piece of bread and top the sandwich!
Seriously, since I made these Quick Pickl'd Collard Greens I have been eating them on everything! I hope that you’ll try this simple, spring, recipe! Trust me, you won’t be disappointed! I’d love to see your kitchen creations! Remember to tag me on IG @plantbasedgingr to keep in touch!
Love, Light, and Lentils, my friends!
Sarah

Tofu and Chickpea Vegan "Egg Salad"
After over 22 years of being plant based...I think I've tried just about every version of vegan egg salad out there but even with the good ones, the great ones, there is always something not quite right...until now! Now, admitadly, there are a couple of steps to this recipe but nothing that’s going to take any longer than the time it would take to actually boil eggs!
After over 22 years of being plant based...I think I've tried just about every version of vegan egg salad out there but even with the good ones, the great ones, there is always something not quite right...until now! The trick to this recipe is getting your hands on some black salt (which isn’t black at all…it’s kind of pink!) and yes, I’m going to just say it now…you’re probably going to need to order it online!

Now, admittedly, there are a couple of steps to this recipe but nothing that’s going to take any longer than the time it would take to actually boil eggs!
Traditional egg salad has a couple of different textures going on, even if it might not seem so…the whites of a boiled egg are rubbery and even a bit bouncy while the yolks are crumbly and even a little chalky! In order to try and duplicate both textures we’re going to use both extra firm tofu and chickpeas for the filling.
What you are going to need to buy: Makes 2-3 servings
Extra Firm Tofu, 8 oz, crumbled
Drained Chickpeas, 1/2 cup, lightly mashed with a fork
Vegan Mayo
Yellow Mustard
Black Salt, tiny pinch
Minced Garlic (Optional)
Relish
Salt and Pepper, to taste
What you are going to need to do:
In a medium mixing bowl lightly mash the chickpeas with the tines of a fork until they become slightly creamy but there are still some lumps. Again, think of the texture of the yolks of boiled eggs.
Drain and lightly press your tofu to remove excess moisture. No need to press for any length of time, just between several paper towels for 30 seconds or so.
Crumble the tofu into the bowl. You want slightly larger pieces than you would expect to have when you dice hard boiled eggs because the tofu will crumble a bit more when you stir everything together.
Add a tiny pinch of the black salt. This is what is going to give you that sulfur or eggy flavor. JUST A PINCH…a little goes a long way and you can always add more.
Now, I’m not going to give measurements for the Mayo/Mustard/Relish situation because everyone likes their egg salad a bit different…but mix in your condiments, add salt and pepper, and taste for seasoning.
At this point you can add in a little more black salt if you like. Again…add sparingly.
Combine well and serve sandwich style with your favorite toppings. I love mine with tomato and lettuce on white bread.
And, there you have it! The search is over…perfect vegan egg salad! Remember to save your aquafaba to use in another recipe or froth it up with a splash of maple syrup and add to your morning coffee! I do hope that you’ll try this recipe! Tag me online when you at @plantbasedgingr so that I can see all of your delicious creations!
Love, Light, and Lentils, my friends!
Sarah

Homemade Gyros with Vegan Tzatziki Sauce!
This Homemade Vegan Tzatziki Sauce is one of my very favorite things to make at home. It’s good on so many things from the traditional gyro to fresh veggies and pita, even avocado toast and sandwiches! Plus, with just 7 ingredients it comes together in less than 5 minutes.
This Homemade Vegan Tzatziki Sauce is one of my very favorite things to make at home. It’s good on so many things from the traditional gyro to fresh veggies and pita, even avocado toast and sandwiches! Plus, with just 7 ingredients it comes together in less than 5 minutes.

This vegan tzatziki sauce is so good you’re going to want to eat it on everything! Seriously…I used it on my avocado toast the morning after I made these gyros! Made with ingredients that you probably already have at home, is it authentic…eh, not quite! Is it dairy free, easy, and delicious? You bet!
What you are going to need to buy:
Vegan Mayo
Vegan Sour Cream - (On this page we are big fans of Tofutti Sour Cream!)
Minced Garlic - (We like these jarred options from Spice World!)
Cucumber (1/2 diced and 1/2 shredded)
Fresh Dill
Salt & Pepper
Lemon Juice
What you are going to need to do:
Like I teased in the intro…this sauce is not particularly authentic but the flavor is so good you’ll never know!
In a medium bowl mix together the following:
1/2 cup of your Tofutti Vegan Sour Cream
1/2 cup of Vegan Mayo
1/2 cup of finely shredded cucumber, only lightly drained.
1 tablespoon of minced garlic
1/4 cup of fresh, minced dill
1 teaspoon of lemon juice
Salt and Pepper, to taste
You can always thin the mixture out with a splash of water if necessary! See! I told you it was super simple! Store in the fridge for up to a week.
I serve my gyros with sauteed mushrooms cooked with a little liquid smoke and garlic.
It’s one of my favorite recipes to serve to a crowd because everyone can make their own and add or subtract the toppings they like! As you can see...I like mine fully loaded!

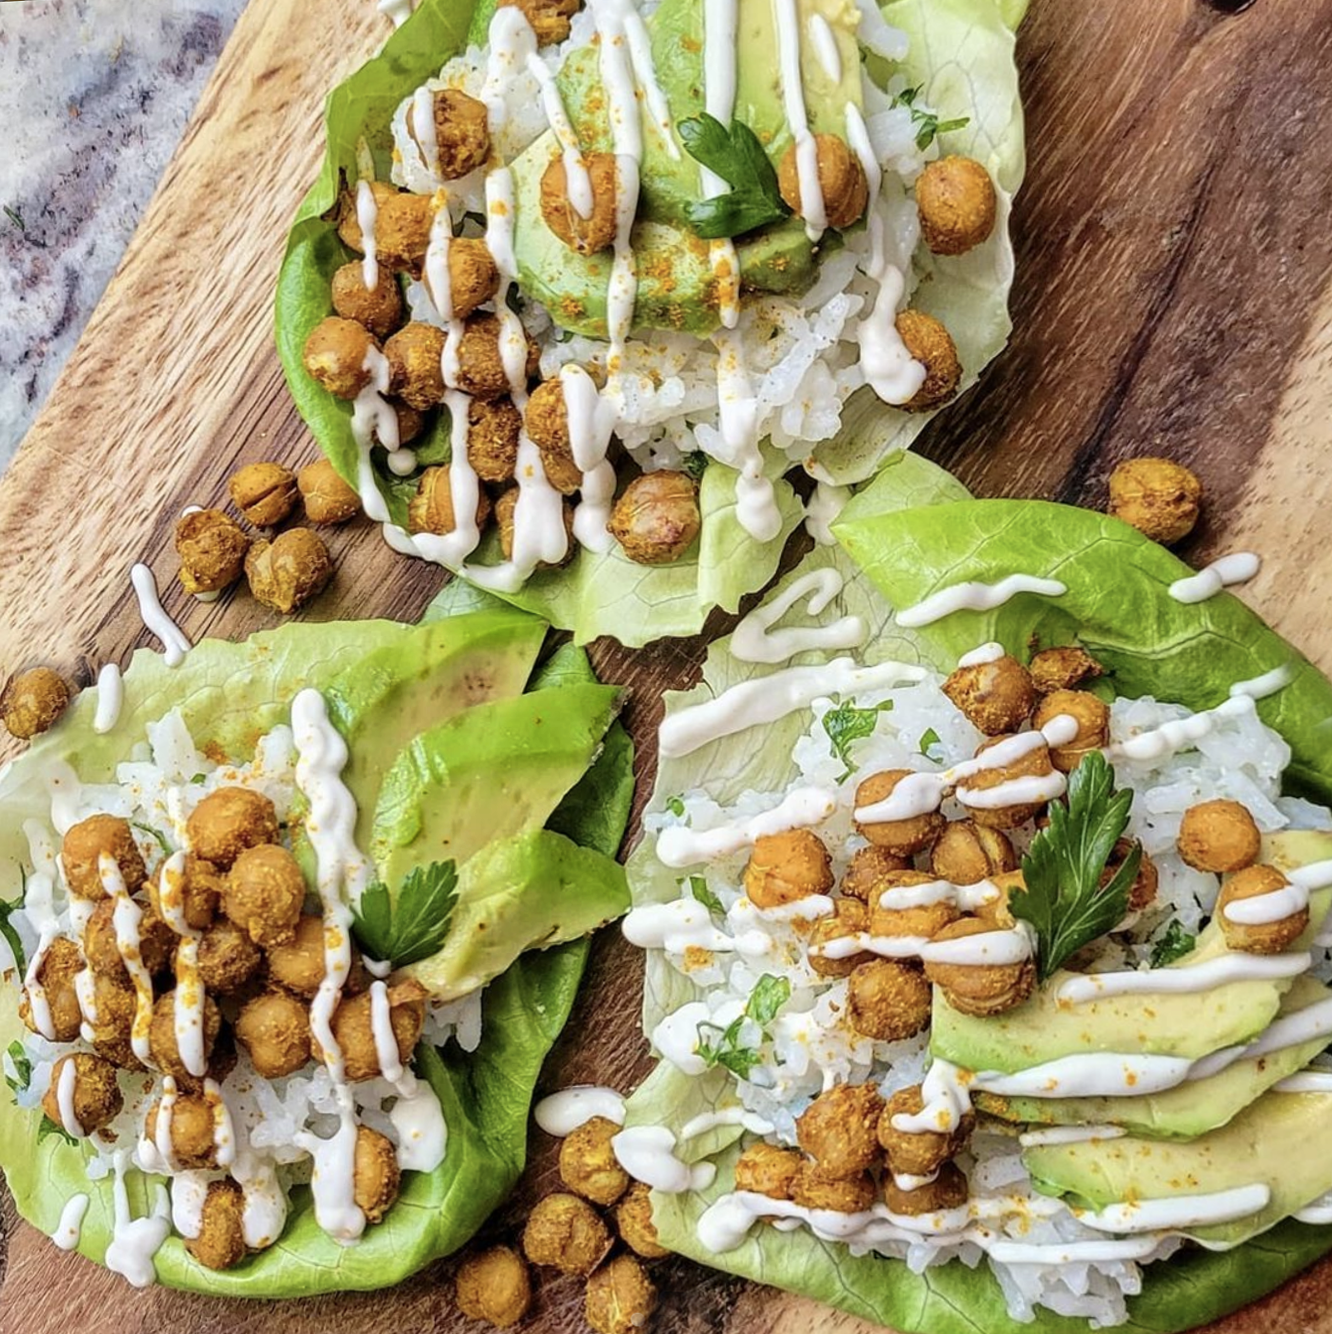
Coconut Curry Chickpea Lettuce Cups with BeanVivo!
If you are craving the flavors of curry but are short on time you are going to love these Curry Chickpea lettuce wraps! They are shockingly easy and even with roasting the chickpeas only take about 15 minutes to pull together with less than 10 ingredients that you probably already have in your panty! I used the lettuce as the “wrap” for this recipe but it would be equally as good wrapped in a tortilla or stuffed into a pita!
Are you ready for the easiest dinner you could whip together in 15 minutes with less than 10 ingredients? Thanks to our friends at BeanVivo these Coconut Curry Chickpea Lettuce Cups with with Cilantro Lime Rice and Pineapple are so simple to make and packed full flavor even the pickiest eaters in your house are sure to gobble them up!
If you’re not familiar with BeanVivo…you should be! Their mission was to develop tasty meals & snacks for people on-the-go, like you and me, by using simple organic ingredients. They combine one of nature’s most nutritious ingredients, not to mention one of my favorites, on our planet…beans, with tons of unique herbs and spices from around the world. Their ready to eat packs are sustainable, convenience (ready to eat in 60 seconds) and are totally gluten-free, and vegan! So…let’s cook!
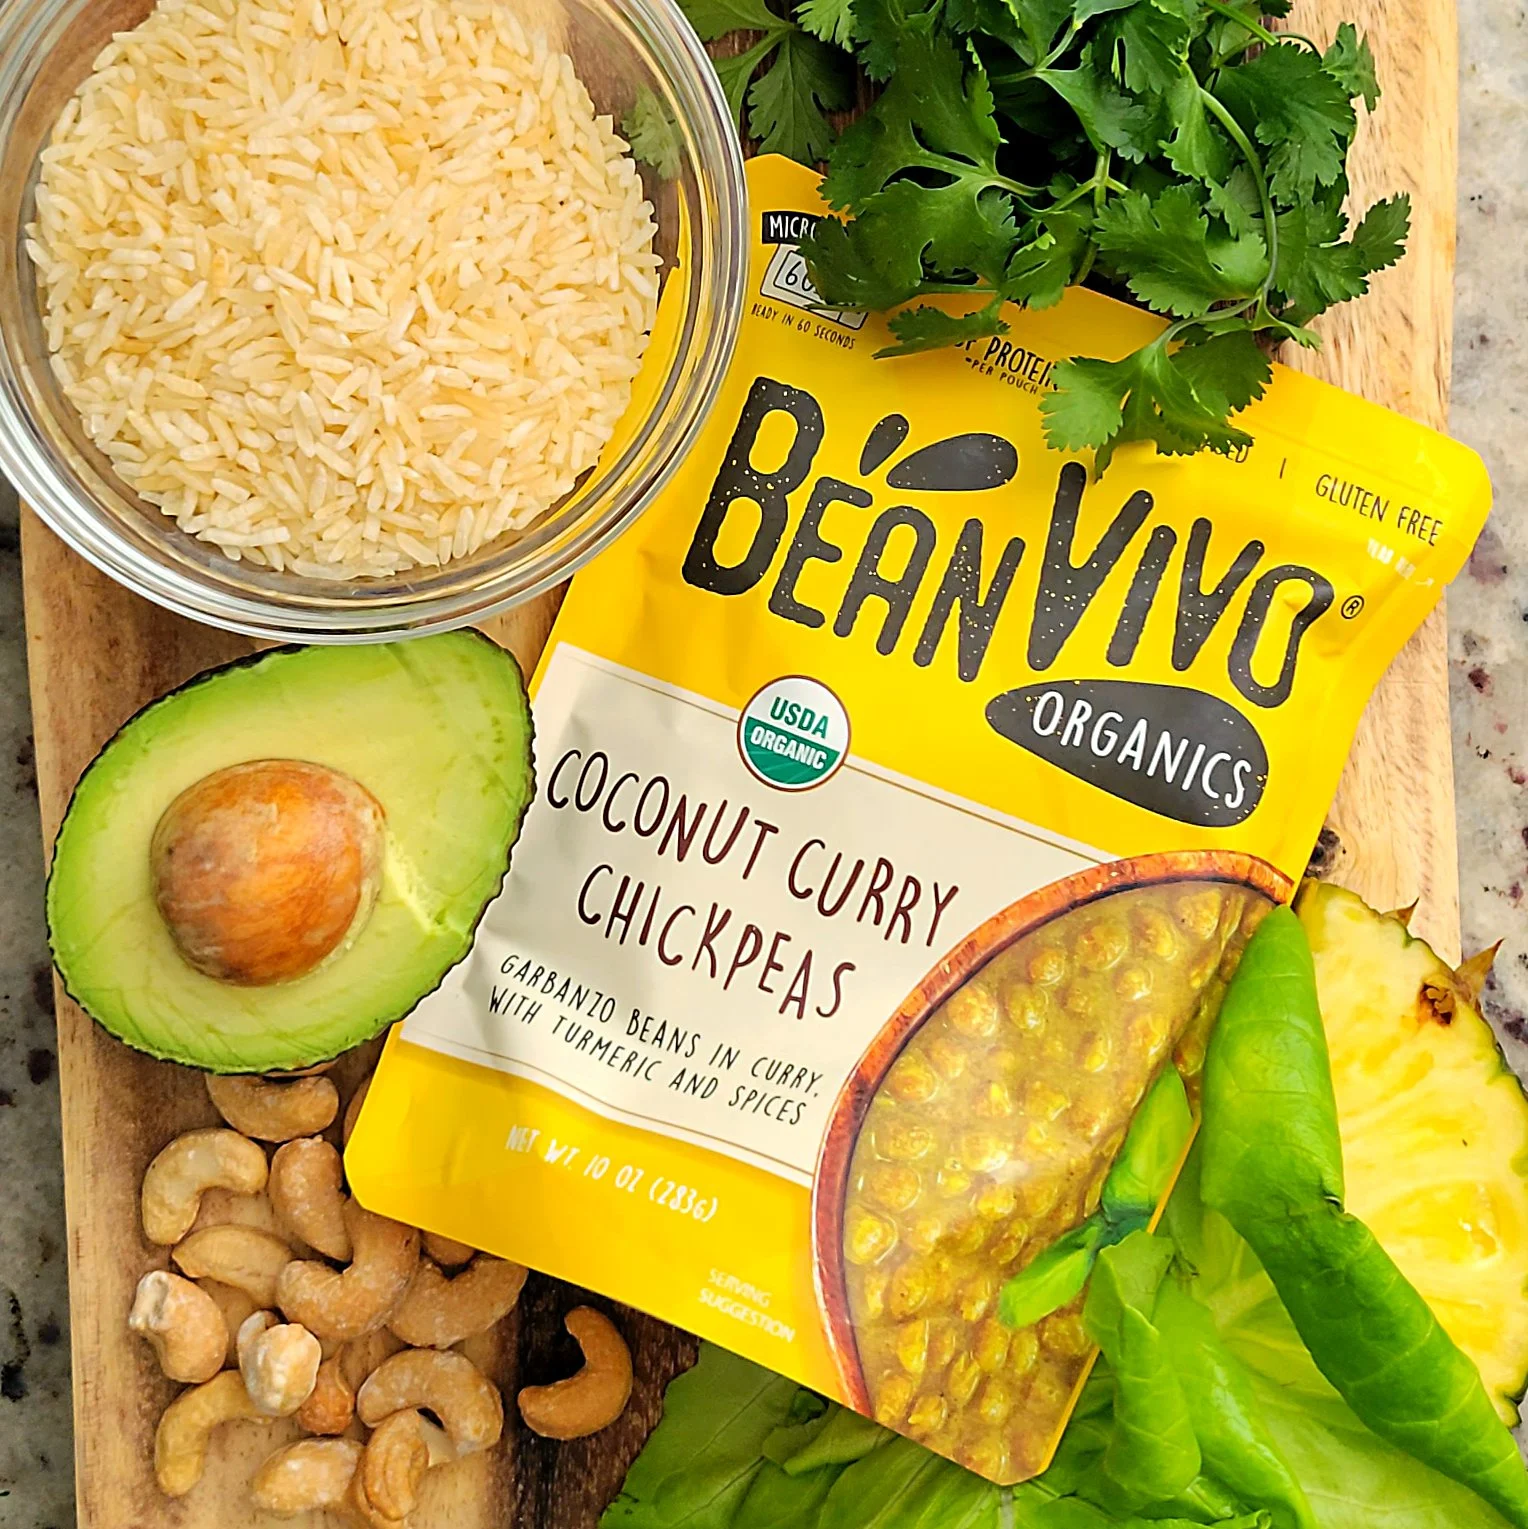


What you are going to need to buy:
Lettuce, use your favorite…I like butter lettuce
One packet of Coconut Curry Chickpeas from BeanVivo
Minute Rice
Dairy Free Butter
Lime Juice
Fresh Cilantro, chopped fine (or parsley, if you must!)
Avocado
Chopped Pineapple
Cashews
What you are going to need to do:
To begin, prepare your rice per the boxed directions allowing about 1/4 cup of cooked rice for each serving (3 lettuce cups, per serving)
Once the rice is finished cooking, stir in 1 teaspoon of butter, and add lime juice and cilantro (To taste…I like mine really lime-y)
Open and slice one small avocado.
Slice fresh pineapple into 1/4 inch chunks
Open your packet of Coconut Curry Chickpeas from BeanVivo . The best part is that you don’t even need to heat them! They are super delicious, right out of the packet!
Assembly!
Using your lettuce as your “shell” spoon your Coconut Curry Chickpeas from BeanVivo on top of a bed of the cilantro lime rice. Add avocado, diced pineapple, and cashews!
See, told you it was easy! Check out all the delicious combinations of BeanVivo products at their website HERE!

Curry Chickpea Lettuce Wraps with Cilantro Lime Rice
If you are craving the flavors of curry but are short on time you are going to love these Curry Chickpea lettuce wraps! They are shockingly easy and even with roasting the chickpeas only take about 15 minutes to pull together with less than 10 ingredients that you probably already have in your panty! I used the lettuce as the “wrap” for this recipe but it would be equally as good wrapped in a tortilla or stuffed into a pita!
Are you ready for the easiest lunch you could whip together in 15 minutes? I have legit been eating these Curry Chickpea Lettuce Wraps with Cilantro Lime Rice all of the time since I first made them a month or so ago!
If you are craving the flavors of curry but are short on time you are going to love these Curry Chickpea lettuce wraps! They are shockingly easy and even with roasting the chickpeas only take about 15 minutes to pull together with less than 10 ingredients that you probably already have in your panty! I used the lettuce as the “wrap” for this recipe but it would be equally as good wrapped in a tortilla or stuffed into a pita! Plus, the cilantro lime rice is so good you’re probably going to want to whip up a big batch to use in all kinds of dishes for the week!


What you are going to need to buy:
Lettuce
One can of Chickpeas
Curry Spice
White Minute Rice
Lime Juice
Fresh Cilantro, chopped fine (or parsley, if you must!)
Avocado
Dairy Free Sour Cream
What you are going to need to do:
Start by preheating your oven to 425
Open the can of chickpeas and drain. Do not rinse.
Keeping the chickpeas in the can add 1 tablespoon of curry spice to the can and swirl around so that all of the chickpeas get covered with the spices.
Place chickpeas on a baking tray with a silicone mat or lined with baking paper.
Bake for 15 minutes, rotating them on the pan about half-way through.
Prepare your rice per the boxed directions allowing 1/4 cup of cooked rice for each wrap you’re making.
Once the rice is finished cooking, add lime juice and cilantro (To taste…I like mine really lime-y)
Open and slice one small avocado.
Mix 3-4 tablespoons of sour-cream with a squeeze of lime juice, just to thin it out a little.
Assembly!
Using your lettuce as your “shell” place your roasted chickpeas on top of a bed of the cilantro lime rice. Add avocado and drizzle sour cream to finish. Garnish with more fresh herbs and a sprinkling of curry powder!
See, told you that was easy! Save any extra chickpeas to use in stews or just to eat as a salty and crunchy snack.
Enjoy!

Copy Cat Vegan Big Mac Special Sauce!
One thing about my Pops is how much he loves burgers...specifically Big Macs, so I knew if I was going to convince him to try a plant-based burger it would be my "Big Moc" that would do the trick. Let's just say it was a huge success...so much so that he requested I make him a bulk batch of my "Moc Sauce" to keep in the fridge.
Two all beef patties, special sauce, lettuce cheese, pickles, onions…all on a sesame seed bun! Who else remembers that little McD’s jingle from the late 80’s? Although it’s been two decades since I’ve had a Big Mac I can still remember the first one that I ate…on a Saturday morning, with my dad and my brother circa 1990…but let’s be real, all we really wanted to do was play on the playground!
One thing about my Pops is how much he loves burgers...specifically Big Macs, so I knew if I was going to convince him to try a plant-based burger it would be my "Big Moc" that would do the trick. Let's just say it was a huge success...so much so that he requested I make him a bulk batch of my "Moc Sauce" to keep in the fridge. #plantbasedwin


What you are going to need to buy:
Vegan Mayo - (We like THIS ONE from Hellman’s…who knew?)
Ketchup
Mustard
Relish, chopped fine
Minced Garlic - (we like these jarred options from Spice World!)
Salt & Pepper, to taste
Vinegar (Optional)
White Sugar (Optional)
Onion Powder
What you are going to need to do:
You guys, this is so easy! In a bowl combine the following ingredients!
1/3 cup of Mayo
3 tablespoons of Ketchup
1 tablespoon of Mustard
2 tablespoons of relish
1/2 teaspoon of minced garlic plus a splash of the oil/juice that the garlic is packed in
Onion Powder, salt and pepper, to taste.
Note: Depending on how you like your sauce you can also add a splash of vinegar and some white sugar. I preferred to add a bit more relish if I wanted it more sweet or a bit more mustard if I wanted it more tangy!
Store in the fridge, in an airtight jar or container, for up to 3 weeks…but trust me, it won’t last that long!
Enjoy!

Homemade Vegan Tzatziki Sauce with Only 7 Ingredients!
This vegan tzatziki sauce is so good you’re going to want to eat it on everything! Seriously…I used it on my avocado toast the morning after I made these gyros! Made with ingredients that you probably already have at home, is it authentic…eh, not quite! Is it dairy free, easy, and delicious? You bet!
This Homemade Vegan Tzatziki Sauce is one of my very favorite things to make at home. It’s good on so many things from the traditional gyro to fresh veggies and pita, even avocado toast and sandwiches! Plus, with just 7 ingredients it comes together in less than 5 minutes.

This vegan tzatziki sauce is so good you’re going to want to eat it on everything! Seriously…I used it on my avocado toast the morning after I made these gyros! Made with ingredients that you probably already have at home, is it authentic…eh, not quite! Is it dairy free, easy, and delicious? You bet!
What you are going to need to buy:
Vegan Mayo
Vegan Sour Cream - (On this page we are big fans of Tofutti Sour Cream!)
Minced Garlic - (We like these jarred options from Spice World!)
Cucumber (1/2 diced and 1/2 shredded)
Fresh Dill
Salt & Pepper
Lemon Juice
What you are going to need to do:
Like I teased in the intro…this sauce is not particularly authentic but the flavor is so good you’ll never know!
In a medium bowl mix together the following:
1/2 cup of your Tofutti Vegan Sour Cream
1/2 cup of Vegan Mayo
1/2 cup of finely shredded cucumber, only lightly drained.
1 tablespoon of minced garlic
1/4 cup of fresh, minced dill
1 teaspoon of lemon juice
Salt and Pepper, to taste
You can always thin the mixture out with a splash of water if necessary! See! I told you it was super simple! Store in the fridge for up to a week.
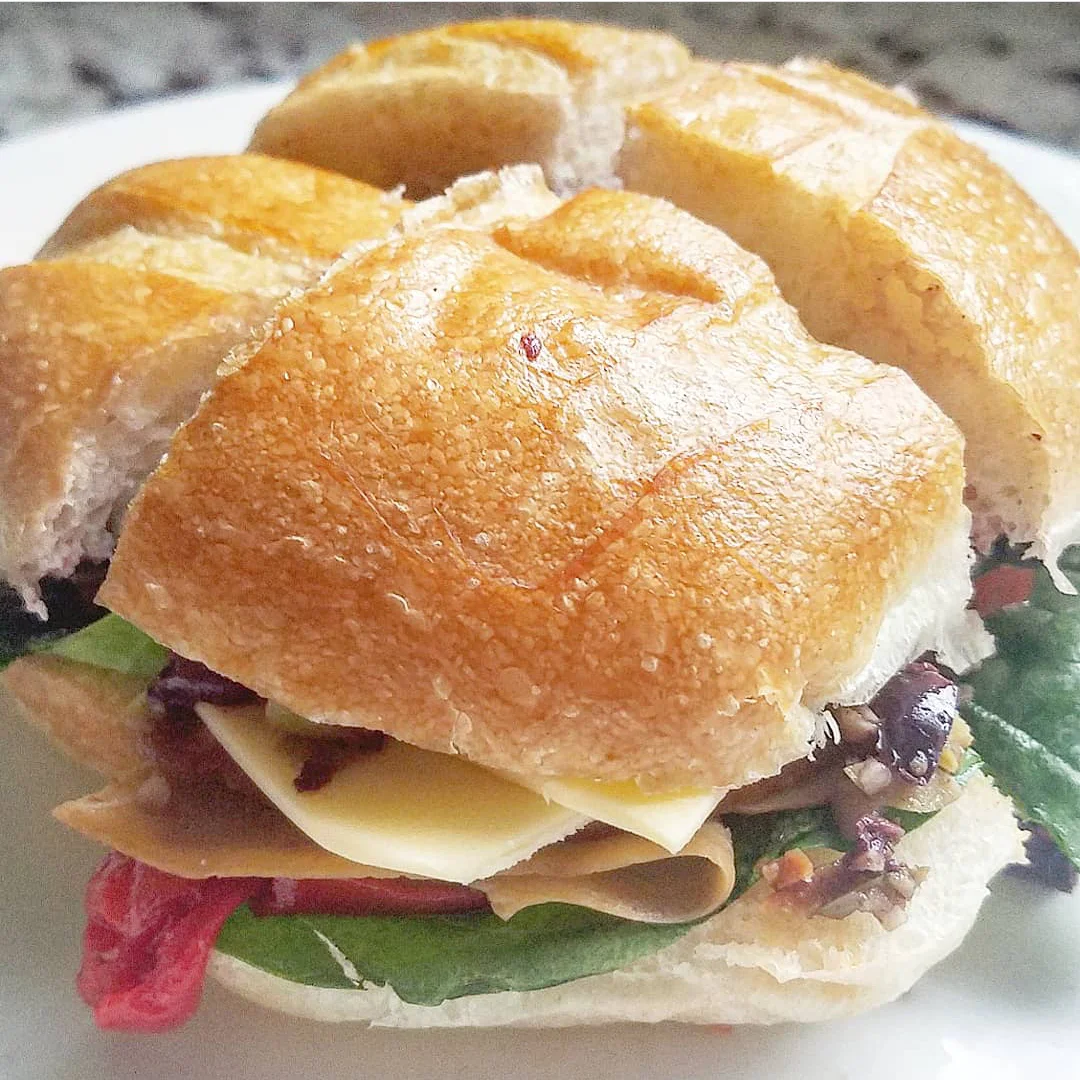
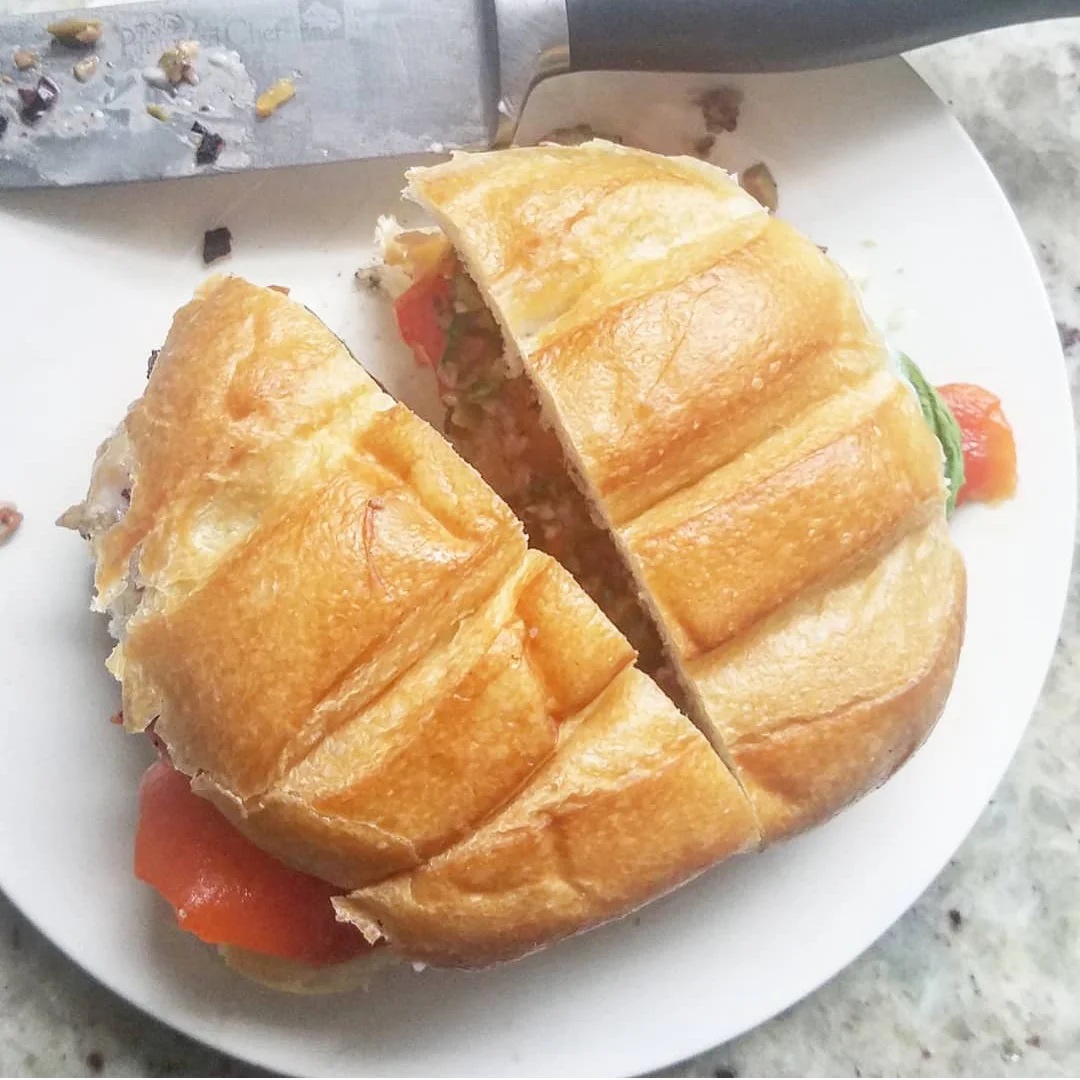
Easy Vegan Olive and Roasted Red Pepper Muffuletta
This easy Muffuletta is a plant-based twist on a popular and traditional New Orleans sandwich! If you’ve got a pallet that craves salty, briny, and vinegary flavors you are sure to love these olive infused sandwiches. Admittedly, they can be a little messy to eat, but I promise they are worth every sloppy bite!
This easy Muffuletta is a plant-based twist on a popular and traditional New Orleans sandwich! Typically made on a round Sicilian sesame bread bun it’s filled with meat, cheese, and the iconic olive spread! Our version uses roasted red pepper, and vegan deli slices in place of cold-cuts! With all of the flavor packed into this little sandwich this is a dish that you could absolutely serve a non-plant based crew!
Weekday, summer, nights call for easy dinners at my house…and bonus if it’s also a recipe where I don’t need to turn on the stovetop or the oven! And, these Easy Vegan Olive and Roasted Red Pepper Muffulettas fit the bill perfectly. Traditionally this Italian-American dish only uses meat, cheese, and olive spread but I also happen to like spinach and tomato…so my version includes those as well. If you’ve got a pallet that craves salty, briny, and vinegary flavors you are sure to love these olive infused sandwiches. Admittedly, they can be a little messy to eat, but I promise they are worth every sloppy bite!


What you are going to need to buy:
Rolls (Don’t overthink this. Use what you like…with one exception, do not use hamburger buns!)
Roasted Red Peppers (Roast your own, or buy them in a jar)
Tomato
Spinach
Green Olives
Kalamata Black Olives
Minced Garlic - (we like these jarred options from Spice World!)
Olive Oil
Vegan Cheese Slices (We like Follow Your Heart vegan Provolone Slices)
Vegan Deli Slices (We like Field Roast Smoked Tomato Slices and Tofurky Original Oven Roasted Slices)
What you are going to need to do:
First things first, I should confess that this recipe is super-easy…like you probably don’t really even need written directions to make it, but here we are…
To begin, you will want to finely chop a handful of green olives (The ones stuffed with pimento are my favorite for this) as well as a handful of black, kalamata olives.
*A note about olives…from someone who is a little bit of an olive snob. Try, as much as you are able, to stay away from canned olives. Opt for the fresh or jarred option, if you can. trust me, your taste buds will tank you for it.)
To the olive mixture add a drizzle of olive oil and minced garlic, to taste. Using the back of a fork, work the mixture by hand, mashing the olives and garlic into the oil, until it becomes slightly paste-like. You do still want the chucks of olives to be somewhat discernible but also need to be able to spread it onto the rolls.
From here, It’s just assembly. I started with a layer of spinach, followed by my roasted red pepper and my deli slices. I then added two slices of cheese and the tomato. On the top side of the bun, spread a generous amount of the olive mixture and top your muffuletta.
To serve, with a sharp, serrated knife, cut into halves or quarters.

Southern Style, Mushroom, Pulled Pork Sandwiches with Vegan Slaw
Remember 20 years ago before vegan food got cool? Before we had fake burgers and pea protein, and seitan at our fingertips in our local grocery stores? Back then, we ate, um…mushrooms, and we ate a lot of them! These Mushroom Pulled Pork Sandwiches are the perfect summer cook-out or picnic food…made with love and just a little sprinkle of nostalgia for the simple plant-based recipes that got me into this lifestyle to begin with!
Remember 20 years ago before vegan food got cool? Before we had fake burgers and pea protein, and seitan at our fingertips in our local grocery stores? Back then, we ate, um…mushrooms, and we ate a lot of them! These Mushroom Pulled Pork Sandwiches are the perfect summer cook-out or picnic food…made with love and just a little sprinkle of nostalgia for the simple plant-based recipes that got me into this lifestyle to begin with!
I have had an awful lot of requests for this recipe after posting it last week as what we enjoyed for our Memorial Day festivities! If I’m honest, this is another one of those recipes that I feel a little guilty calling a “recipe” because it’s so simple…I’m sure we could have some heated debate over sauce and slaw but I’ll share with you how I made mine and you can always customize it to your own tastes when you make it at home! (And you SHOULD make it at home because, YUM!)


What you are going to need to buy:
Mushrooms! - (figure on 6oz of mushrooms, per serving!)
(Ok, listen, friends! I know there are a lot of fancy mushrooms on the market these days but for this recipe I just used what my local Publix had on sale, which was, plain, ol’ white mushrooms!)
Liquid Smoke
Minced Garlic - (we like these jarred options from Spice World!)
BBQ Sauce - (Buy or make your own!)
Cole Slaw Mix (this is another reason why this recipe is so easy…I simple bought the pre-shredded slaw mix from the produce section and made my own dressing!)
Vegan Mayo - I have really been into the egg-free option that Hellman's has these days!)
White Wine Vinegar
Maple Syrup
Mustard
Salt & Pepper, to taste
Burger Buns (Sara Lee has great dairy-free options)
What you are going to need to do:
The main part of this recipe and, dare I say, the only really skill needed to make it much of a success is slicing the mushrooms! I order for this recipe to really mimic the texture of pulled pork you want to slice your mushrooms as thin as possible.
I actually bough the pre-sliced white mushrooms and then took the individual slices and cut them into tiny “sticks” - think like the thickness of a tine on a fork. It takes a bit of time, but it’s worth it…and it’s still less time than the 8 hours it takes to make traditional pulled pork!
Once your mushrooms are all sliced, we are going to saute them in a medium skillet, with minced garlic and a few splashes of liquid smoke until they are cooked down and soft.
Be careful here! Because you cut them so thin, you’ll need to be a little on the gentle side when stiring them in the pan!
Once the mushrooms are cooked, simply add your favorite bbq sauce and let simmer for another 2 minutes. Be careful not to burn the sauce.
Onto the Coleslaw!
In my world, there is simply no other way to eat this sandwich than with it being topped with slaw!
Like i said, above, I buy the prepackaged coleslaw mix that has the shredded cabbage and carrots all ready to go, but feel free to shred your own!
For the dressing we are going to mix:
1 cup of vegan mayo
1 tablespoon of white wine vinegar
1-2 tablespoons of mustard, depending on how much you like mustard
1 tablespoon of maple syrup
Salt and pepper, to taste.
In my experience this is going to make enough dressing for one bag of coleslaw…(4 servings)
Toss your shredded cabbage and carrots with the slaw dressing and park in the fridge for 20 minutes or so! You can even make this the night before!
The Assembly!
Bun
Mushroom “Pulled Pork”
Coleslaw
Bun.
It really is that easy! Some people I know top theirs with potato chips, fresh sliced or caramelized onions, melted cheese, homemade pickles, and even pickled jalapeños! We served them with some grilled street corn and baked beans! Does it get any more “summer” than that?
Enjoy!

Impossible Vegan Big Mac with Homemade Special Sauce
There isn’t too much to this recipe to be honest. Fry up a couple of vegan burgers, make some special sauce, chop some veg and assemble! I only have a couple of tricks! If you want to actually do that whole double stack, like a traditional big mac…make your patties really thin! (But, honestly…they would be just as good as just a single regular burger.) Sometimes vegan cheese can take a little longer to melt so make sure to put in onto the top of your burgers as soon as you flip them! Just a little splash of liquid smoke and some minced garlic in the pan when you fry your burgers will make all the difference in the flavor profile!
Two all beef patties, special sauce, lettuce cheese, pickles, onions…all on a sesame seed bun! Who else remembers that little McD’s jingle from the late 80’s? Although it’s been two decades since I’ve had a Big Mac I can still remember the first one that I ate…on a Saturday morning, with my dad and my brother circa 1990…but let’s be real, all we really wanted to do was play on the playground!
There isn’t too much to this recipe to be honest. Fry up a couple of vegan burgers, make some special sauce, chop some veg and assemble! I only have a couple of tricks!
If you want to actually do that whole double stack, like a traditional big mac…make your patties really thin! (But, honestly…they would be just as good as just a single regular burger)
Sometimes vegan cheese can take a little longer to melt so make sure to put in onto the top of your burgers as soon as you flip them!
Just a little splash of liquid smoke and some minced garlic in the pan when you fry your burgers will make all the difference in the flavor profile!

What you are going to need to buy:
Impossible Burger from Impossible Foods
Liquid Smoke
Vegan Mayo - (We like THIS ONE from Hellman’s…who knew?)
Ketchup
Mustard
Relish, chopped fine
American Cheese - (love THESE SLICES from Follow Your Heart)
Minced Garlic - (we like these jarred options from Spice World!)
White Onion
Onion Powder
Vinegar
Pickles
Lettuce
Salt & Pepper, to taste
Burger Buns
What you are going to need to do:
You can either buy the individual Impossible Burger patties or the block “ground beef.” Season with salt and pepper and a little liquid smoke.
Fry your burgers in a non-stick skillet on medium heat. Depending on size of the burgers they should take about 2 minutes per side.
To make the sauce:
1/3 cup of Mayo
3 tablespoons of Ketchup
1 tablespoon of Mustard
2 tablespoons of relish
1/2 teaspoon of minced garlic plus a splash of the oil/juice that the garlic is packed in
Onion Powder, salt and pepper, to taste.
Note: Depending on how you like your sauce you can also add a splash of vinegar and some white sugar. I preferred to add a bit more relish if I wanted it more sweet or a bit more mustard if I wanted it more tangy!
Chop Lettuce.
Dice Onions.
Assemble and Enjoy!

Impossible Patty Melt
These 100% Vegan Patty Melts, made with ground from Impossible Foods look a lot fancier than they really are…and actually make a great week night dinner…plus this happens to be THE dish if you’re looking to fool your meat-eating friends and family with your plant-based magic!
These 100% Vegan Patty Melts, made with ground from Impossible Foods look a lot fancier than they really are…and actually make a great week night dinner…plus this happens to be THE dish if you’re looking to fool your meat-eating friends and family with your plant-based magic!
If you’ve been plant based for awhile then you like have a favorite faux-burger brand that you like best! This recipe was made with the Impossible Ground, which we think browns/crusts up the best for a “smash-style” burger that you typically see in a patty melt…but having said that, use what you like, or what you’ve got in the freezer!


What you are going to need to buy:
Impossible Ground (or your favorite meatless ground alternative)
Sweet Onion
White Mushrooms, sliced
Olive Oil
Minced Garlic - (We like the jarred kind from Spice World)
Balsamic Vinegar - (We get ours from this great little place here in Central Florida called The Ancient Olive)
Your Favorite Bread , Vegan or Otherwise - (I used Sara Lee® Artesano™ Bakery Bread)
Non-Dairy Cheese - (We used THIS CHEESE from Field Roast…melts like a dream!)
Liquid Smoke
Salt and Pepper
Onion Powder
Paprika
Non-Dairy Butter - ( We used Earth Balance)
What you are going to need to do:
Start by peeling and slicing your onion and, using a little olive oil on medium heat, cook with your mushrooms and garlic, adding onion powder, and a splash of balsamic vinegar. Cook until mushrooms and onions are soft.
Combine your Impossible Ground with a teaspoon of Liquid Smoke, a teaspoon of Pickapeppa Sauce, a pinch of paprika and salt/pepper, to taste. Mix well and form into patties. Depending on your preferred size you should be able to get 3 or 4 patties from one package of ground.
Using a little Earth Balance Vegan Butter in your skillet, fry up your patties on medium heat…remember they should be a little thinner than a hamburger. I also like to kinda shape the patty to fit the bread I am using.
After you flip the patty to cook on the second side, load up the top with your onions and mushrooms.
Place your sliced non-dairy cheese on your top piece of bread and pop into the microwave for about 10 seconds. Place your bread, cheese side down, onto your onion and mushroom covered patties and flip the entire affair so that now your bread can griddle on the skillet.
Repeat the bread, cheese, microwave routine for the other piece and place that on top, flipping when the first side is golden brown so that the second side can griddle.
Slice, serve, and enjoy!
A quick note about Vegan Cheese: We all know it takes higher heat to melt vegan cheese! When I am making sandwiches that require my cheese to melt, I always lay out my vegan cheese on the bread and pop it into the microwave for about 10 seconds. and this just gives it a jump start to ensure a good melt without burning your sandwich!
Enjoy!

Roasted Red Pepper and Feta Sandwich with Olive and Garlic Spread
These Roasted Red Pepper and Feta Sandwiches with Olive and Garlic Spread are simple enough to whip up, even after the longest of days, and hearty enough to not feel like you are skimping on “dinner.”
Confession: I’ve been on a total sandwich kick this week…mainly because I bought some delicious rolls for my Vegan Muffulettas and, if I am honest, I typically don’t keep a lot of bread in the house…because, basically, I have no will power around carbs! But, tonight’s recipe is so easy and low calorie that none of that really matters…It’s delicious and that’s all you need to know.
I don’t know about you, but even though I love to cook, there are just some weeknights that I simply don’t have the energy for big, extravagant, gourmet, meals. This week has been that week, and full disclosure, I have had some variation of “sandwich” every night so far. Tonight is no exception but with the addition of this sandwich being toasted, I will admit, it feels more like a dinner, and less like a lunch! These Roasted Red Pepper and Feta Sandwiches with Olive and Garlic Spread are simple enough to whip up, even after the longest of days, and hearty enough to not feel like you are skimping on “dinner.”


What you are going to need to buy:
Rolls (Don’t overthink this. Use what you like…with one exception, do not use hamburger buns!)
Roasted Red Peppers (Roast your own, or buy them in a jar)
Spinach
Green Olives
Kalamata Black Olives
Minced Garlic - (we like these jarred options from Spice World!)
Olive Oil
Vegan Feta Cheese (We like Violife - Just Like Feta Block)
What you are going to need to do:
Honestly, I always feel a bit weird about calling a sandwich a “recipe” because it’s really just all assembly…but this one does have a couple of steps.
Set your oven to the broil setting…choose “low” if you have the option.
To begin, you will want to finely chop a handful of green olives (The ones stuffed with pimento are my favorite for this) as well as a handful of black, kalamata olives.
*A note about olives…from someone who is a little bit of an olive snob. Try, as much as you are able, to stay away from canned olives. Opt for the fresh or jarred option, if you can. trust me, your taste buds will tank you for it.)
To the olive mixture add a drizzle of olive oil and minced garlic, to taste. Using the back of a fork, work the mixture by hand, mashing the olives and garlic into the oil, until it becomes slightly paste-like. You do still want the chucks of olives to be somewhat discernible but also need to be able to spread it onto the rolls.
On the bottom half of your roll arrange spinach, the roasted red peppers, and thin slices of vegan cheese. For this dish, I love the saltiness of feta. It pairs so beautifully with the olives!
Place under the broiler for one to two minutes until cheese is soft and melt-y, but not not brown and the bottom of the roll is crunchy. This happens quick…keep your eye on it.
Add the olive spread to the top bun, top and serve by cutting into halves or quarters.
That’s it…see, told you it was easy!