


Healthy Chocolate Oatmilk Ice Cream - Only 5 Ingredients!
Not only is this Chocolate Oatmilk Ice Cream the one of the simplest summer recipes to make it also sneaks in an extra serving of veggies into your favorite summer snack by using avocados to make it extra creamy and dreamy! Only using 5 ingredients, most of which you probably alfready have in the house…it’s perfect for the kiddos because when it warms up it gets soft but never really "melts" making it much less of a mess for little mouths!
It's National Oat Milk Week and I'm celebrating with my friends over at Rise Brewing Co. using their Organic Chocolate Oatmilk to make this 5 ingredient dairy free ice cream!
Not only is this the one of the simplest summer recipes to make it also sneaks in an extra serving of veggies into your favorite summer snack by using avocados to make it extra creamy and dreamy!


Easily double or triple the recipe to serve a crowd. It's perfect for the kiddos because when it warms up it gets soft but never really "melts" making it much less of a mess for little mouths! Will definitely be serving this next weekend for Memorial Day!

Healthy Chocolate Oatmilk Ice Cream
Author: Sarah | April 19, 2021
Servings: 2-4
prep time: 15 minutes
freeze time: 3 hours - Overnight
total time: 8 hours
Ingredients: What You need to buy!
1 ripe avocado
1/4 c. Chocolate Oatmilk from Rise Brewing Co.
1/4 c. Cocoa Powder
3 tablespoons of Maple Syrup
Mini Chocolate Chips
Instructions: What You need to do!
Blend avocado, oatmilk, cocoa powder, and maple syrup until smooth.
Add a handful of chocolate chips and stir to combine
Freeze for 3 hours or up to overnight in a coverd bowl.
Serve with your favorite dairy free topping!
And…that’s it! See, I told you it was easy! Another of my favorite ways to enjoy this nice-cream is to make coffee floats! Simply use your favorite cold brew coffee, like the Nitro Original Black from the Rise Brewing Co. in place of root beer and top with a scoop of ice cream!
This recipe also happens to be the fastest and yummiest way to make dairy-free chocolate pudding! Simply skip the freezing step and refrigerate for about 30 minutes before serving! I really hope that you’ll try this Healthy Chocolate Oatmilk Ice Cream with Only 5 Ingredients this summer…and make sure to tag me when you do! @plantbasedgingr
Love, Light, and Lentils, my friends!
Sarah

Banana and Peanut Butter Bread Pudding
What do you do with bananas that are on their way out and more sourdough bread than you can possibly finish? Banana and Peanut Butter Bread Pudding, of course! There is just something about this recipe that’s hard to beat! Great for a crowd, this vegan dish, that’s really more like dessert than breakfast is made with dairy free butter, oatmilk, and JustEgg and comes together in under an hour!
What do you do with bananas that are on their way out-the-door and more sourdough bread than you can possibly finish? Banana and Peanut Butter Bread Pudding, of course! If you’re a fan of “dump and bake” kinds of recipes you’re going to love this one. The most time-consuming part is simply cutting up the bread and slicing the bananas!

Now, cards on the table…I don’t particularly love either bananas OR bread pudding but there is just something about this recipe that’s hard to beat! Great for a crowd, this vegan dish, that’s really more like dessert than breakfast is made with dairy free butter, oatmilk, and JustEgg and comes together in under an hour!
What you are going to need to buy:
For the Bread Pudding
3-4 cups of crusty bread, cut into cubes
3 ripe bananas cut into slices
2 cups of oatmilk
JustEgg to replace 3 large eggs
1 tablepoon of cinnamon
1 teaspoon of nutmeg
1/2 cup brown sugar, more for sprinkling
1/2 teaspoon of salt
Splash of Vanilla
1/2 cup of peanut butter
1/2 cup of Walnuts
For the Icing1/2 stick Dairy Free Butter, melted
Powdered Sugar, 1 cup
Splash of Vanilla
Pinch of Salt
What you are going to need to do:
Layer your cubed bread and banana slices into a baking dish (I used an 8 x 10) sprayed with non-stick spray.
Combine the remaining ingredients (minus the nuts and brown sugar for sprinkling) and wisk until well combined. Don’t be too worried if the peanut butter doesn’t completely combine or there are still little pieces. They will melt when baked!
Pour mixture over the bread and bananas. Spoon any peanut butter that didn’t totally dissolve evenly over the top.
Top with walnuts and sprinkle with brown sugar.
Bake at 375 for 40 minutes. You can gently lay a piece of foil over the baking dish to keep the top from burning but keep sides loose and un-crimped. You don’t want your Bread Pudding to “steam” under the foil…it’s just to keep the top from getting too crispy! Remove the foil for the final 15 minutes of baking.
While the Bread Pudding is baking mix together 1/2 stick of melted vegan butter with 1 cup of powdered sugar, 1/2 teaspoon of vanilla and a pinch of salt. (Add more or less sugar depending on how thick you like your icing.)
At 40 minutes, remove from oven and let stand for 15 minutes before drizzling the top with icing and serving.
A couple of notes about this recipe: I know there are a lot of “egg-replacers” that vegan and non-dairy diets use in baking. I used the product JustEgg and it turned out wonderfully. I can’t guarantee that others will do the same…they may be great but I’ve not tested any others with this particular recipe.
Love chocolate? You could totally throw in a handful of chocolate chips to this recipe and it would be delicious!
Love, Light, and Lentils, my friends!
Sarah

Dairy Free Peppermint Cheesecake
I’ve always kinda shied away from cheesecakes at home because they seemed so finicky. Line the pan with foil, bake with a hot water bath, magic spells to chant while it’s cooling so that it (fingers crossed) won’t crack…seemed like too much work BUT this recipe is the opposite of all that. Throw everything in a stand mixer and you’re off to the races! (And, for the record, yes…mine did crack, and it was STILL delicious! Best part of this recipe is that it works just as well if you’re planning to do a traditional cheesecake and are not worried about it being dairy-free.
I don’t know about you but one of the things that I can’t seem to get enough of at the Holidays is peppermint! This Dairy Free Peppermint Cheesecake made with the Vanilla Oat Milk from the Rise Brewing Company is super easy and great to take along to a family dinner or work party because even your friends who are not dairy free will love it!
I’ve always kinda shied away from cheesecakes at home because they seemed so finicky. Line the pan with foil, bake with a hot water bath, magic spells to chant while it’s cooling so that it (fingers crossed) won’t crack…seemed like too much work BUT this recipe is the opposite of all that. Throw everything in a stand mixer and you’re off to the races! (And, for the record, yes…mine did crack, and it was STILL delicious! Best part of this recipe is that it works just as well if you’re planning to do a traditional cheesecake and are not worried about it being dairy-free.


What you are going to need to buy:
Graham Crackers 10-12, total
2-3 tablespoons Butter - (we used the plant-based butter from Earth Balance)
3/4 cup of Vanilla Oat Milk from the Rise Brewing Company
16 oz Cream Cheese - (we used the vegan cream cheese from Miyoko!)
8 oz Sour Cream - (we love the Tofutti Brand best!)
Egg Substitute (for 3 eggs) - (we used the Just Egg from the Brand Eat Just)
2 1/2 cup Sugar
2 tablespoon Vanilla Extract
1-2 teaspoons Peppermint Extract, depending on your taste.
Pinch of Salt
Red food coloring, optional
What you are going to need to do:
Preheat oven to 350 degrees.
To make the crust: Combine crushed graham crackers and melted butter until a sandy texture is achieved.
using a small glass, or the flat bottom of a measuring cup, press into the bottom of a spring-form pan. Store in fridge until ready to fill with cheesecake mixture to allow butter to firm back up.
In a stand mixture combine room temperature cream cheese, sour cream, and vanilla until soft and well combined.
With mixer on LOW, gradually add the oat milk, sugar, salt, and peppermint extract.
Next, add the “eggs”, gradually making sure everything is well combined. Once combined, beat on high for 1 minute.
At this point, if you are so inclined, you can remove half the batter and add red food coloring to the half that is left in the stand mixer so that you can then swirl the batter in the pan.
Pour batter into the spring form pan and bake for 1 hour, or until center is just set.
Once baking is completed crack the oven door and allow to cool, inside the oven for 1 hour.
Refrigerate 4-5 hours or overnight.
Serve cold, with your favorite non-dairy topping!

Puffed Cranberry Feta and Walnut Bites
If you're looking for a quick and easy holiday appetizer or even another small item to add to a Christmas breakfast buffet...you've got to try these Puffed Cranberry Feta and Walnut Bites. Made with crescent rolls, which happen to be accidentally vegan...you might already have the ingredients in your pantry! They look way, way, fancier than they are and can be made either vegetarian or vegan depending on the cheese option you use!!

If you're looking for a quick and easy holiday appetizer or even another small item to add to a Christmas breakfast buffet...you've got to try these Puffed Cranberry Feta and Walnut Bites. Made with crescent rolls, which happen to be accidentally vegan...you might have all the ingredients you need already in your pantry! They look way, way, fancier than they are and can be made either vegetarian or vegan depending on the cheese option you use!!
For this recipe you’re going to need cranberry sauce…and I make my own because 1. It’s easy and only takes about 7-10 minutes and 2. It tastes so much better than the canned stuff BUT you could just as easily use some canned cranberry sauce, or even some jam or preserves!
What you are going to need to buy:
Pillsbury Crescent Rolls
Fresh Cranberries
Maple Syrup
Small Orange
Cinnamon
Cloves
Dairy-Free Feta Cheese
Walnuts
What you are going to need to do: The Cookies
To start, in a small saucepan, bring 1/2 cup of water, 1/2 cup of maple syrup, the juice of one small orange, and 1 cup of fresh cranberries to a boil and let boil on medium-high until the berries start to burst.
With the back of a fork, crush the berries and continue to cook for 2-3 more minutes until the mixture thickens up. Add 1/2 teaspoon of cloves and 1/2 teaspoon of cinnamon and stir to combine. Remove from heat.
Preheat your oven to 350
Open a can of crescent rolls and roll out the pastry onto a clean counter or cutting board but do not separate into triangles. Instead, gently pinch the perforations closed and then cut the rectangle of dough into 12 equal squares
Push the crescent dough squares down into a mini muffin tin.
Fill with cranberry sauce and top with crumbled feta cheese and walnuts.
Bake for 12-14 minutes, turning halfway through baking until pastry is golden brown and set.
Let stand fro 1-2 minutes in the tin before removing to serve!

Mini Patriotic Fruit Pizzas (Dairy and Egg Free)
Well, it’s officially SUMMER, my favorite season, and one of the reasons why I love summer so much are all of the fresh berries that are now ripe! With Independence Day just a few weeks away, these red, white, and blue mini fruit pizzas, with icing made from Kite Hill Foods cream cheese, are a great idea for your Fourth of July menu if you're still looking for a little something sweet to serve!
Well, it’s officially SUMMER, my favorite season, and one of the reasons why I love summer so much are all of the fresh berries that are now ripe! With Independence Day just a few weeks away, these red, white, and blue mini fruit pizzas, with icing made from Kite Hill Foods cream cheese, are a great idea for your Fourth of July menu if you're still looking for a little something sweet to serve!
My niece and nephew were in town this past weekend and among a lot of pool time and craft projects we also managed to whip a batch of these Mini Summer Fruit Pizzas! These kids are not plant-based by any means, but you should have seen them gobble up the result! We all had fun, and no one even knew the difference, just the way that Aunt Sarah Likes it!


What you are going to need to buy:
Flour (1.5 c)
White Sugar (1/2 c)
Butter, softened - (or vegetable oil, vegan spread) ( 6 tablespoons) - (We like Earth Balance)
Vanilla (1 tablespoon)
Pinch of Salt
1 Egg - (Or the vegan equivalent such as Just Egg, which is what we used)
Milk - (1-2 tablespoons) (Substitute your plant based favorite - we like the Vanilla Oat Milk, for this recipe, for obvious reasons! The Vanilla Oat Milk from Rise Brewing is great for baking.
Baking Soda (1 teaspoon)
Baking Powder (1 teaspoon)
Fruit, of your choice, diced into small pieces
Cream Cheese (from from Kite Hill Foods)
Powdered Sugar
What you are going to need to do: The Cookies
Let’s start with the crusts…which are basically just sugar cookies.
In a bow sift together the flour, sugar, baking powder, soda, and salt.
In a smaller bowl whisk together the softened butter, vanilla, oak milk, and egg until well combined.
Combine wet and dry ingredients until the dough comes together. Do not overwork the dough. Wrap in plastic wrap and let rest in the refrigerator for 15 minutes.
Roll out dough and cut to desired shape…obviously for these I used a round cutter (actually a biscuit cutter because it had the pretty fluted edge!)
Bake at 325 for 8-10 minutes, depending on your oven.
Let cool completely before decorating.
The Icing:
This icing is so easy it’s hardly worth explaining. Into a small bowl mix together 1/2 container of Kite Hill Cream Cheese, 1/2 cup of powdered sugar, and a splash of vanilla. You can use the entire container of cream cheese if you plan to double to cookie recipe (This recipe makes 12 medium cookies.)
The Assembly:
After the cookie crusts are nice and cool, frost the tops of the cookies and arrange fruit (or other toppings) to your liking. Keep cool before serving.

Easy Peanut Butter Banana Bread
Who doesn’t bananas? Well, spoiler alert…I really don’t! But, I do happen to love banana bread so when I was at my Dad’s house this past weekend and saw the poor little bunch of spotty, sad, bananas on his counter I knew just what to do and the addition of peanut butter in this recipe is a total game changer! Made with oat milk, dairy free butter, and JustEgg is so quick and easy, even I can master it…so I know that you can to! Not worried about it being vegan? No problem…it works just as well with the traditional ingredients you have in your fridge!
Who doesn’t love bananas? Well, spoiler alert…I really don’t! But, I do happen to love banana bread so when I was at my Dad’s house this past weekend and saw the poor little bunch of spotty, sad, bananas on his counter I knew just what to do. Plus, the addition of peanut butter in this recipe is a total game changer!

To be fair, I am a far better cook than I am a baker and even before a took a step back from eggs and dairy, baking was never my favorite thing to do…but this Peanut Butter Banana Bread, made with dairy free butter, and JustEgg is so quick and easy, even I can master it…so I know that you can too! Not worried about it being vegan? No problem…it works just as well with the traditional ingredients you have in your fridge!
What you are going to need to buy:
4 medium bananas, very ripe
1/3 cup dairy-free butter, melted
1 teaspoon Baking Soda
1 pinch Salt
1 cup Brown Sugar
1/4 cup of JustEgg, egg replacer
1 teaspoon Vanilla Extract
1/2 cup of creamy Peanut Butter
1.5 cups AP Flour
What you are going to need to do:
Preheat over to 350 degrees.
To begin, in a large bowl, mash 3 of the bananas with a fork or potato masher until a paste forms.
To your bananas, add the melted butter and stir until well combined.
Add the brown sugar, Just Egg, Vanilla, Peanut Butter and mix until smooth.
Sift together the flour, salt, and baking soda and slowly fold into the wet ingredients until well incorporated. Do not over mix.
In a standard loaf pan that has been sprayed with non-stick baking spray, scoop the batter into the pan and using a rubber scrapper, make sure that the batter is level, smooth, and fills all corners.
Dust the top with a sprinkling of brown sugar, for a nice crust, when baked.
Cut the remaining banana into slices and arrange on top of the batter.
Bake at 350 for 50 minutes or until a toothpick comes out clean from the center of the loaf.
Let cool 10 minutes before serving.

Better Than Canned, Vegan Crescent Cinnamon Rolls with Cream Cheese Frosting!
Ever since I realized that canned crescent rolls are are #accidentallyvegan I have been thinking about using them to make some dairy free cinnamon rolls! And...WOW am I glad that I did because these bad boys turned out absolutely amazing. These quick and easy rolls are everything you love about cinnamon rolls and everything you love about crescent rolls all in one bite!
If you grew up as an 80’s kid like I did, canned cinnamon rolls were a Saturday morning tradition. Probably the best thing you can really say about canned rolls, as an adult, is that they are quick and easy, crack open the can, plop them into a dish and bake. But would you believe that in the time it takes to preheat your oven you can up your cinnamon roll game by using another canned doughy staple from your childhood? That’s right…we’re talking crescent rolls!
Ever since I realized that canned crescent rolls are are #accidentallyvegan I have been thinking about using them to make some dairy free cinnamon rolls! And...WOW am I glad that I did because these bad boys turned out absolutely amazing. These quick and easy rolls are everything you love about cinnamon rolls and everything you love about crescent rolls all in one bite!


What you are going to need to buy:
Canned crescent rolls. (The Pillsbury brand is vegan!)
Non Stick Cooking Spray
1 cup of White Sugar
3 Tablespoons of Ground Cinnamon
Dairy Free Cream Cheese
Powdered Sugar
Vanilla or Maple Extract
What you are going to need to do:
Preheat your oven to 350.
Yes, the back of the can will tell you to bake at a higher temperature…don’t do it! We are going to bake these rolls at a lower temperature for longer than what you would bake traditional crescent rolls.
Crack open your crescent rolls and carefully unroll them onto a piece of parchment paper.
Do not break apart along the perforated edged into individual pieces. The goal is to get one rectangle of dough.
Take your fingers and gently press the perforated seams that you would normally use to separate into individual crescent rolls back together.
Spray the dough rectangle with the non-stick cooking spray. This is going to give the cinnamon sugar something to stick to.
Combine your cinnamon sugar and sprinkle a liberal amount onto the entire rectangle, leaving a one inch seam on one of the short ends. This is where you will close your rolls and you want the dough to stick to itself after rolled up!
Begin at the opposite end from where you left your sugarless seam and roll the dough onto itself until you get a log. Go slow and try to make sure that the whole log stays together. You can use the parchment to help you roll.
With a very sharp, serrated knife, cut the roll in half, then in half again and one final time so that you have 8 equal pieces.
Lightly spray the pan you are going to bake the rolls in.
Note: I like to bake mine in a round pan but if you want to use a 9 by 9 pan that is fine too but you will want to cut your rolls into 9 pieces so that they fit nicely into 3 rows of three!
Place the rolls onto the center rack of a hot oven and bake for 15 minutes with a piece of tin foil draped over the top of the baking dish. This doesn’t need to be sealed on the edges, just lay flat onto the top. The crescent dough will brown faster than it cooks so you want to guard aganist the tops of your rolls getting too brown, too quick!
After 15 minutes remove the foil and bake for another 10 to 15 minutes until light golden brown and fluffy!
I like to frost these rolls with cream cheese that I have added just a pinch of powdered sugar and vanilla extract. Personally, I don’t like my frosting to be too sweet because there is so much sugar in the rolls. The tang of the cream cheese is the perfect balance to all the sweetness and butter inside the rolls!
Let sit for 1-2 minutes after baking before frosting.
Enjoy!
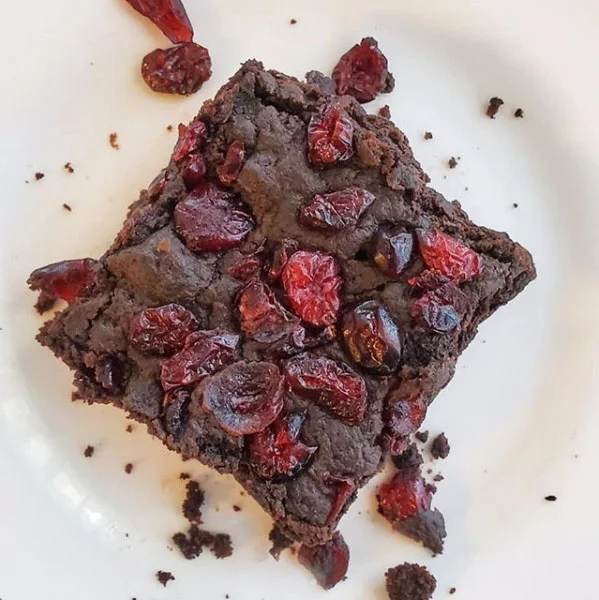
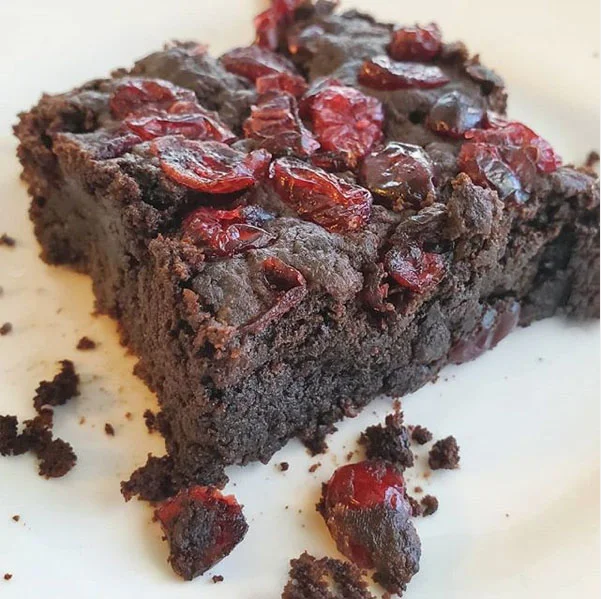
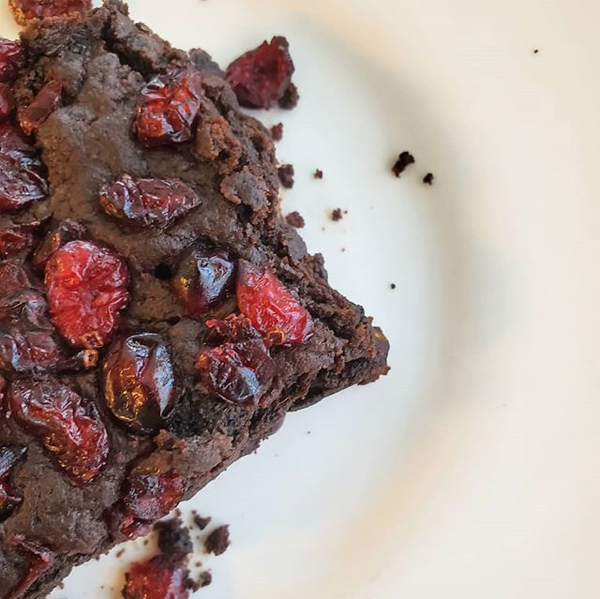
Fudgy Espresso and Sweet Cherry Vegan Brownies
Who doesn’t love coffee and brownies? This vegan brownie recipe is so rich and delicious no one will ever know that they are dairy free…or that secretly they are chocked full of fiber, potassium, and Vitamin A thanks to that sneaky sweet potato that is hiding inside. Brownies as vitamin supplements…why isn’t that a thing yet?
Who doesn’t love coffee and brownies? This vegan brownie recipe is so rich and delicious no one will ever know that they are dairy free…or that secretly they are chocked full of fiber, potassium, and Vitamin A thanks to that sneaky sweet potato that is hiding inside. Brownies as vitamin supplements…why isn’t that a thing yet?
Now, a note about planning: Don’t get me wrong, you can absolutely eat these brownies straight from the oven and no one is going to stop you, but, fair warning, they will be a bit crumbly and will try to fall apart. Best to make this dessert a day ahead! Maybe it’s some kind of baking magic, the vegan gods, the ocean tides…who knows why, but these extra chocolatey brownies really benefit from sitting overnight to really develop that “fudgy” texture.

What you are going to need to buy:
1/4 cup + 2 tablespoons of All Purpose Flour
1/4 cup + 2 tablespoons of Cocoa Powder
1 teaspoon of salt
1 tablespoon of instant espresso or instant coffee crystals
1 tablespoon of baking powder
1/2 cup of Creamy Peanut Butter
2/3 cup of White Sugar
1/3 cup of Maple Syrup - (The good stuff…not pancake syrup)
1/4 cup of Olive Oil
1 medium Sweet Potato, cooked
1 tablespoon Vanilla
1 cup of Dried Cherries - (or try cranberries or blueberries)
What you are going to need to do:
Preheat over to 325 degrees.
To begin, you need to cook your sweet potato. You can bake it…but the microwave works just as well for this and only takes about 3 minutes. - Once potato is cooked and cool enough to handle, cut in half and scoop out the contents into a mixing bowl.
To the sweet potato add you sugar, maple syrup, vanilla, and olive oil and wish until smooth and all of the lumps of sweet potato have dissolved and become well incorporated.
Sift dry ingredients: Flour, Cocoa, Espresso or Coffee, Salt, and Baking Powder.
Slowly add the dry ingredients into the wet and mix until dough just starts to come together. Add the Peanut Butter to the batter and mix until just incorporated.
At this point if the batter seems too dry you may add an additional teaspoon of olive oil. These are dense, fudge brownies and this is thick batter. it won’t “pour” like traditional brownie batter made with eggs and dairy.
Using a nonstick cooking spray, or vegan butter, coat the bottom of a 9 x 9 baking dish and then using a silicone spatula press the dough into the baking dish, making sure to evenly spread into corners.
Sprinkle your dried cherries onto the top of the batter and using the same silicone spatula lightly press into the top of the brownies to make sure they really sink in and sick.
Bake on the center rack of your oven for 20-22 minutes or until a toothpick inserted into the center of the brownies comes out clean.
Remove from oven and let cool completely before serving (several hours, if not over night)
Makes 9-12 brownies depending on how big you cut them…Makes one brownie if a hurricane is on the way and you’re alone in your apartment for several days with the dog! (Just sayin’ - Don’t judge!)
Enjoy!
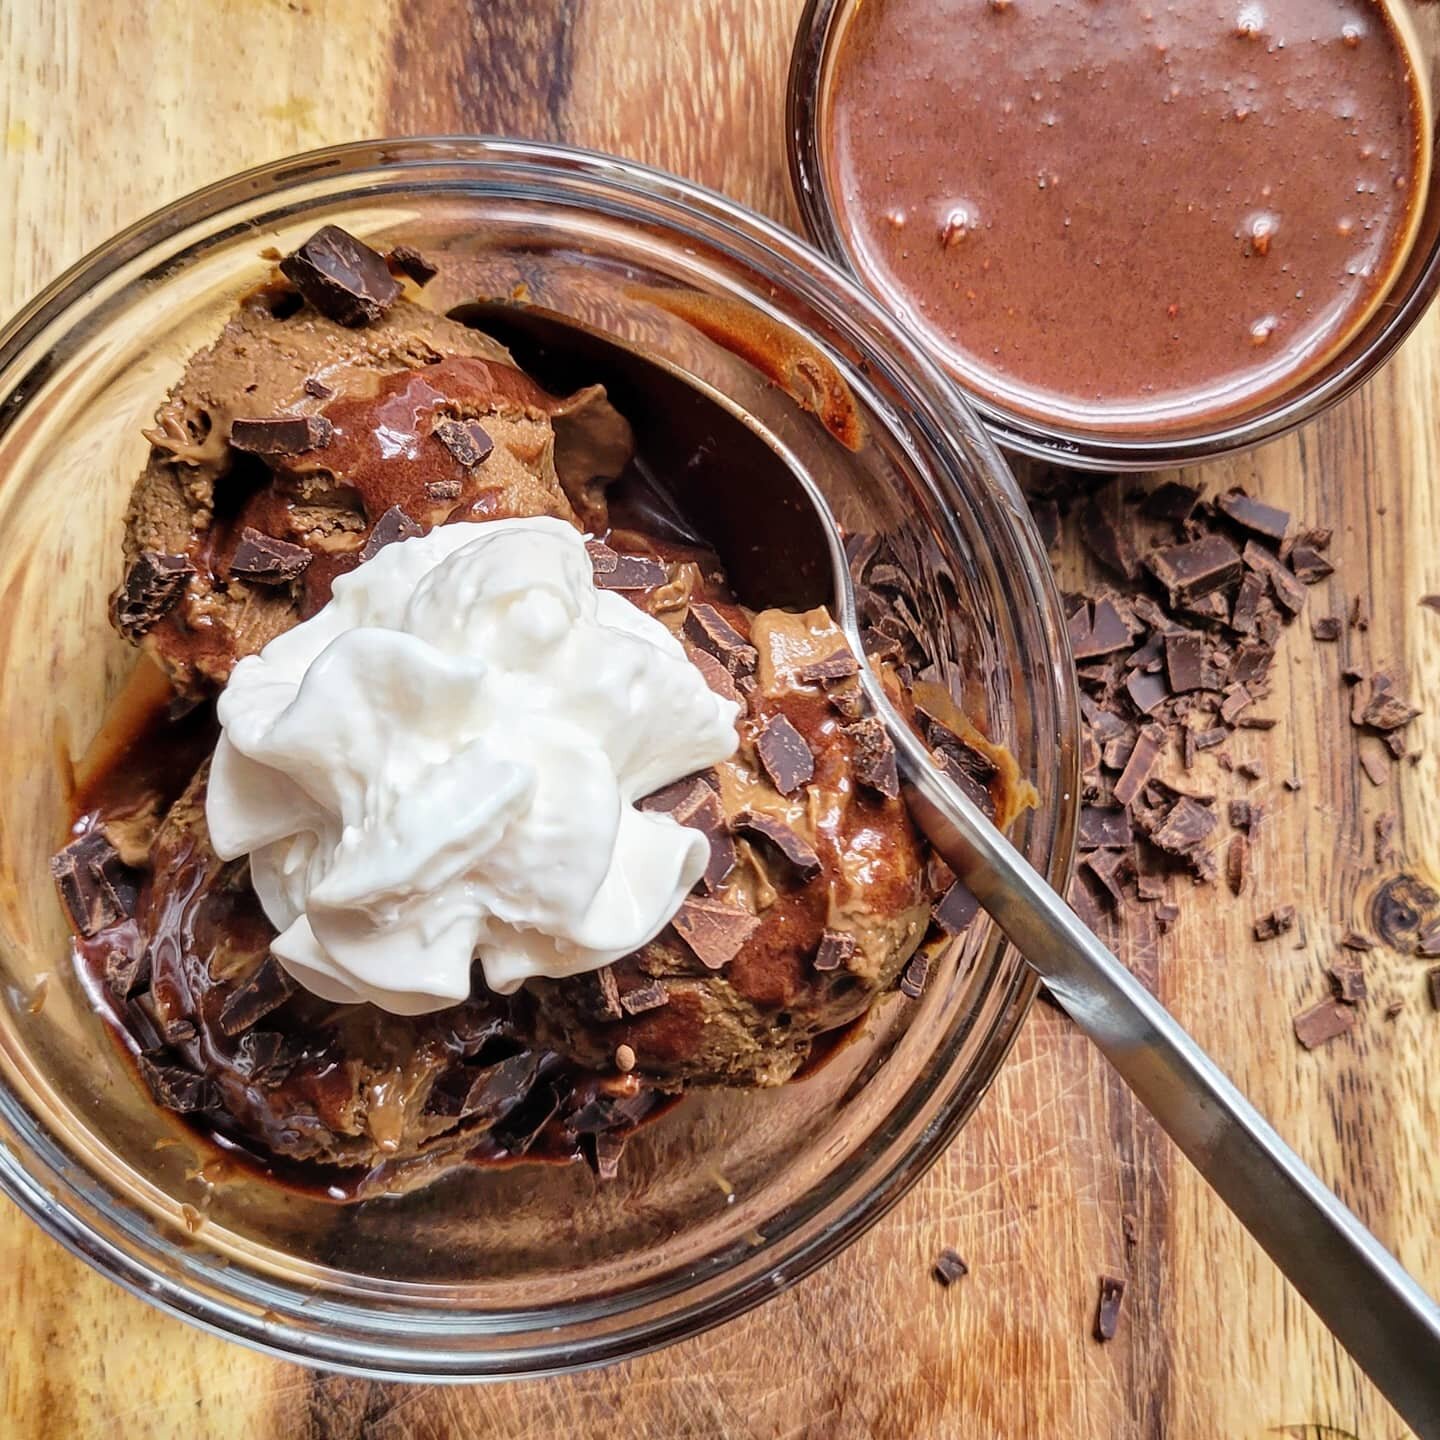
Melt Proof Dairy Free Chocolate Ice Cream - Great for Kids this Summer PLUS Easy Vegan Chocolate Sauce!
This recipe just might be the perfect summer-time treat to help you beat the heat! Yes, you do freeze it, and yes the finished product has the texture of ice cream, but because the base in not milk and eggs, even when it does warm up a little it never really “melts” only softens into a “pudding-like” consistency but never gets melty, messy or drippy!
This recipe just might be the perfect summer-time treat to help you beat the heat, plus because it’s packed with heart-healthy avocado, (yes, I said avocado, but don’t worry, no one will ever know!) and has no processed sugar, it’s great for kiddos, too! Plus, I’ll give you my tip for the fastest and easiest vegan chocolate sauce to top it with! Yum!

Oh, the memories of summer I have, from childhood, bargaining with my parents for the biggest ice cream they would allow, only to have it melting, running, and dripping down my arm, staining my face, hands, and clothes only a few bites in…Yes, you do freeze it, and yes the finished product has the texture of ice cream, but because the base in not milk and eggs, even when it does warm up a little it never really “melts” only softens into a “pudding-like” consistency but never gets melty, messy or drippy!
What you are going to need to buy:
Avocados (roughly 1 per each 1-2 adult servings)
Cocoa Powder
Salt
Oat Milk - (The Chocolate Oat Milk from the Rise Brewing Co. is perfect for this recipe)
Maple Syrup
That’s it…I know, right? Just trust me, It’s total magic!
What you are going to need to do:
In a high powered blender add your avocados and 1/4 cup of oat milk and 1/4 cup of Maple Syrup, pulse until the mixture begins to smooth out. This will depend of how ripe your avocados are. Add a bit more oat milk, if needed.
From here you are going to add 1/4 cup of cocoa powder and a pinch of salt and blend until smooth.
Now, the measurments on this are going to depend on a couple of things…how much ice cream you are making, how ripe your avocados are, and how sweet, rich, or “chocolate-y” you want your ice cream.
NOTE: We are going to freeze this and like all food that gets eaten frozen, the cold dulls the flavor profile, so you will want the mixture to be slightly more intense (sweetness and chocolate flavor) than if you were eating it at room temperature!
Go slow and take your time, especially with the Oat Milk because if you get it too runny to start with you’re going to need to add another avocado!
Keep adding Oat Milk, Syrup, and Cocoa until you get the flavor profile you like AND you have reached a consistency that is like a slightly soft pudding, but NOT runny or liquid like yogurt.
When you have achieved both a taste and a texture you like, transfer the mixture to a freezer safe bowl, cover, and freeze until firm. (This will take several hours)
While the Ice Cream is freezing…whip up the vegan chocolate sauce.
This is so remarkable easy, I feel silly even typing up directions:
in a small mason jar, with a lid, shake together 1 cup of maple syrup and 1/4 cup of cocoa powder. Want a thicker, “dark chocolate” sauce? Just add more cocoa. That’s it. See, I told you it was easy!
Shaking the mixture together in a jar is so, so, so much easier than trying to mix it together, in a bowl, with a spoon, which is almost impossible because of how finely processed the cocoa tends to be. If you don’t have a mason jar, use a small Tupperware container, with a lid.
To Serve:
Scoop the ice cream into cones or bowls, as desired and top with the vegan chocolate sauce and other toppings, like your favorite vegan cream!
Enjoy!

Baked Oatmeal with Creamy Yogurt and Fresh Summer Berries
You probably have most (if not all) of the ingredients that you need to make this delicious baked oatmeal in your pantry right now! It’s easy to mix up, hard to mess up, and everyone, even picky eaters, seem to love it!
One of my absolute favorite breakfast recipes is baked oatmeal. You probably have most (if not all) of the ingredients that you need to make this delicious breakfast in your pantry right now! It’s easy to mix up, hard to mess up, and everyone, even picky eaters, seem to love it!
I had never heard of this dish until I spent several years living up in Ohio’s Amish County where, needless to say, there were not a lot of vegetarian dishes on the menu very often. Brunch potlucks and Saturday morning community breakfasts were always overloaded with bacon and eggs - biscuits and sausage gravy, and casseroles filled with ham but the bright spot in my little plant-based world was always the baked oatmeal! The great part about this dish is that it’s hearty enough to be satisfying and simple enough to make either a vegetarian or vegan option. A crowd-pleaser for sure!


What you are going to need to buy:
Quick Cooking Oats (3 cups )
Brown Sugar - (you can also use coconut sugar) (1 cup)
Baking Powder (2 teaspoons)
Vanilla (1 Tbsp)
Pinch of Salt
Powdered Cinnamon, Nutmeg, Clove - (you can also use pumpkin pie spice) (1 teaspoon each)
2 Eggs - (Or the vegan equivalent such as Just Egg, which is what we used)
Milk - (Substitute your plant based favorite - we like Oat Milk, for this recipe, for obvious reasons! The Vanilla Oat Milk from Rise Brewing is great for baking. (Almond and Cashew also work well) (1 cup)
Butter, melted - (or vegetable oil, vegan spread) (1/2 cup) - (We like Earth Balance)
Yogurt, for topping! (We used this non-dairy option from the Forager Project)
Honey - (or Maple Syrup/Agave)
Fresh Fruit
What you are going to need to do:
Okay, here is my disclaimer for this recipe: I know that I always say that I don’t do measurements and 99.9% of the time that is true…but baking is another whole animal. If I’m honest, I don’t do it often. I’m not great at it. (Which may be why I like this recipe, because it’s hard to screw up) Having said that…I did go ahead and offer measured suggestions for this recipe. Happy Baking!
The Baking.
Preheat over to 350.
In a large bowl combine dry ingredients, oats, sugar, (yes, the sugar is considered “dry” for this recipe), baking powder, salt and spices.
In another bowl beat, by hand, lightly, the eggs and vanilla and then add the milk and the butter or oil. If you’re using the Just Egg, BONUS: no need to beat, just lightly mix to incorporate.
Gently stir the dry ingredients into the wet until well incorporated.
Spoon into a nine inch pan that has been sprayed with baking spray and bake for 30-40 minutes.
Now, the timing on this one can be tricky. Every oven is different. Glass pan vs metal pan, etc. I like to check on mine at the 30 minute mark because you really don’t want to over-bake this dish. The center should be set, but if your toothpick comes out just a little sticky (not runny) you should be okay. In this instance we want the center to set but we are NOT looking for the toothpick to come out too “clean” or dry. The dish will continue to set up a little on the counter after you take it out of the oven.
Let rest 2-3 minutes before serving.
The Toppings.
Many of the Ohio Amish serve this dish, in a bowl, and pour milk over it. (Also, the way that a lot of them eat shortcake) but that’s not really my style. I like the creaminess of yogurt! I also like to mix in just a little honey (or maple/agave syrup for the vegan version) to slightly sweeten the yogurt and loosen it up just a little.
Top with your sweetened yogurt and fresh berries. Red, white, and blue seemed appropriate for Memorial Day, coming up at the end of the month, but use whatever fruit your family likes. In the fall this dish topped with stewed apples is a total game changer. We also love fresh peaches in the summertime!

Vegan Walnut Banana Bread
Moist, with plenty of lift, and a crunchy brown sugar crust this Vegan Walnut Banana Bread is sure to become a family favorite. One of the best things about Vegan Banana bread is that you don’t need to stress out over trying to figure out an egg substitute because the bananas do that heavy lifting for you! This delicious recipe is the perfect way to use up your over-ripe fruit and can be totally customized with whatever mix-ins that you love!
Vegan baked goods are actually much easier and tastier than you might imagine and this Vegan Walnut Banana Bread is a perfect example. Moist, with plenty of lift, and a crunchy brown sugar crust it’s sure to become a family favorite.
Homemade breads are the kind of comfort foods that I can never resist! One of the best things about Vegan Banana bread is that you don’t need to stress out over trying to figure out an egg substitute because the bananas do that heavy lifting for you! This delicious recipe is the perfect way to use up your over-ripe fruit and can be totally customized with whatever mix-ins that you love! As with a lot of vegan baking, the trick to this banana bread is cooling time. Make sure to let this loaf cool completely before slicing or it will be crumbly and want to fall apart. Even letting it sit overnight, covered, isn’t a bad idea.


What you are going to need to buy:
3 Over-Ripe Bananas (The more brown and spotty, the better: I have, in a pinch used two over-ripe bananas mixed with one regular one and the recipe has worked out just fine.)
1/3 cup of White Sugar
1/3 cup of Brown Sugar (+ 1/4 cup to sprinkle on the top before baking)
1/3 cup of Vegetable Oil
1 tablespoon of Vanilla Extract
2 cups of All Purpose Flour
1 teaspoon of Salt
1 teaspoon of Baking Powder
1 teaspoon of Cinnamon
1 teaspoon of Nutmeg
1/2 cup of Walnuts, chopped
What you are going to need to do:
Preheat oven to 350 degrees.
To begin, mash your overripe bananas together in a mixing bowl until smooth.
To your banana puree add your oil, sugar, and vanilla and mix until well incorporated.
In another bowl sift together dry ingredients (minus the walnuts) and then add slowly to the banana/sugar/oil mixture.
Do not overwork the mixture. Gently fold in flour until just incorporated. Batter will be thick.
Fold in walnuts (or whatever other mix-ins you prefer. (Chocolate chips, cranberries, etc…)
Spoon batter into a loaf dish that you have oiled and floured
Using the back of the spoon smooth batter into pan making sure mixture is worked into all corners.
Sprinkle 1/4 cup of brown sugar onto the top on the batter for a crunchy top crust (Don’t sip this step…is it a lot of sugar…yes! Is it the best part? Also, yes!
Bake on the center rack of your oven for 45 minutes or until a toothpick inserted into the center of the loaf comes out clean.
Remove from oven and let cool completely before serving (several hours, if not over night)
Enjoy!