


Zucchini Fries with Homemade Pesto Hummus!
Technically this recipe is, in fact, TWO recipes in one, but the ingredients overlap so much and let’s face it, who doesn’t want some amazing homemade pesto hummus to have on hand, even if you don’t eat it all with these fries…? (Side note: I didn’t eat it all, either but I ended up using the rest the following day in another dish…so keep your eyes peeled for that post soon!)
Technically this recipe is, in fact, TWO recipes in one, but the ingredients overlap so much and let’s face it, who doesn’t want some amazing homemade pesto hummus to have on hand, even if you don’t eat it all with these fries…? (Side note: I didn’t eat it all, either but I ended up using the rest the following day in another dish…so keep your eyes peeled for that post soon!)
My bestie is on her own health journey these days. She's not necessarily plant-based but every now and then I can woo her over to the green side for a bit...like this week when she texted me that she was making zucchini fries! Her recipe called for egg whites but I knew I could probably pull off essentially the same thing with some aquafaba AND since I would be opening a can of chickpeas anyway homemade hummus to dip them in just seemed like the obvious choice!


What you are going to need to buy:
Zucchini - quantity is going to just depend on how many fries you want. What you see pictured is one medium zucchini and I gobbled them all up myself, so…make your best choices!
One can of Chickpeas
Minced Garlic - (we like these jarred options from Spice World!)
Bread Crumbs (I ended up using my own because I had some crutons that I had made from some leftover sourdough bread…but any will work. Use traditional Japanese Panko for a vegan version!)
Italian Seasoning
Nutritional Yeast - (If you don’t care about this recipe being vegan, you can use some powdered parmesan.)
Garlic Powder (Yes, there is fresh garlic and powdered garlic in this recipe. Don’t judge)
Onion Powder
Paprika
Salt & Pepper, to taste
Lemon Juice
Basil (and/or Italian Parsley)
Olive Oil
What you are going to need to do:
Let’s start with the Zucchini Fries!
Preheat over to 400 degrees.
Open the can of chickpeas and drain, reserving the liquid.
In a small bowl toss 1/4 cup of the chickpeas with 1/2 teaspoon of garlic powder, onion powder, paprika, salt, and pepper, until fully coated.
Place chickpeas on a baking tray with a silicone mat or lined with baking paper.
Cut your zucchini into your prefered “fry” sized pieces. I will say that, in the end I did prefer the thinner fries because they were crispier.
With a stand mixer or traditional hand mixer, whip the liquid from the chickpeas (called aquafaba) until light and and fluffy (resembling whipped egg whites) - This can take several minutes.
In a shallow dish or a rimmed plate mix together bread crumbs, Italian seasoning, nutritional yeast, garlic powder, onion powder, paprika, salt, and pepper. (Quantities will vary based on how many fries you are making. Don’t stress out…this is hard to really mess up.)
Dip the zucchini fries into the whipped aquafaba making sure to fully coat and then coat with the breadcrumb mixture. Continue until all fries are coated.
Bake at 400 for 20 minutes, flipping 1/2 through cooking.
Okay, onto the HUMMUS and PESTO!
While the chickpeas and the fries are in the oven you can make the hummus!
Into a blender dump the rest of the chickpeas along with 3 tablespoons of oil, 2 tablespoons of minced garlic (along with a little of the oil that the garlic is paked in…yum!), the juice of one lemon (or a couple tablespoons of white cooking vinegar.)
Blend until smooth adding additional oil, or even some of the whipped aquafaba, until your desired consistency is achieved.
Dump…scrape… or otherwise evacuate your hummus from the blender into a bowl. Get out all you can but don’t be too picky about it. No need to rinse the blender.
Back into the blender add 1 to 1.5 cups of fresh basil (and other greens of your choice) with 3-4 tablespoons of oil, salt, pepper, and a squeeze of lemon juice. Blend until the herbs are broken down but not completely smooth.
Back to the fries…
You can, for the last 2 minutes, turn your oven from bake to broil to get some nice toasted color on your fries but watch this carefully. Every oven is different and you don’t want them to burn!
Let fries cool on the tray for 2-3 minutes before serving.
Serve fries with pesto that you have swirled into the hummus…and garnished with the roasted chickpeas!
(Try not to eat the entire plate yourself)
Enjoy!

Healthy Chocolate Oatmilk Ice Cream - Only 5 Ingredients!
Not only is this Chocolate Oatmilk Ice Cream the one of the simplest summer recipes to make it also sneaks in an extra serving of veggies into your favorite summer snack by using avocados to make it extra creamy and dreamy! Only using 5 ingredients, most of which you probably alfready have in the house…it’s perfect for the kiddos because when it warms up it gets soft but never really "melts" making it much less of a mess for little mouths!
It's National Oat Milk Week and I'm celebrating with my friends over at Rise Brewing Co. using their Organic Chocolate Oatmilk to make this 5 ingredient dairy free ice cream!
Not only is this the one of the simplest summer recipes to make it also sneaks in an extra serving of veggies into your favorite summer snack by using avocados to make it extra creamy and dreamy!


Easily double or triple the recipe to serve a crowd. It's perfect for the kiddos because when it warms up it gets soft but never really "melts" making it much less of a mess for little mouths! Will definitely be serving this next weekend for Memorial Day!

Healthy Chocolate Oatmilk Ice Cream
Author: Sarah | April 19, 2021
Servings: 2-4
prep time: 15 minutes
freeze time: 3 hours - Overnight
total time: 8 hours
Ingredients: What You need to buy!
1 ripe avocado
1/4 c. Chocolate Oatmilk from Rise Brewing Co.
1/4 c. Cocoa Powder
3 tablespoons of Maple Syrup
Mini Chocolate Chips
Instructions: What You need to do!
Blend avocado, oatmilk, cocoa powder, and maple syrup until smooth.
Add a handful of chocolate chips and stir to combine
Freeze for 3 hours or up to overnight in a coverd bowl.
Serve with your favorite dairy free topping!
And…that’s it! See, I told you it was easy! Another of my favorite ways to enjoy this nice-cream is to make coffee floats! Simply use your favorite cold brew coffee, like the Nitro Original Black from the Rise Brewing Co. in place of root beer and top with a scoop of ice cream!
This recipe also happens to be the fastest and yummiest way to make dairy-free chocolate pudding! Simply skip the freezing step and refrigerate for about 30 minutes before serving! I really hope that you’ll try this Healthy Chocolate Oatmilk Ice Cream with Only 5 Ingredients this summer…and make sure to tag me when you do! @plantbasedgingr
Love, Light, and Lentils, my friends!
Sarah

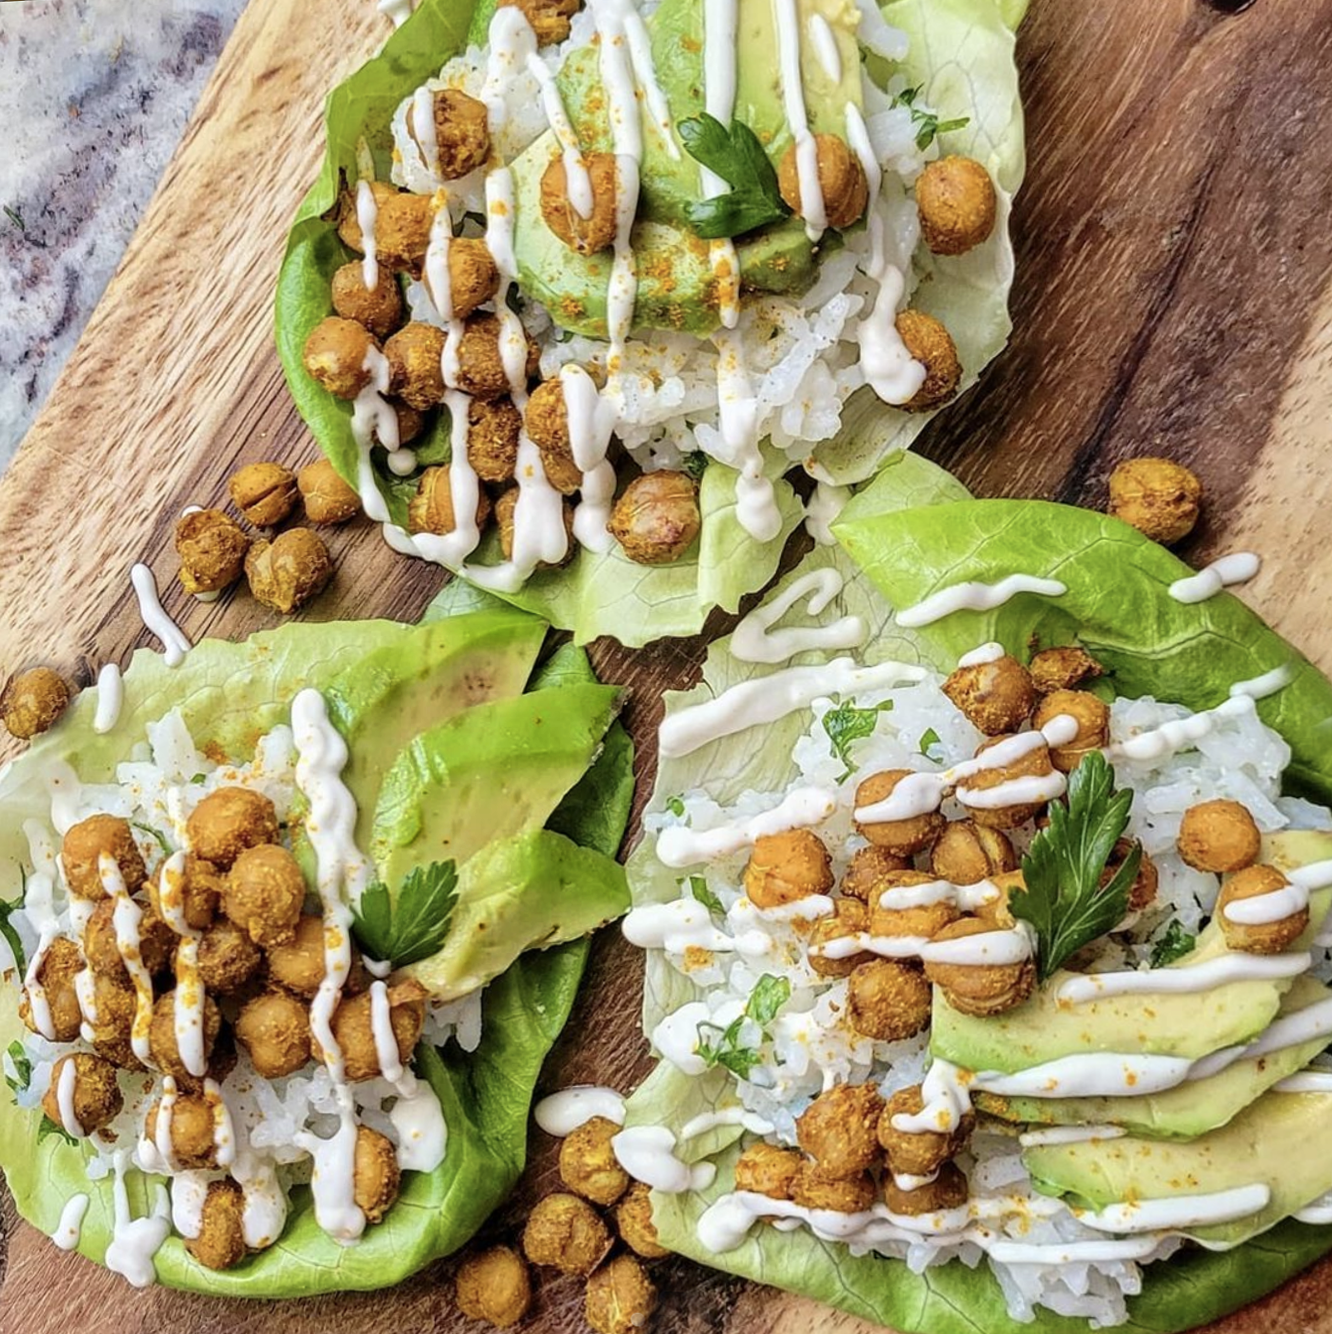
Coconut Curry Chickpea Lettuce Cups with BeanVivo!
If you are craving the flavors of curry but are short on time you are going to love these Curry Chickpea lettuce wraps! They are shockingly easy and even with roasting the chickpeas only take about 15 minutes to pull together with less than 10 ingredients that you probably already have in your panty! I used the lettuce as the “wrap” for this recipe but it would be equally as good wrapped in a tortilla or stuffed into a pita!
Are you ready for the easiest dinner you could whip together in 15 minutes with less than 10 ingredients? Thanks to our friends at BeanVivo these Coconut Curry Chickpea Lettuce Cups with with Cilantro Lime Rice and Pineapple are so simple to make and packed full flavor even the pickiest eaters in your house are sure to gobble them up!
If you’re not familiar with BeanVivo…you should be! Their mission was to develop tasty meals & snacks for people on-the-go, like you and me, by using simple organic ingredients. They combine one of nature’s most nutritious ingredients, not to mention one of my favorites, on our planet…beans, with tons of unique herbs and spices from around the world. Their ready to eat packs are sustainable, convenience (ready to eat in 60 seconds) and are totally gluten-free, and vegan! So…let’s cook!
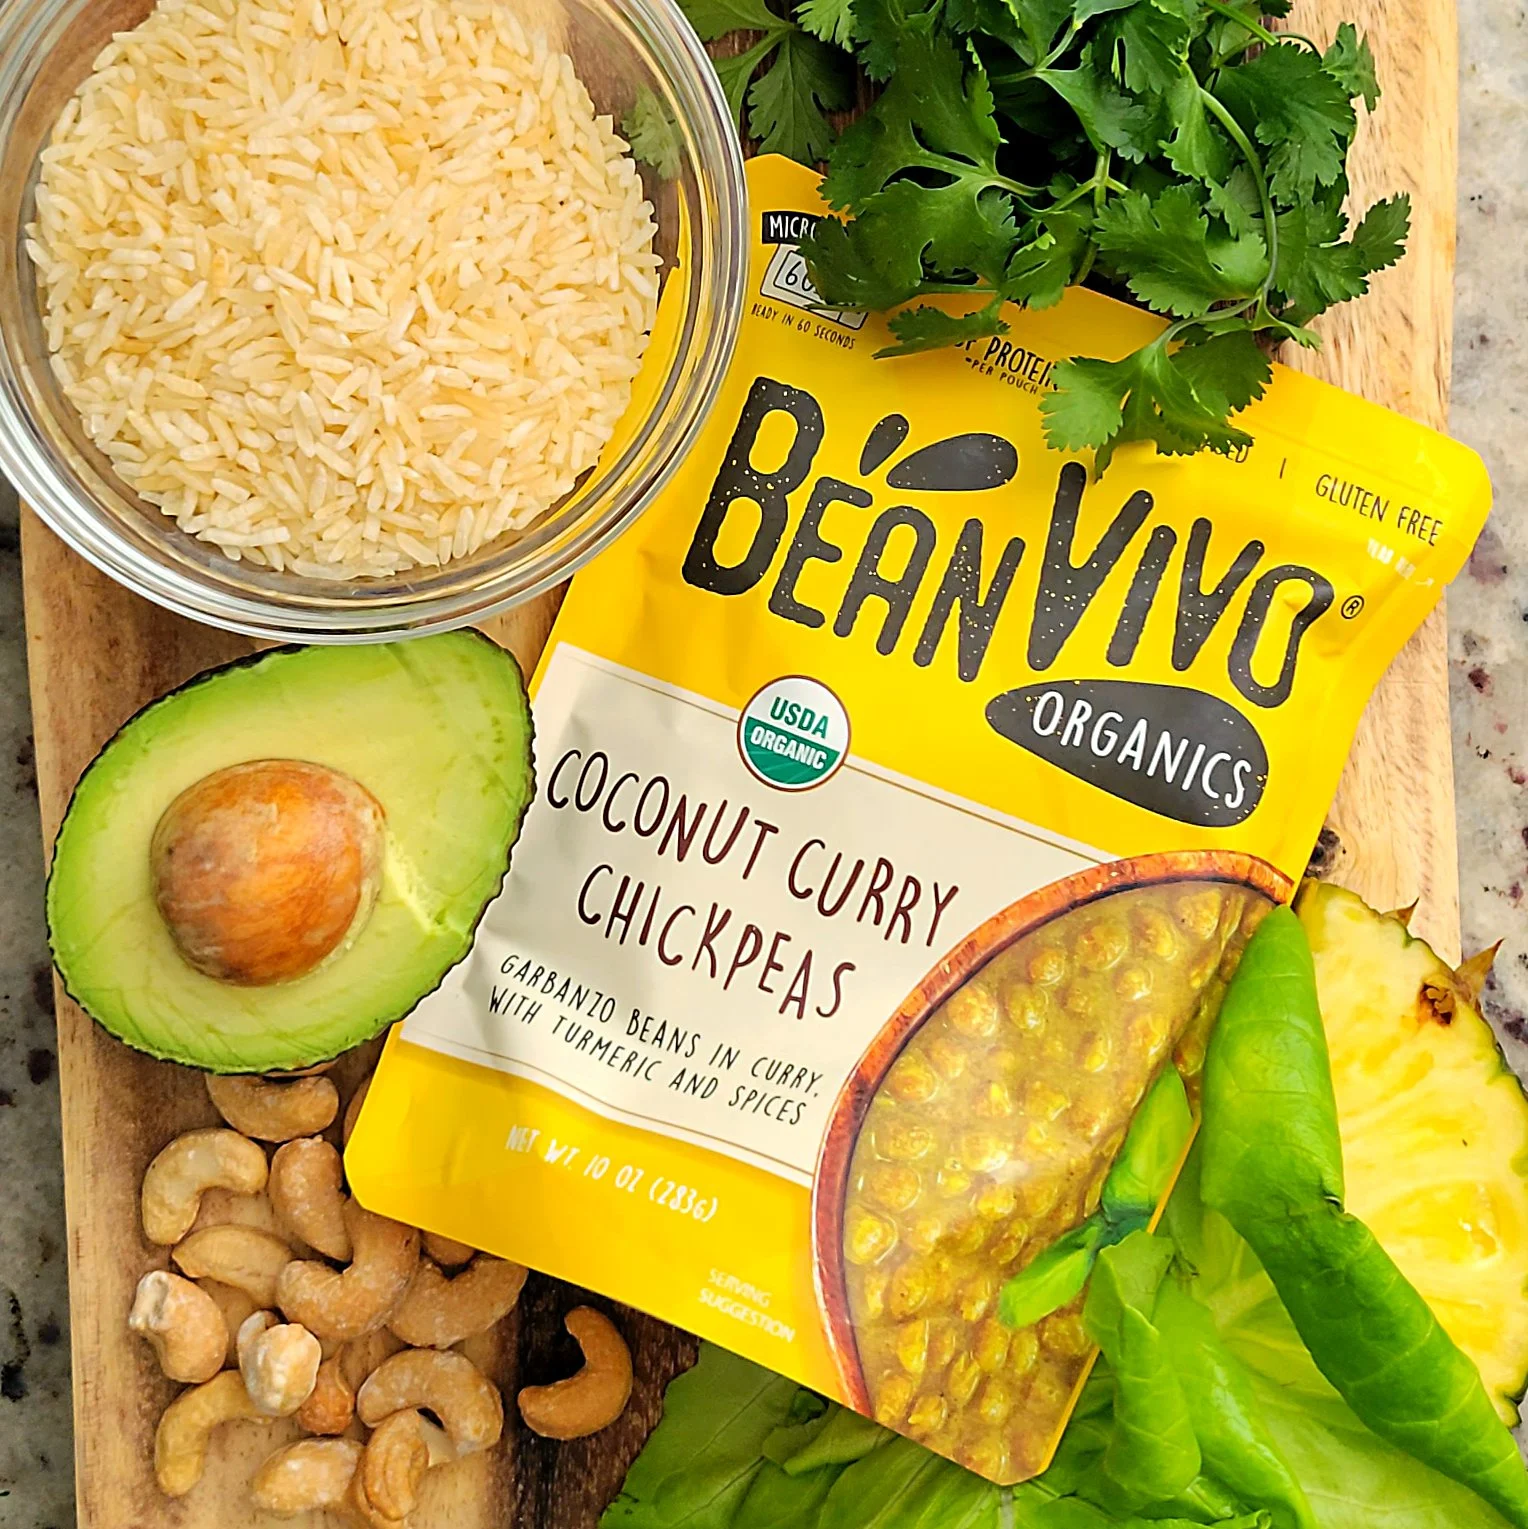


What you are going to need to buy:
Lettuce, use your favorite…I like butter lettuce
One packet of Coconut Curry Chickpeas from BeanVivo
Minute Rice
Dairy Free Butter
Lime Juice
Fresh Cilantro, chopped fine (or parsley, if you must!)
Avocado
Chopped Pineapple
Cashews
What you are going to need to do:
To begin, prepare your rice per the boxed directions allowing about 1/4 cup of cooked rice for each serving (3 lettuce cups, per serving)
Once the rice is finished cooking, stir in 1 teaspoon of butter, and add lime juice and cilantro (To taste…I like mine really lime-y)
Open and slice one small avocado.
Slice fresh pineapple into 1/4 inch chunks
Open your packet of Coconut Curry Chickpeas from BeanVivo . The best part is that you don’t even need to heat them! They are super delicious, right out of the packet!
Assembly!
Using your lettuce as your “shell” spoon your Coconut Curry Chickpeas from BeanVivo on top of a bed of the cilantro lime rice. Add avocado, diced pineapple, and cashews!
See, told you it was easy! Check out all the delicious combinations of BeanVivo products at their website HERE!

Curry Chickpea Lettuce Wraps with Cilantro Lime Rice
If you are craving the flavors of curry but are short on time you are going to love these Curry Chickpea lettuce wraps! They are shockingly easy and even with roasting the chickpeas only take about 15 minutes to pull together with less than 10 ingredients that you probably already have in your panty! I used the lettuce as the “wrap” for this recipe but it would be equally as good wrapped in a tortilla or stuffed into a pita!
Are you ready for the easiest lunch you could whip together in 15 minutes? I have legit been eating these Curry Chickpea Lettuce Wraps with Cilantro Lime Rice all of the time since I first made them a month or so ago!
If you are craving the flavors of curry but are short on time you are going to love these Curry Chickpea lettuce wraps! They are shockingly easy and even with roasting the chickpeas only take about 15 minutes to pull together with less than 10 ingredients that you probably already have in your panty! I used the lettuce as the “wrap” for this recipe but it would be equally as good wrapped in a tortilla or stuffed into a pita! Plus, the cilantro lime rice is so good you’re probably going to want to whip up a big batch to use in all kinds of dishes for the week!


What you are going to need to buy:
Lettuce
One can of Chickpeas
Curry Spice
White Minute Rice
Lime Juice
Fresh Cilantro, chopped fine (or parsley, if you must!)
Avocado
Dairy Free Sour Cream
What you are going to need to do:
Start by preheating your oven to 425
Open the can of chickpeas and drain. Do not rinse.
Keeping the chickpeas in the can add 1 tablespoon of curry spice to the can and swirl around so that all of the chickpeas get covered with the spices.
Place chickpeas on a baking tray with a silicone mat or lined with baking paper.
Bake for 15 minutes, rotating them on the pan about half-way through.
Prepare your rice per the boxed directions allowing 1/4 cup of cooked rice for each wrap you’re making.
Once the rice is finished cooking, add lime juice and cilantro (To taste…I like mine really lime-y)
Open and slice one small avocado.
Mix 3-4 tablespoons of sour-cream with a squeeze of lime juice, just to thin it out a little.
Assembly!
Using your lettuce as your “shell” place your roasted chickpeas on top of a bed of the cilantro lime rice. Add avocado and drizzle sour cream to finish. Garnish with more fresh herbs and a sprinkling of curry powder!
See, told you that was easy! Save any extra chickpeas to use in stews or just to eat as a salty and crunchy snack.
Enjoy!

Creamy Hummus Pasta with Roasted Red Tomatoes (Lucky Left Overs Series)
When you live alone and cook for guests mostly on the weekends, your mid-week fridge can often end up filled with the odds and end s from dishes gone-by! This pasta dish is not only great because it uses up your leftover hummus but also because it really does take less than 15 minutes to throw together…and bonus, you can always use a tub of store-bought hummus if you have to!
Remember when I told you a couple of days ago that I was working on another recipe to use up the rest of that homemade hummus and pesto that we made for our zucchini fries? Well, friends…here it is! This Creamy Hummus Pasta with Roasted Red Tomatoes is just about the simplest dish to whip up but I promise your taste buds will thank you!
When you live alone and cook for guests mostly on the weekends, your mid-week fridge can often end up filled with the odds and ends from dishes gone-by! This pasta dish is not only great because it uses up your leftover hummus but also because it really does take less than 15 minutes to throw together…and bonus, you can always use a tub of store-bought hummus if you have to!


What you are going to need to buy:
Hummus, about 2 cups (for 2-3 servings) - CLICK HERE for the recipe that this recipe uses!
Sundried tomatoes, 1/2 cup - (we like the California SunDry Tomatoes that come in a jar! Plus, they keep in the fridge forever!
Cherry or grape tomatoes, cut in half, 7 or so, per serving
Lemon Juice
Salt and Pepper
Pasta of your choice
What you are going to need to do:
Preheat over to 415 degrees.
Cut your tomatoes in half and sprinkle with salt.
Place tomatoes on a baking tray with a silicone mat or lined with baking paper and roast for 12 minutes, flipping half-way through.
Cook your pasta, per the package directions, in salted water until tender.
Drain pasta, but reserve 1/2 cup of pasta water.
Gently stir in the hummus, the sundried tomatoes, and 1 tablespoon of lemon juice, adding the pasta water, as necessary, until the hummus coats the pasta with an “alfredo” like consistency. Note: You may not use all the pasta water and that’s okay.
Gently scoop the roasted tomatoes from the baking tray and fold them into the pasta.
Salt and pepper, to taste.
Drizzle with 1-2 tablespoons of the oil that the sundried tomatoes are packed in onto the top of the pasta before serving and garnish with fresh herbs.
See, I told you it was easy! In all likelihood, it took me longer to type up this post than it will for you to make this dish!
Enjoy!