


Spicy Jackfruit Carnitas Street Tacos with Apple Salsa
I don’t know about you but when the days get busier tacos always seem to be a go-to meal for me! Quick, easy, and who doesn’t love tacos? These Spicy #Jackfruit Carnitas Street Tacos taste just like Summer to me. The smoky spiciness of the jackfruit with the cold sweet crunch of the apple salsa...in case you were wondering, yes...yes, this is one of best things I have put in my face in recent memory!

I don’t know about you but when the days get busier tacos always seem to be a go-to meal for me! Quick, easy, and who doesn’t love tacos? These Spicy Jackfruit Carnitas Street Tacos taste just like Summer to me. With an Apple, Onion, and Garlic Salsa, tossed with a balsamic glaze, and topped with some vegan crema and fresh herbs these sound weird...but taste amazing!
The smoky spiciness of the jackfruit with the cold sweet crunch of the apple salsa...in case you were wondering, yes...yes, this is one of best things I have put in my face in recent memory! I seriously could have eaten three more!
What you are going to need to buy:
Jackfruit - (Fresh or Frozen is fine. This recipe uses frozen from The Jackfruit Company)
Tortilla or Hard Taco Shells, whatever you prefer
Medium Apple
Medium Sweet Onion
Minced Garlic - (we like these jarred options from Spice World!)
Sour Cream - (I’m a pretty die-hard Tofutti fan, so that’s what I always use!)
Balsamic Vinegar
Spices for your Jackfruit - (we used oregano, cumin, paprika, chili and a touch of brown sugar)
Liquid Smoke
Salt and Pepper, to taste
Fresh Cilantro - (or flat leaf parsley, if you must!)
Lime Juice
What you are going to need to do:
Honestly, these tacos look so fancy but they come together so fast and easy!
To start you’re going to finely chop your onion and 3/4 of your apple (reserving some apple for large slices as garnish, if you like.)
Into a bowl combine the apples, onion, minced garlic, (to taste, maybe a teaspoon), and a tablespoon of your favorite balsamic vinegar. Currently, I am loving this cilantro and garlic option from The Ancient Olive!
Set aside.
Preparing the Jackfruit:
In a medium skillet you’re going to saute the Jackfruit until it becomes soft and begins to give up up some of it’s juices.
With 2 forks, gently pull the bulbs apart like you would pull pork.
Reduce heat and add to the skillet: a dash of liquid smoke plus oregano, cumin, paprika, chili and a touch of brown sugar. Measurements will vary based on the amount you are making. Start out conservative and you can always add more of the flavors you like.
Salt and Pepper, to taste.
Assembly:
Onto your taco shell of choice, layer your Jackfruit mixture and top with your onion and apple salsa.
Drizzle some sour cream that has been cut with a teaspoon of lime juice and sprinkle with paprika to garnish. Additionally, garnish with apple wedges and fresh herbs.
Here’s a taco shell tip from Sarah: Can’t decide between hard and soft tacos? Drape your soft shells over the grates/rails of a hot oven and let them “crisp up” for about 4 minutes and boom, best of both worlds.

Poor Man's Vegan Chicken Parmesan Casserole
Who doesn’t love a good pasta dish? It’s the kind of comfort food that you crave when life get’s crazy and you don’t have any idea what else to make for dinner. Or, if you are like me, this week, it’s because you just need to go to the grocery store! This Poor Man's Vegan Chicken Parmesan Casserole is also the perfect way to use up the pasta that you have at home because just about any kind of noodle or shell will work for this dish.
Who doesn’t love a good pasta dish? It’s the kind of comfort food that you crave when life get’s crazy and you don’t have any idea what else to make for dinner. Or, if you are like me, this week, it’s because you just need to go to the grocery store! This Poor Man's Vegan Chicken Parmesan Casserole is also the perfect way to use up the pasta that you have at home because just about any kind of noodle or shell will work for this dish.
I have made several versions of a plant-based Chicken Parmesan dish over the years, but honestly, this is one of the easiest and everyone, even the meat eaters in my life, always love it. Part traditional Chicken Parmesan, part pasta casserole, it’s the best of both worlds when you’re craving some comfort food, plus because you’re not doing all the breading and frying it comes together in half the time, just about 30 minutes, total.


What you are going to need to buy:
Your favorite kind of pasta shell or small noodle. (Pictured here is cavatappi, or as my niece calls them, corkscrews!)
Red Sauce - (Make your own or use your favorite jarred brand. Trust me, either way, it’s going to be delicious.)
Vegan Parmesan - (We love the Follow Your Heart shredded Parmesan)
Vegan Mozzarella - (The Miyoko's Creamery has one that melts and browns up so nice that you’ll never know the difference)
Minced Garlic - (we like these jarred options from Spice World!)
Breaded Vegan Chicken Strips or Tenders - (Pictured here are the Gardein Crispy Tenders)
Salt and Black Pepper
Italian Seasoning or Fresh Herbs
What you are going to need to do:
To start, take your fingers out of the freezer so they can begin to thaw. (You can even pop them into the microwave for 30 seconds, or so…)
Preheat oven to 350 degrees
In a stock pot, bring salted water to a rolling boil to cook your desired pasta.
Once your pasta is cooked drained, mix in your pasta sauce and parmesan cheese. Amounts will vary based on how much past you have cooked and how many portions you are making. You want the pasta nice and covered in the sauce because you’re going to bake this dish and don’t want it to dry out.
I like to also mix in a bit of minced garlic to the pasta and the shells at this point.
Layer the pasta in a casserole dish, leaving room at the top for the Chicken.
Lay the chicken strips on top of the pasta. It’s best if these are at room temperate at this point and not frozen.
Place a heaping tablespoon of red sauce on top of the tenders and top with a thick slice of mozzarella.
Cover tightly with tin foil and bake for 15 minutes.
Uncover and turn your oven to broil. Broil, uncovered for 5 minutes to really melt that cheese and get some nice browning but keep your eye on it because it can go from brown and bubbly to burned real quick!
Let sit for 3-4 minutes before serving. Top with fresh herbs and serve with your favorite garlic bread!
Enjoy!

Carrot Bacon Topped Avocado Toast
If you have been in the veg community for any length of time, you’ve probably heard about the wonder that is, Carrot Bacon! And, while I can’t lay claim to this recipe nor the base idea, I do have enough people ask me about it when I post photos that feature it that I thought I would share with you all how I make my Carrot Bacon!
If you have been in the veg community for any length of time, you’ve probably heard about the wonder that is, Carrot Bacon! And, while I can’t lay claim to this recipe nor the base idea, I do have enough people ask me about it when I post photos that feature it that I thought I would share with you all how I make my Carrot Bacon!

I believe that the original recipe came from, the reigning vegan queen herself, Ms. Tabitha Brown, or at least that who I first saw share it! She uses a veggie peeler and an air fryer and my version uses a mandolin and the oven…just one more example of how most of cooking really is just good improv! Feel free to jump down to the end of the recipe if you just want my quick tips and tricks!
What you are going to need to buy:
Fresh Carrots
Liquid Smoke
Minced Garlic - (we like these jarred options from Spice World!)
Maple Syrup - (The good stuff, not pancake syrup.)
Garlic Powder, Paprika, Onion Powder
Salt & Pepper
Avocado
Sliced Vegan Cheese (like this ONE from Field Roast)
Tomato
Bread
Vegan Feta (this recipe uses the Block Feta from Violife!)
What you are going to need to do:
For the Carrot Bacon:
Using a mandolin or a veggie peeler slice your carrots into long thin strips/ribbons. This is why you want those fat carrots because they do tend to shirk up quite a bit in the oven.
Into a zip-top baggie that is large enough to hold your ribbons add:
1 -2 tablespoons of Liquid Smoke
1-2 tablespoons of Maple Syrup
1 teaspoon on minced garlic
1/2 teaspoon each of the spices. (Garlic Powder, Paprika, and Onion Powder, Salt and Pepper)
Let the carrot ribbons marinate for anywhere from 10-30 minutes.
Preheat your oven to 400 degrees.
On a baking tray lay out your carrot ribbons and place them in the oven to crisp up for 15-20 minutes. (Keep an eye on them, flipping after 10 minutes. You can also baste the reverse side with the leftover marinade when you flip them.
Feel free to turn on your broiler for the last 5 minutes or so to get your bacon extra crispy but watch is carefully so that it doesn’t burn…because it will!
Remove from oven and let sit for 1 -2 minutes until cool enough to handle.
The Assembly:
Apply your best practices for standard avocado toast preparation! I like mine to resemble a BLT and use tomato layered over some sliced vegan cheese and topped with dairy-free feta
Now, for the TIPS & TRICKS:
🌿 Use giant carrots...like really the fattest ones you can find. My local Asian Market has the biggest carrots I’ve ever seen!
🌿 Use a mandolin or a peeler because you won't be able to slice the carrots thin enough with a knife. I love my Pampered Chef Simple Slicer. I use it for everything!
🌿 The longer you can marinate the carrots, the better the flavor!
🌿 I bake mine on parchment because when that sticky marinade cooks onto your baking sheet at 400 degrees, it’s a pain to get off!
🌿 Use the leftover marinade to base when you flip the bacon half-way through cooking
🌿 Use the broil feature of your oven at the end to really crisp up the bacon but watch it carefully so it doesn’t burn! - I leave the oven door cracked so I can keep an eye on what’s happening!
Enjoy! And as Tabitha says…
“Hey, you have a good day, but if you can't, don't you go out messing up nobody else's.”

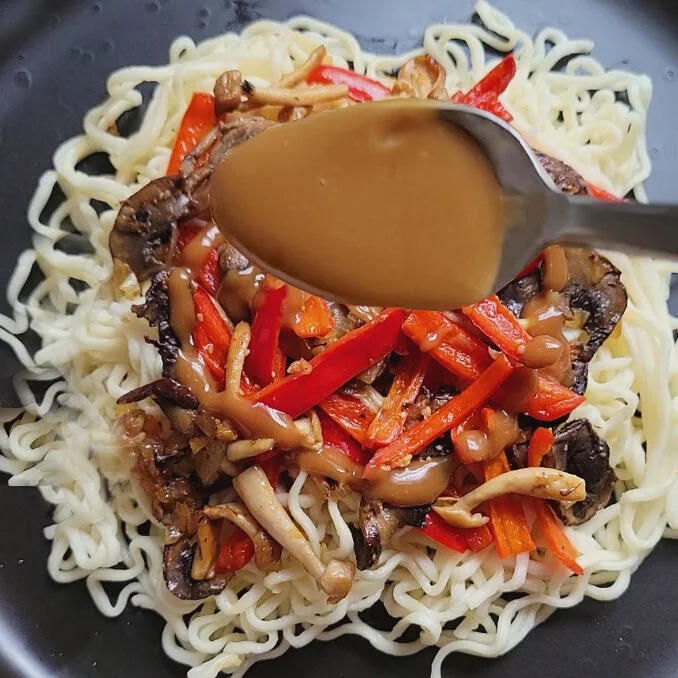
Noodles with Garlic Mushrooms and Peppers topped with Thai Inspired Spicy Lime Peanut Sauce
Raise your hand if you buy mushrooms, when they are on sale, and then spend the next week watching them turn to goo in your fridge because you’re uninspired as to what to do with them!? I’ve got you covered! The Thai inspired spicy lime peanut sauce is all you need to turn ramen and mushrooms into an amazing dinner! Make a little extra, because you’re going to want to put it on everything!
Sometimes you plan, shop for, and execute extravagant meals that look and taste like they should be served at the fanciest of restaurants and sometimes you haven’t been to the grocery store in a week and you’re trying to find way to level up ramen! This recipe is perfect because it looks and tastes fancy but it comes together with simple pantry ingredients and a small amount of produce, in less than 20 minutes!
Raise your hand if you buy mushrooms, when they are on sale, and then spend the next week watching them turn to goo in your fridge because you’re uninspired as to what to do with them!? I’ve got you covered! The Thai inspired spicy lime peanut sauce is all you need to turn ramen and mushrooms into an amazing dinner! Make a little extra, because you’re going to want to put it on everything!


What you are going to need to buy:
Ramen - (the stuff you ate in college is fine, especially if you have some in the house BUT a trip to your local Asian market for a more authentic option is really going to make this dish!)
Vegan Butter - (This recipe used Earth Balance)
Mushrooms, sliced - (This recipe used a couple kinds because it’s what I had in the bottom on the crisper drawer, but use what you’ve got!)
Red Peppers, julienned (cut into strips)
Yellow Onion, diced
Minced Garlic - (we like these jarred options from Spice World!)
Olive Oil
Salt and Pepper, to taste
Peanut Butter - (creamy is best)
Sesame Oil - (You can use another neutral oil, but the flavor will differ a bit)
Chili Oil - (If you don’t have Chili oil, you can use dried chili powder)
Soy Sauce
Maple Syrup
Lime Juice
Water, for thinning
What you are going to need to do:
In a medium skillet, saute your mushrooms, onions, peppers and garlic in a little olive oil until soft.
Note: add the garlic about 1/2 way through cooking, once the onions have given up a little moisture into the pan, so that it doesn’t burn
Prepare your ramen, per the package directions BUT if your ramen comes with a flavor packet, do not use it. Once noodles are soft, drain well and stir in one teaspoon of butter, while the noodles are hot.
To Make the Spicy Lime Peanut Sauce: (This makes enough for two servings)
This can be done on a bowl with the aid of the microwave, or on the stove-top in a small sauce pot.
Mix together the following
4 tablespoons of peanut butter
1 tablespoon of sesame oil
1 tablespoon of Soy Sauce
1/2 teaspoon of chili oil
Heat these ingredients until the peanut butter becomes soft enough to incorporate easily into the oils and whisk to combine. After well combined add:
1 tablespoon of maple syrup
1 tablespoon of lime juice
Salt and pepper, to taste
At this point, taste your sauce…want a bit more tang, add another splash of lime juice. Like things a but more spicy…more chili oil. Once you get the flavor you like use 2-3 tablespoons of water to thin sauce to desired consistency. I like mine about the thickness of a ranch dressing, thin enough to drizzle, but thick enough to stick to the mushrooms and noodles.
To Serve:
Plate the noodles and top with the cooked mushrooms, peppers and onions.
Drizzle peanut sauce on top.
Garnish with chopped peanuts, if desired.
Enjoy!

Vegan Fish Tacos with Spicy Lime Aioli
If you’re like me…you can’t seem to get enough tacos… and Fish Taco are one of my absolute favorites, especially in the Summer time! The fishless fillets from Gardein make them so quick and easy to whip up and taste amazing! Maybe a little nontraditional...topped with a spicy lime and garlic aioli but these are the perfect vegan tacos to add to your weekly Taco Tuesday lineup.
If you’re like me…you can’t seem to get enough tacos… and Fish Tacos are one of my absolute favorites, especially in the Summer time! The fishless filets from Gardein make them so quick and easy to whip up and taste amazing! Maybe a little nontraditional...topped with a spicy lime and garlic aioli but these are the perfect vegan tacos to add to your weekly Taco Tuesday lineup.
Taco are not something that I ever think to put on the blog, although, not gonna lie…I eat them at least once a week for either lunch or dinner BUT a sweet friend wrote me and asked if I would post the recipe for the yummy Fish Tacos that I featured over on my @plantbasedgingr IG page this week.


What you are going to need to buy:
The Fishless Filets from Gardein
Tortilla or Hard Taco Shells, whatever you prefer
Shredded Cabbage - (I often keep a bag of a shredded cole slaw mix on hand to use in recipes like this where I’m not going to need or want and entire head of cabbage!)
Tomatoes, Diced
Avocado
Sour Cream - (I’m a pretty die-hard Tofutti fan, so that’s what I always use!)
Salt and Pepper, to taste
Fresh Herbs
Fresh Lime
For the Spicy Lime Aioli:
Mayo - (Vegan or otherwise)
White Vinegar
Hot Sauce/Chili Sauce
White Sugar
Lime Juice
Salt & Pepper, to taste
What you are going to need to do:
Start by preheating your oven and cooking the fishless filets. They are small and don’t take long. I don’t even wait for the oven to preheat, just set the temp and throw them on a baking tray. They, honestly, should be plenty warm by the time you get all the rest of the ingredients together.
Dice your tomato and your avocado and chop your herbs. You can really put anything in these tacos that you like. I have added sweet corn before and that is also really delicious.
Now for the Aioli:
Now, some people will, for sure, argue with me, but in my book aioli is just fancy, runnier mayo! It’s super easy to make…very customizable and might just become your favorite condiment.
Quantities are hard for this because it really depends on how much you need to make: Mix together Mayo with a splash of vinegar and the juice of 1/2 a lime until the consistence loosens up but is not too runny. Think like a nice alfredo sauce…it will cling to the food and not run off, but way thinner than mayo and you don’t need a knife to spread it…drizzle-able. Not a word, but you get the idea!
Taste for flavor and add salt, pepper, a pinch of sugar and depending on how spicy you want it, your desired amount of hot sauce. If you get it too spicy for your liking, just add a tablespoon or so, more mayo. Tweak until you like the taste. For these tacos this aioli provides a big punch of flavor so I like mine very lime-forward and very spicy!
Assembly:
Remove your fishless filets from the oven and slice into 1/2” strips.
Onto your taco shell of choice, layer your cabbage, fish, tomato, avocado (and anything else you like) and drizzle with the aioli you just made!
Garnish with fresh herbs like cilantro, parsley or even dill!
Here’s a taco shell tip from Sarah: Can’t decide between hard and soft tacos? Drape your soft shells over the grates/rails of a hot oven and let them “crisp up” for about 4 minutes and boom, best of both worlds.

Mediterranean Kabobs with Fresh Pesto and Fluffy Couscous (Just 10 Ingredients)
Need a dish that cooks up quick, tastes amazing, and looks super impressive on the plate? These mediterranean inspired kabobs with fresh pesto, served over fluffy couscous are it! And, no...you don’t need a grill to make a great kabob! These cooked up, quick and easy, in the oven on 400 for about 15 minutes...the whole meal is on the table in less than 30 minutes!
Need a dish that cooks up quick, tastes amazing, and looks super impressive on the plate? These mediterranean inspired kabobs with fresh pesto, served over fluffy couscous are it! And, no...you don’t need a grill to make a great kabob! These cooked up, quick and easy, in the oven on 400 for about 15 minutes...the whole meal is on the table in less than 30 minutes!
I love couscous…that is no secret! If you are a long-time reader you know that I make it all the time! It cooks up in the same amount of time as most rice or noodles, is so versatile that you can serve it with almost any style of food, and it’s super affordable! Plus: If you are trying to impress someone (wink, wink) it looks and sounds way more fancy than it really is!


What you are going to need to buy:
Couscous - (Here’s my secret! I typically buy the boxed stuff and my favorite brand happens to be THESE from from the brand Near East)
Butter - (I love this plant based butter from Earth Balance)
Minced Garlic - (we like these jarred options from Spice World!)
Vegetables for the Kabobs - (This recipe is simple, tomatoes and mushrooms, but really you can use whatever veg you like!)
Feta - (the block Feta from Violife is amazing and great for this recipe because you can cut it into big chunks!)
Basil - (about 1 cup of leaves)
Olive Oil
Lemon Juice
Salt & Pepper, to taste
What you are going to need to do:
Preheat your oven to 400 degrees.
If you are using wood kabob sticks, make sure to soak them in water…you can do this while you make the pesto.
For this small amount of pesto I don’t bother getting out the blender but if you have a little food chopper, that could be handy! Chop your basil into very small pieces! This might take a few passes, if you are doing it by hand.
To the chopped basil, add olive oil, minced garlic, pinch of salt, and a squeeze of lemon juice. You can adjust to your own taste. I like mine a little more on the lemon-forward side. Make as much or as little as you like. If you make too much, it will keep in the fridge and you can put it on…almost everything. Moral: there is never too much pesto!
Assemble the Kabobs
This isn’t hard…as long as your kabob sticks have been soaking for 5 minutes or so…
Arrange your veg onto the kabob sticks and try not to overcrowd or some things might not cook evenly. Try to think about the kinds of veg you have and how slow or how quickly they cook! This mushroom and tomato combo is great because they are both done at about the same time. Onions would also have been good! Something like potatoes are going to take more time…
Place on a baking sheet or straight on the grates of your oven, your preference! If you do go straight onto the oven rack, place the baking sheet below to catch drips!
These are going to cook fir about 15 minutes at 400…and will need to be gently turned every 4-5 minutes so nothing sticks.
In the meantime…let’s make some couscous.
It’s pretty straight forward and I would say that you can prepare per your box’s instructions with TWO EXCEPTIONS! The trick to really flavorful couscous is to toast it before cooking! If you’ve been here awhile you’ll be familiar with this but if not…(See Below)
PRO TIP: In a non-oiled, medium saucepan, on medium/low heat measure out the desired amount of couscous, according to the boxed directions, for the number of serving you need to make. Let the couscous toast in the warm pan, stirring or agitating the pan often so that the contents do not burn. After about 90 seconds you should see the couscous pearls begin to turn from blond to light brown. When this happens take the saucepan off the heat. It will continue to toast, from the residual heat but you don’t want it to burn.
I also always add about a tablespoon of butter, at the very end and stir into the cooked couscous.
Serving!
The service of this dish is really what takes these humble ingredients and turns them into something special.
After the kabobs come out of the oven, slide a piece of feta onto each end of the kabob stick and place on top of a bed of the couscous.
Brush the kabobs with the pesto mixture and enjoy!

Southern Style, Mushroom, Pulled Pork Sandwiches with Vegan Slaw
Remember 20 years ago before vegan food got cool? Before we had fake burgers and pea protein, and seitan at our fingertips in our local grocery stores? Back then, we ate, um…mushrooms, and we ate a lot of them! These Mushroom Pulled Pork Sandwiches are the perfect summer cook-out or picnic food…made with love and just a little sprinkle of nostalgia for the simple plant-based recipes that got me into this lifestyle to begin with!
Remember 20 years ago before vegan food got cool? Before we had fake burgers and pea protein, and seitan at our fingertips in our local grocery stores? Back then, we ate, um…mushrooms, and we ate a lot of them! These Mushroom Pulled Pork Sandwiches are the perfect summer cook-out or picnic food…made with love and just a little sprinkle of nostalgia for the simple plant-based recipes that got me into this lifestyle to begin with!
I have had an awful lot of requests for this recipe after posting it last week as what we enjoyed for our Memorial Day festivities! If I’m honest, this is another one of those recipes that I feel a little guilty calling a “recipe” because it’s so simple…I’m sure we could have some heated debate over sauce and slaw but I’ll share with you how I made mine and you can always customize it to your own tastes when you make it at home! (And you SHOULD make it at home because, YUM!)


What you are going to need to buy:
Mushrooms! - (figure on 6oz of mushrooms, per serving!)
(Ok, listen, friends! I know there are a lot of fancy mushrooms on the market these days but for this recipe I just used what my local Publix had on sale, which was, plain, ol’ white mushrooms!)
Liquid Smoke
Minced Garlic - (we like these jarred options from Spice World!)
BBQ Sauce - (Buy or make your own!)
Cole Slaw Mix (this is another reason why this recipe is so easy…I simple bought the pre-shredded slaw mix from the produce section and made my own dressing!)
Vegan Mayo - I have really been into the egg-free option that Hellman's has these days!)
White Wine Vinegar
Maple Syrup
Mustard
Salt & Pepper, to taste
Burger Buns (Sara Lee has great dairy-free options)
What you are going to need to do:
The main part of this recipe and, dare I say, the only really skill needed to make it much of a success is slicing the mushrooms! I order for this recipe to really mimic the texture of pulled pork you want to slice your mushrooms as thin as possible.
I actually bough the pre-sliced white mushrooms and then took the individual slices and cut them into tiny “sticks” - think like the thickness of a tine on a fork. It takes a bit of time, but it’s worth it…and it’s still less time than the 8 hours it takes to make traditional pulled pork!
Once your mushrooms are all sliced, we are going to saute them in a medium skillet, with minced garlic and a few splashes of liquid smoke until they are cooked down and soft.
Be careful here! Because you cut them so thin, you’ll need to be a little on the gentle side when stiring them in the pan!
Once the mushrooms are cooked, simply add your favorite bbq sauce and let simmer for another 2 minutes. Be careful not to burn the sauce.
Onto the Coleslaw!
In my world, there is simply no other way to eat this sandwich than with it being topped with slaw!
Like i said, above, I buy the prepackaged coleslaw mix that has the shredded cabbage and carrots all ready to go, but feel free to shred your own!
For the dressing we are going to mix:
1 cup of vegan mayo
1 tablespoon of white wine vinegar
1-2 tablespoons of mustard, depending on how much you like mustard
1 tablespoon of maple syrup
Salt and pepper, to taste.
In my experience this is going to make enough dressing for one bag of coleslaw…(4 servings)
Toss your shredded cabbage and carrots with the slaw dressing and park in the fridge for 20 minutes or so! You can even make this the night before!
The Assembly!
Bun
Mushroom “Pulled Pork”
Coleslaw
Bun.
It really is that easy! Some people I know top theirs with potato chips, fresh sliced or caramelized onions, melted cheese, homemade pickles, and even pickled jalapeños! We served them with some grilled street corn and baked beans! Does it get any more “summer” than that?
Enjoy!

Impossible Vegan Big Mac with Homemade Special Sauce
There isn’t too much to this recipe to be honest. Fry up a couple of vegan burgers, make some special sauce, chop some veg and assemble! I only have a couple of tricks! If you want to actually do that whole double stack, like a traditional big mac…make your patties really thin! (But, honestly…they would be just as good as just a single regular burger.) Sometimes vegan cheese can take a little longer to melt so make sure to put in onto the top of your burgers as soon as you flip them! Just a little splash of liquid smoke and some minced garlic in the pan when you fry your burgers will make all the difference in the flavor profile!
Two all beef patties, special sauce, lettuce cheese, pickles, onions…all on a sesame seed bun! Who else remembers that little McD’s jingle from the late 80’s? Although it’s been two decades since I’ve had a Big Mac I can still remember the first one that I ate…on a Saturday morning, with my dad and my brother circa 1990…but let’s be real, all we really wanted to do was play on the playground!
There isn’t too much to this recipe to be honest. Fry up a couple of vegan burgers, make some special sauce, chop some veg and assemble! I only have a couple of tricks!
If you want to actually do that whole double stack, like a traditional big mac…make your patties really thin! (But, honestly…they would be just as good as just a single regular burger)
Sometimes vegan cheese can take a little longer to melt so make sure to put in onto the top of your burgers as soon as you flip them!
Just a little splash of liquid smoke and some minced garlic in the pan when you fry your burgers will make all the difference in the flavor profile!


What you are going to need to buy:
Impossible Burger from Impossible Foods
Liquid Smoke
Vegan Mayo - (We like THIS ONE from Hellman’s…who knew?)
Ketchup
Mustard
Relish, chopped fine
American Cheese - (love THESE SLICES from Follow Your Heart)
Minced Garlic - (we like these jarred options from Spice World!)
White Onion
Onion Powder
Vinegar
Pickles
Lettuce
Salt & Pepper, to taste
Burger Buns
What you are going to need to do:
You can either buy the individual Impossible Burger patties or the block “ground beef.” Season with salt and pepper and a little liquid smoke.
Fry your burgers in a non-stick skillet on medium heat. Depending on size of the burgers they should take about 2 minutes per side.
To make the sauce:
1/3 cup of Mayo
3 tablespoons of Ketchup
1 tablespoon of Mustard
2 tablespoons of relish
1/2 teaspoon of minced garlic plus a splash of the oil/juice that the garlic is packed in
Onion Powder, salt and pepper, to taste.
Note: Depending on how you like your sauce you can also add a splash of vinegar and some white sugar. I preferred to add a bit more relish if I wanted it more sweet or a bit more mustard if I wanted it more tangy!
Chop Lettuce.
Dice Onions.
Assemble and Enjoy!

Creamy Hummus Pasta with Roasted Red Tomatoes (Lucky Left Overs Series)
When you live alone and cook for guests mostly on the weekends, your mid-week fridge can often end up filled with the odds and end s from dishes gone-by! This pasta dish is not only great because it uses up your leftover hummus but also because it really does take less than 15 minutes to throw together…and bonus, you can always use a tub of store-bought hummus if you have to!
Remember when I told you a couple of days ago that I was working on another recipe to use up the rest of that homemade hummus and pesto that we made for our zucchini fries? Well, friends…here it is! This Creamy Hummus Pasta with Roasted Red Tomatoes is just about the simplest dish to whip up but I promise your taste buds will thank you!
When you live alone and cook for guests mostly on the weekends, your mid-week fridge can often end up filled with the odds and ends from dishes gone-by! This pasta dish is not only great because it uses up your leftover hummus but also because it really does take less than 15 minutes to throw together…and bonus, you can always use a tub of store-bought hummus if you have to!


What you are going to need to buy:
Hummus, about 2 cups (for 2-3 servings) - CLICK HERE for the recipe that this recipe uses!
Sundried tomatoes, 1/2 cup - (we like the California SunDry Tomatoes that come in a jar! Plus, they keep in the fridge forever!
Cherry or grape tomatoes, cut in half, 7 or so, per serving
Lemon Juice
Salt and Pepper
Pasta of your choice
What you are going to need to do:
Preheat over to 415 degrees.
Cut your tomatoes in half and sprinkle with salt.
Place tomatoes on a baking tray with a silicone mat or lined with baking paper and roast for 12 minutes, flipping half-way through.
Cook your pasta, per the package directions, in salted water until tender.
Drain pasta, but reserve 1/2 cup of pasta water.
Gently stir in the hummus, the sundried tomatoes, and 1 tablespoon of lemon juice, adding the pasta water, as necessary, until the hummus coats the pasta with an “alfredo” like consistency. Note: You may not use all the pasta water and that’s okay.
Gently scoop the roasted tomatoes from the baking tray and fold them into the pasta.
Salt and pepper, to taste.
Drizzle with 1-2 tablespoons of the oil that the sundried tomatoes are packed in onto the top of the pasta before serving and garnish with fresh herbs.
See, I told you it was easy! In all likelihood, it took me longer to type up this post than it will for you to make this dish!
Enjoy!
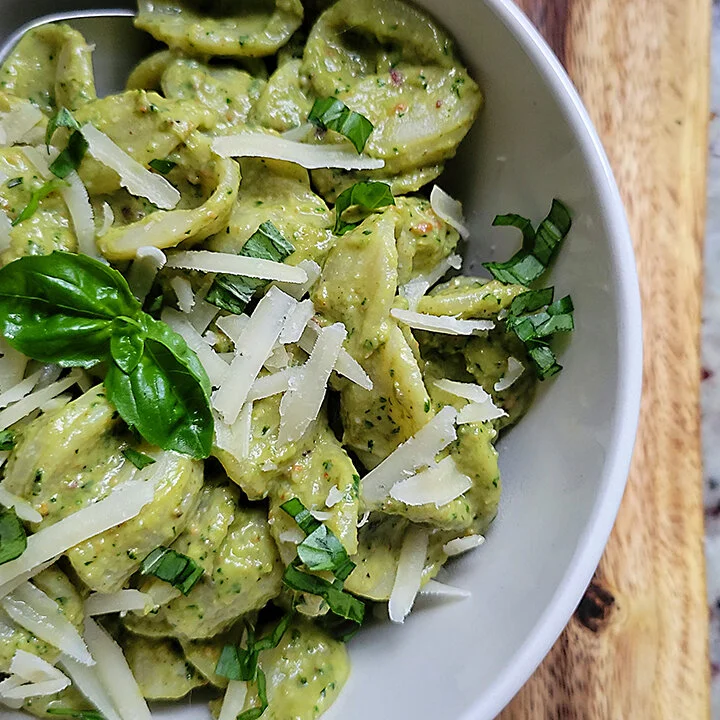
The Ultimate Creamy Pesto with Avocado and Pistachios
Traditionally made with fresh basil, oil, and toasted pine nuts, this recipe swaps out the pine nuts for toasted pistachios, and adds avocado, for a nice, ultra-creamy texture, that is perfect for dressing pasta! Using the avocado means you can use less olive oil, and both the avocado and the pistachios are packed full with all kinds of “good fats” - no guilt required! Make a little extra because you’ll want to have some stashed in the fridge to top everything from your morning bagels to your vegetable soup!
Who doesn’t love pesto pasta? Not only is it a quick and easy week night dish when you’re basil is over-grown and out of control but it’s also a refreshing change of pace from all of the heavy and rich red-sauce pasta dishes that we’ve been eating all winter.
Traditionally made with fresh basil, oil, and toasted pine nuts, this recipe swaps out the pine nuts for toasted pistachios, and adds avocado, for a nice, ultra-creamy texture, that is perfect for dressing pasta! Using the avocado means you can use less olive oil, and both the avocado and the pistachios are packed full with all kinds of “good fats” - no guilt required! Make a little extra because you’ll want to have some stashed in the fridge to top everything from your morning bagels to your vegetable soup!


What you are going to need to buy:
Basil, like a bunch of it.
This really is one of those recipes that you’re more likely going to use the overgrown basil plant you have at home rather than but this much fresh basil at the store BUT if you’re going to buy it, you’ll need about 3 cups of fresh basil leaves for enough pesto to sauce 4 servings of pasta.
Fresh Parsley, (not required, but if you’re like me and your basil is over-grown, chances are your parsley is too…so I use this as an opportunity to use it up as well. All told you’re looking at about 3 cups of fresh herbs (lightly packed)
Pistachios, shelled (about 1 cup)
Avocado
1/2 cup of non-dairy Parmesan, (…or regular Parmesan, if that’s your thing. We love the vegan Parmesan Shreds from Follow Your Heart.)
Minced Garlic - (We like the jarred kind from Spice World)
Olive Oil
Cold Water
Splash of White Vinegar or Lemon Juice
Salt & Pepper, to taste
What you are going to need to do:
Start by toasting your pistachios. On the stove-top in a dry skillet or in oven, it’s your choice…just be careful not to burn them.
Into the blender goes your de-stemmed herbs and 1/2 cup of olive oil (or another neutral oil of your choice) and a splash of white vinegar or lemon juice, (maybe a tablespoon or two…)
Lightly pulse to begin to break up the herbs. Add 1 teaspoon of minced garlic (and a little of the oil that the garlic is packed in won’t hurt, either)
Add in your non-dairy parmesean and toasted pine nuts, and avocado and continue to pulse until mixture starts to come together. Once all the big chunks have processed run your blender on low, gently working up to a medium, and then high speed until pesto is creamy.
If too tick, you can add up to 1/4 cup of water, but add slowly or you’ll run the risk of thinning it out too much. It’s okay if this is on the thicker side because you can always use a bit of the pasta water, when you dress your pasta, to thin it out a bit and the starch in the pasta water will do a better job to help emulsify all the oils and the water, anyway.
After the pesto is fully blended, taste for seasoning and add salt and pepper. The cheese and the pistachios are both quite salty, so waiting until the end will ensure you don’t over-season.
Assembly:
Cook your preferred pasta per the packaged directions. I always like a noodle that’s going to catch or trap a bunch of sauce, instead of a plain fettuccine or spaghetti…but you use what you like!
Reserve 1/4 cup of pasta water in case you want to thin out the sauce a little.
Do not drain pasta, simple ladle or scoop from water into serving bowls and top with pesto. Mix lightly to cover.
Garnish with additional herbs, cheese, and cracked black pepper. This dish is perfect for a crowd because you can make the pesto ahead of time and it looks way fancier on the plate than it is to make!
Enjoy!

Impossible Patty Melt
These 100% Vegan Patty Melts, made with ground from Impossible Foods look a lot fancier than they really are…and actually make a great week night dinner…plus this happens to be THE dish if you’re looking to fool your meat-eating friends and family with your plant-based magic!
These 100% Vegan Patty Melts, made with ground from Impossible Foods look a lot fancier than they really are…and actually make a great week night dinner…plus this happens to be THE dish if you’re looking to fool your meat-eating friends and family with your plant-based magic!
If you’ve been plant based for awhile then you like have a favorite faux-burger brand that you like best! This recipe was made with the Impossible Ground, which we think browns/crusts up the best for a “smash-style” burger that you typically see in a patty melt…but having said that, use what you like, or what you’ve got in the freezer!


What you are going to need to buy:
Impossible Ground (or your favorite meatless ground alternative)
Sweet Onion
White Mushrooms, sliced
Olive Oil
Minced Garlic - (We like the jarred kind from Spice World)
Balsamic Vinegar - (We get ours from this great little place here in Central Florida called The Ancient Olive)
Your Favorite Bread , Vegan or Otherwise - (I used Sara Lee® Artesano™ Bakery Bread)
Non-Dairy Cheese - (We used THIS CHEESE from Field Roast…melts like a dream!)
Liquid Smoke
Salt and Pepper
Onion Powder
Paprika
Non-Dairy Butter - ( We used Earth Balance)
What you are going to need to do:
Start by peeling and slicing your onion and, using a little olive oil on medium heat, cook with your mushrooms and garlic, adding onion powder, and a splash of balsamic vinegar. Cook until mushrooms and onions are soft.
Combine your Impossible Ground with a teaspoon of Liquid Smoke, a teaspoon of Pickapeppa Sauce, a pinch of paprika and salt/pepper, to taste. Mix well and form into patties. Depending on your preferred size you should be able to get 3 or 4 patties from one package of ground.
Using a little Earth Balance Vegan Butter in your skillet, fry up your patties on medium heat…remember they should be a little thinner than a hamburger. I also like to kinda shape the patty to fit the bread I am using.
After you flip the patty to cook on the second side, load up the top with your onions and mushrooms.
Place your sliced non-dairy cheese on your top piece of bread and pop into the microwave for about 10 seconds. Place your bread, cheese side down, onto your onion and mushroom covered patties and flip the entire affair so that now your bread can griddle on the skillet.
Repeat the bread, cheese, microwave routine for the other piece and place that on top, flipping when the first side is golden brown so that the second side can griddle.
Slice, serve, and enjoy!
A quick note about Vegan Cheese: We all know it takes higher heat to melt vegan cheese! When I am making sandwiches that require my cheese to melt, I always lay out my vegan cheese on the bread and pop it into the microwave for about 10 seconds. and this just gives it a jump start to ensure a good melt without burning your sandwich!
Enjoy!

Fluffy Pear and Pecan Pancakes
I’ve tried to make a lot of vegan pancakes in my day…a lot! Most aren’t bad…some have been terrible but these, THESE might just be the best that I have ever had! Made with vanilla oat milk from Rise Brewing Company, they are super easy to make. The light and fluffy, the texture is perfect, and with only a handful of ingredients they come together so quick and easy…the best part, no one even needs to know they are dairy free!
We don't have a partridge but we do have pears! These pecan and pear pancakes made with vanilla oat milk from Rise Brewing Company are super easy to make and are the perfect Christmas morning breakfast!
I’ve tried to make a lot of vegan pancakes in my day…a lot! Most aren’t bad…some have been terrible but these, THESE might just be the best that I have ever had! Light and fluffy, the texture is perfect, and with only a handful of ingredients they come together so quick and easy…the best part, no one even needs to know they are dairy free!


What you are going to need to buy:
1.5 cups of Flour
3 teaspoons of Baking Soda
1 teaspoon Salt
3 tablespoons Sugar
1/2 cup of small Pecan pieces
1 and 1/4 cup of Oat Milk - (We love the Vanilla Oat Milk from Rise Brewing)
1 Egg or your favorite vegan Egg Substitute - (We used Just Egg from Just Foods)
2 tablespoons of Olive Oil
1 teaspoon Cinnamon
Diced Pear
1/2 cup Maple Syrup
What you are going to need to do:
In a medium mixing bowl, sift together flour, baking soda, salt, sugar, and cinnamon.
Stir in egg, oil, and oat milk until mixture comes together. If mixture is too dry add a bit more oat milk or and additional teaspoon of just egg.
Do not over mix.
Stir in pecans.
Let mixture set while you dice the pear into small chunks
In a small saucepan, over medium/high heat bring the diced pear and maple syrup to a quick boil, mix, and remove from heat. Stir in a pinch of cinnamon and a pinch of salt.
Heat a lightly oiled pan or griddle over medium heat and cook pancakes until brown on both sides.
Serve warm with your favorite plant based butter and pears drizzled over the top.

Pork Fried Rice with Fresh Veggies and Garlic
The trick to any fried rice recipe, including this one, is “day-old-rice.” This is a great dish to plan to have for dinner towards the end of the week, like a Meat Free Friday meal (or even on a Saturday afternoon) because it uses up all the leftover things that you probably have taking up space in your fridge from earlier in the week!
The trick to any fried rice recipe, including this one, is “day-old-rice.” This is a great dish to plan to have for dinner towards the end of the week, like a Meat Free Friday meal (or even on a Saturday afternoon) because it uses up all the leftover things that you probably have taking up space in your fridge from earlier in the week!
Yummy fried rice paired with Beyond Meat’s Plant Based Brats, even the meat-eaters in the family will ask for seconds! This recipe is really adaptable so don’t worry if some of your ingredients (like the veggie selection) varry a little! If you don’t have any day-old-rice hanging around to use for your fried rice base then you can always cook up a batch, strain and spread out on a small sheet tray and place in the refrigerator for 30 minutes. Fresh rice, straight piping hot and from the pot simply has too much moisture to “fry” up properly and you’ll end up with a slightly soggy or chewy end result.


What you are going to need to buy:
Rice
Veggies (use what you have in the fridge) or a frozen bag from the store works just fine. We used corn, green beans, peppers, and onions.
Butter (for a Vegan Recipe we used Earth Balance)
Egg (for a Vegan Recipe we used VeganEgg from Follow Your Heart)
Minced Garlic - (we like these jarred options from Spice World!)
Plant Based Brats - (We used these from Beyond Meat)
Soy Sauce
Worcestershire Sauce
Salt & Pepper, to taste
Sesame Oil (optional)
What you are going to need to do:
In a large skillet saute’ your veggies in a small amount of butter and garlic. This is especially important if you are using frozen veggies because they will likely have more water/moisture that you will want to cook out.
Add your egg, or VeganEgg to the veggies and stir vigerosly so that the egg coats the veggies and cooks at the same time. You’ll likely have some small, pea-sized pieces of egg along with the veggies and that’s what you want. Use a spoon or spatula to break up any larger pieces of egg.
Add another 1-2 tablespoons of butter and bring heat in skillet to medium high. Add in rice and stir to combine with veggies. Add soy sauce, worcestershire sauce, salt and pepper, to taste. This would also be the time to add more garlic, if desired. Stirring every 15-20 seconds for 3-4 minutes, or until you notice the rice and veggies starting to brown and get slightly crispy. Be careful not to burn!
Remove rice and veggies and place into a glass bowl that can be covered to keep warm. I like to set my bowl on the stove behind the burner that I am using so some of the residual heat can work to keep it warm while you cook the brats.
Cut your brats, on an angle, into 1” thick pieces. Over medium heat add butter to the skillet and place braut pieces into pan with cut sides down. At this point, I like to sprinkle the brats with a little worcestershire sauce and additional garlic. Cook until you see that the cut sides are picking up some color and then flip, about 1-2 minutes per side.
Serve the brats over the fried rice and garnish with a drizzle of sesame oil, if desired.
Enjoy!

Quick and Easy Creamy Zucchini and Mushroom Carbonara
This Creamy Zucchini and Mushroom Carbonara basically checks all of my boxes! It goes from skillet to table in under 30 minutes, is loaded with veggies and is so rich and luxurious that even your non-vegan friends are sure to love it! As with a lot of the dishes that I share…if you do eat eggs and dairy, by all means, use the ingredients that you like…BUT, if you are willing to be slightly adventurous I would say, challenge your expectation of what you think vegan food tastes like…and with the addition of my secret ingredient, I guarantee that this dish will surprise you!
Okay, people…cards on the table! Pasta is kind of my weakness. Well, truth be told, carbs in general, and salty things, and creamy things…so this Creamy Zucchini and Mushroom Carbonara basically checks all of my boxes! It goes from skillet to table in under 30 minutes, is loaded with veggies and is so rich and luxurious that even your non-vegan friends are sure to love it!
The internet is rife with authentic carbonara recipes. This is not that kind of recipe. There is also really no shortage of vegetarian carbonara recipes that replace the meat in the original dish with mushrooms while still retaining the eggs and dairy. Again, this is not that kind of recipe. As with a lot of the dishes that I share…if you do eat eggs and dairy, by all means, use the ingredients that you like…BUT, if you are willing to be slightly adventurous, I would say, maybe challenge your expectations of what you think vegan food tastes like…and with the addition of my secret ingredient, I guarantee that this dish will surprise you!


What you are going to need to buy:
Small Yellow Onion
Small Zucchini
Minced Garlic - (we like these jarred options from Spice World!)
Fresh Mushrooms (Use what you like…but remember that this is replacing the meat in the original dish so a meatier, more hearty, mushroom is going to be your best bet.
Olive Oil
Liquid Smoke: Surprise…Secret Ingredient!
Thick Cut Pasta
Salt and Pepper
Cashew Milk - (We used Forager Brand Half and Half because it’s nice and creamy)
Vegan Cream Cheese - (We used Kite Hill Brand)
Vegan Parmesan - (We used Follow Your Heart Shredded Parmesan)
Fresh Herbs - (Use what you’ve got but we recommend parsley or thyme)
What you are going to need to do:
In a skillet on medium heat sauté 1/2 of a small chopped onion, one zucchini, cut into 1/2” cubes, with olive oil and minced garlic for 1-2 minutes.
In a pot, bring salted water to a boil to cook pasta. This recipe should make 4 small servings or 2, rather large, appetizer sizes servings. Boil pasta accordingly. Once the onions have started to become translucent, add 2 cups of sliced mushrooms to the pan with a pinch of salt and 1.5 tablespoons of my secret ingredient, liquid smoke. This really helps to mimic that meaty and salty, smoked texture of meat that traditional carbonara has. Cook on medium/low heat until all veggies are soft.
A note about mushrooms: They shrink. Don’t slice them too thin or they will shrivel up to almost nothing. 1/2” slices are not too large!
Once the veggies are almost soft, drop pasta into boiling water and cook via packaged instructions. Do not overcook the pasta because it will finish cooking back in the skillet with the sauce.
To the cooked veggies add 1/4 cup of vegan cream cheese and 1/4 cup of your half and half. Melt, on low heat until well incorporated. If the sauce seems too thick you can add a little more half and half.
Drain pasta leaving just a little pasta water on the noodles and add them to the sauce in the skillet. The starch in the residual pasta water will help to make the sauce extra thick and creamy. Gently fold in the pasta and add 1/3 cup of vegan parmesan cheese. Stir until cheese is melted and fully incorporated.
Add salt and black pepper, to taste.
Plate and garnish with fresh herbs!

Saag Paneer Mini Pizzas with Veggies and Toasted Pine Nut Chonk
This is the perfect dish for when you are trying to eat somewhat healthy but you are also just craving PIZZA! Made with a base of saag, a type of spiced spinach gravy with cheese, our version uses a vegan feta. With the crispy crusts, briny, salty, cheese and creamy spinach saag, combined with the fresh burst of veggies on top they really hit the spot on the nights when you are just kind of craving junk food. Plus…with almost two cups of spinach per pizza…hello, can we say leafy greens? Popeye would be so proud!
Okay people! Let's talk Indian food...specifically saag! I just recently discovered a dish called saag paneer, which is quickly becoming a favorite! As much as I love it served over herbed white rice, today we are going to use it as a base for some mini pizzas!
This is the perfect dish for when you are trying to eat somewhat healthy but you are also just craving PIZZA! Made with a base of saag, a type of spiced spinach gravy with cheese, our version uses a vegan feta. With the crispy crusts, briny, salty, cheese and creamy spinach saag, combined with the fresh burst of veggies on top they really hit the spot on the nights when you are just kind of craving junk food. Plus…with almost two cups of spinach per pizza…hello, can we say leafy greens? Popeye would be so proud!


What you are going to need to buy:
Large Bag of Spinach
Fresh Basil
One white or yellow onion, small, diced
Minced Garlic - (we like these jarred options from Spice World!)
Powdered Ginger
Powdered Cumin
Paprika
Chili Spice
Medium Tortillas or Roti
VioLife Vegan Feta Cheese - (Or your favorite block feta for just a vegetarian version)
Pine Nuts
Olive Oil
Fresh Veggies - (We used onion and tomato but feel free to use what you love on pizza, olives, artichoke, peppers…)
What you are going to need to do:
Preheat over to 400.
This recipe comes together in just a couple of steps. To begin, in a medium saucepan, add 3 tablespoon of olive oil, minced garlic, diced onion, and garlic powder, (Reserving just a few diced onions to sprinkle on top at the end) and sauté on medium heat until the onions become translucent but not brown.
Note: This amount of saag will make two or maybe three mini pizzas depending on how large your tortillas are and how thick you spread it.
Add a total of 5 cups fresh spinach and 7-8 fresh basil leaves to the pan in batches and begin to wilt down the greens, stirring and turning so that all of the greens become coated in the oil. After all of the greens have been wilted down (Think the consistency of what you would use to make creamed spinach) remove from heat and transfer to a blender. A stick blender also works well for this dish.
On a flat cookie sheet lay out your tortillas and prick with a fork so they won’t rise and dome in the oven. Place in oven to crisp up, but watch them so that they do not burn. Remove when edges are golden.
Blend the greens until they become somewhat smooth, but not so much that the consistency becomes runny. We are looking for a nice spreadable gravy consistency, like a thick pizza sauce. Stir greens to let some of the heat/steam escape. We want the gravy mixture to be warm, but not hot enough to melt the cheese when added.
Cut small half inch slice of feta from the VioLife Feta block. I recommend cutting one slice from the block for each pizza you are making. Cut that slice again across the long side and then slice into half inch cubes. You should get 14-16 mini cubes from each original slice off the block.
Reserve 5-6 cubes, per pizza, and add the rest into the spinach gravy, giving a light stir, just to incorporate. Remember, we don’t really want the cheese to melt, or break apart.
Making the chonk.
Chonk is basically just toasted spices in oil and it get’s drizzled over the top of our finished pizzas. In the same saucepan that you wilted the greens in, add another 3 tablespoons of olive oil, along with a handful of pine nuts, ginger powder, cumin powder, chili powder and paprika. Sauté over medium heat until the pine nuts turn a nice golden brown. Be careful, once they turn brown, they can burn easily. Remove from heat.
Assembling the pizzas.
Divide the spinach saag and spread think layer onto each crisp tortilla, making sure that cheese is distributed evenly. Top with remaining feta, diced tomatoes, reserved fresh onion and put back into hot oven for about 90 seconds.
When ready to serve, cut into quarters and drizzle with the pine nut chonk.

Braised Beefless Tips and CousCous with Tzatziki Mint Sauce
In this dish it becomes the beautiful base for the braised beefless tips and the cool and refreshing tzatziki inspired mint sauce. An easy weekday meal, you can have this dish on the table, to feed a crowd, in just about 30 minutes!
One of my all time favorite foods to cook is couscous and although it seems like it would be intimidating, it’s really super easy! Quick, versatile, and more interesting that plain rice, couscous can be served with just about any style of food.
Most people think of couscous as a middle-eastern dish but it actually has its roots, originally, in North Africa. Although it’s prepared similar to rice and other grains, couscous is actually made from tiny steamed balls of semolina flour, making it more like pasta and less like rice from a nutritional standpoint. In this dish it becomes the beautiful base for the braised beefless tips and the cool and refreshing tzatziki inspired mint sauce. An easy weekday meal, you can have this dish on the table, to feed a crowd, in just about 30 minutes!


What you are going to need to buy:
Pearled Couscous
Veggie Stock or Bouillon – (we like the “Not Beef Bouillon” by Edward and Sons
Olive Oil
White or Yellow Onion, small, diced
Sundries Tomatoes, jarred, in oil, or cut into bite-sized pieces
Black Kalama Olives, cut in half
Soy Sauce
Worcestershire
Vegan Mayo or Vegan Yogurt
Small Cucumber, diced very fine or grated
Fresh Mint
Lemon Juice
Minced Garlic - (we like these jarred options from Spice World!)
What you are going to need to do:
Step one in this recipe, or any recipe involving couscous is to dry toast the couscous. This sounds mo0re complicated than it is and in the end gives the finished dish a much more complex depth of flavor- It only takes two minutes! Do not skip this step.
In a medium saucepan, on medium/low heat measure out the desired amount of couscous, according to the boxed directions, for the number of serving you need to make. Add to this the minced garlic and onions. I almost always use the minced garlic that comes jarred in the produce section. One teaspoon for every half-cup of dry couscous you are cooking.
Let the couscous, onions, and garlic toast in the warm pan, stirring or agitating the pan often so that the contents do not burn. After about 90 seconds you should see the couscous pearls begin to turn from blond to light brown. When this happens take the saucepan off the heat. It will continue to toast, from the residual heat but you don’t want it to burn.
Set aside.
In a nonstick skillet, over medium heat, with just a little soy sauce and worcestershire sauce in the pan, (maybe a teaspoon of each) begin to brown the frozen beefless tips. Feel free to add any other sauces or seasonings that you like, at this time. Personally, I have a bottle of balsamic fig vinegar that I just love so I almost always add a dash of that, as well.
Bring your couscous saucepan back over to medium heat and add the veggie stock. (Follow the boxed directions of your couscous for the recommend amount of liquid) Bring to a simmer and then reduce heat and cover for 10 minutes. Stir occasionally to make sure that nothing is sticking to the bottom of the pan and that the liquid is being absorbed. If, after 10 minutes) the couscous seems too runny, take the lid off the saucepan and some of that excess water should boil/evaporate off.
Continue to check on the browning beefless tips, stirring occasionally to make sure they are not sticking to the pan…but you do want a slight amount of sticky caramelization to be happening in the bottom of the pan from the soy and worcestershire we added earlier. If they are looking dry…feel free to add a touch more of your sauces.
Once the Couscous has absorbed all the liquid and is creamy, remove from heat and stir in the sundried tomatoes and olives.
For the tzatziki inspired mint sauce, combine Vegan Mayo or Vegan Yogurt, minced garlic, salt and pepper, lemon juice, grated cucumber, and diced fresh mint. Adjust quantities to your own personal taste. White Vinegar can be used instead of lemon juice. The sauce should be think enough to pour, but not super runny.
When ready to serve, lay down a base of the Couscous and top with the Beefless Tips. Drizzle the tzatziki inspired mint sauce over the top and garnish with another fresh spring of mint.
What's in our Tzatziki inspired Mint Sauce?
Vegan Mayo or Vegan Yogurt
Minced Garlic
Lemon Juice
Grated Cucumber
Salt and Pepper
Diced, Fresh Mint – (yes, it needs to be fresh!)

Asian Inspired Orange Chick'n with Couscous and Sauteed Veggies
Served with fresh veggies, the best part about this Asian Inspired Orange Chick'n with Couscous and Sauteed Veggies dish? The leftovers make amazing chicken burrito wraps the next day for lunch!
Who doesn’t love Orange Chicken? Served on a bed of dainty couscous, it’s feels fancier than just stir-fry and rice but still takes less than 30 minutes to prepare. This sweet and savory dish is a quick and easy way to get a hot meal, on a week-night table, that everyone will love.
Although it’s prepared similar to rice and other grains, couscous is actually made from tiny steamed balls of semolina flour, making it more like pasta and less like rice from a nutritional standpoint. Most people think of couscous as a middle-eastern dish but it actually has its roots, originally, in North Africa, and is great compliment to just about every style of cuisine. Served with fresh veggies, the best part about this dish? The leftovers make amazing chicken burrito wraps the next day for lunch!


What you are going to need to buy:
Boxed Couscous - (we like the Near East brand and they have several to choose from!)
Veggie Stock or Bouillon – (we like the “Not Chicken Bouillon” by Edward and Sons
Olive Oil
White or Yellow Onion, small, diced
Gardein’s Mandarin Crispy Chick’n
Fresh Veggies - (we used, Broccoli, Cauliflower, Baby Carrots, and Mushrooms)
Soy Sauce
Worcestershire
Minced Garlic - (we like these jarred options from Spice World!)
What you are going to need to do:
Step one in this recipe, or any recipe involving couscous is to dry toast the couscous. This sounds more complicated than it actually is and in the end gives the finished dish a much more complex depth of flavor- It only takes two minutes! Do not skip this step.
In a medium saucepan, on medium/low heat measure out the desired amount of couscous, according to the boxed directions, for the number of serving you need to make. Add to this the minced garlic and onions. I almost always use the minced garlic that comes jarred in the produce section. One teaspoon for every half-cup of dry couscous you are cooking.
Let the couscous, onions, and garlic toast in the warm pan, stirring or agitating the pan often so that the contents do not burn. After about 90 seconds you should see the couscous pearls begin to turn from blond to light brown. When this happens take the saucepan off the heat. It will continue to toast, from the residual heat but you don’t want it to burn.
Set aside.
Ideally, this rest of this recipe can be made in one big skillet, if you’ve got one big enough for the chicken and the veggies to cook at the same time, on opposite sides of the pan, without too much crowding. To a large skillet or frying pan, over medium low heat add the Gardein Chicken Nuggets to one side of the pan, making sure that they are all laying flat and not too crowded. You want to crisp up the outsides a little first before we add the sauce.
Cook the nuggets on medium heat for about 1-2 minutes or until golden brown and then flip all nuggets over to let the other side brown. At this point, if you pan is big enough add the veggies to the other side of the skillet, sprinkle with a little salt and drizzle with a dash of soy sauce and worcestershire.
Bring your couscous saucepan back over to medium heat and add the veggie stock. (Follow the boxed directions of your couscous for the recommend amount of liquid) Bring to a simmer and then reduce heat and cover for 10 minutes. Stir occasionally to make sure that nothing is sticking to the bottom of the pan and that the liquid is being absorbed. If, after 10 minutes) the couscous seems too runny, take the lid off the saucepan and some of that excess water should boil/evaporate off.
At this point your chicken should be crispy and cooked through and your veggies tender. Remove Veggies from the pan and set aside, covered. Turn up the heat in the skillet and add the pack of sauce that is included in the Gardein Mandarin Chick’n Meal kit. The sauce is very thin, at this point, so we want to take a few minutes and thicken it up. Bring the sauce to a boil, but be careful not to burn it. You will need to stir and watch this closely but once you see the sauce turn more viscous and honey-like, remove skillet from the heat. Add the sauteed veggies back into the pan with the chick’n just to coat them in whatever residual sauce is left in the pan and to re-warm just a little.
Once the Couscous has absorbed all the liquid and is creamy, remove from heat. If your couscous has become too dry, no worries, just add a little water, maybe a tablespoon, and stir to incorporate. When ready to serve, lay down a base of creamy couscous and top with Orange Chick’n and sauteed veggies. Additionally, you could garnish with slivered almonds or crushed peanuts.