


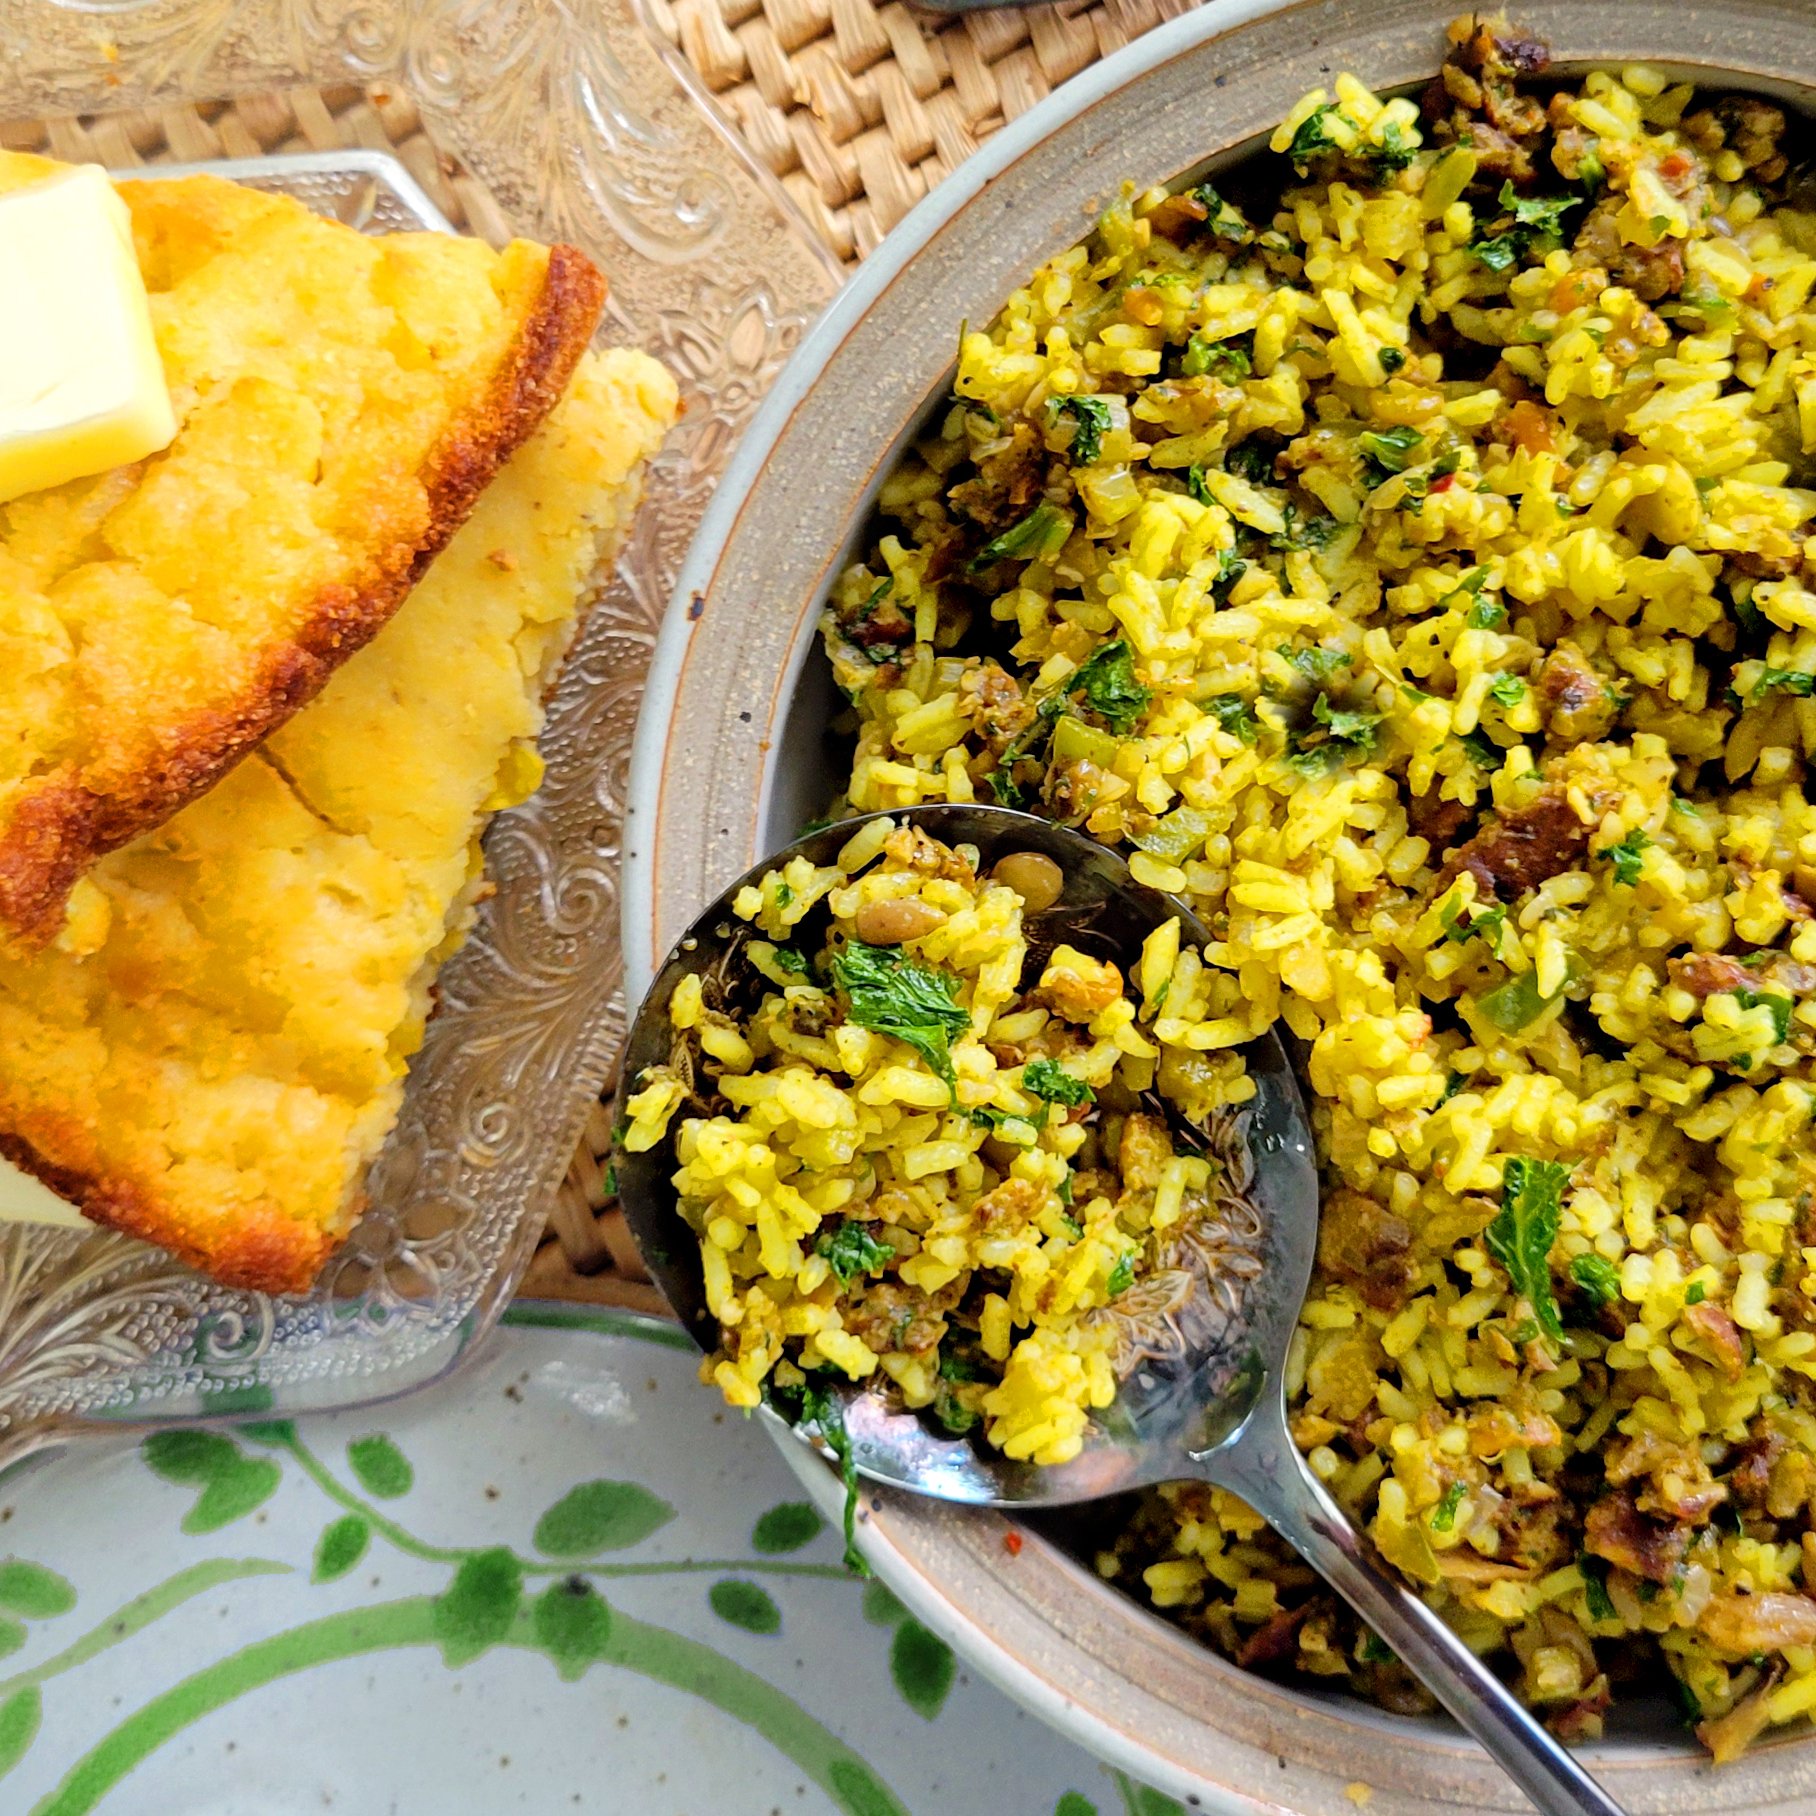
Vegan Dirty Rice with Mustard Greens
Easter is this weekend and if you're still looking for a comfortfood side-dish to round out your table...do I have a recipe for you...Vegan Dirty Rice with Mustard Greens! Whether you're new to cooking with greens or you grew up with them, you're going to love this new take on dirty rice! Hopefully the green beans and mashed potatoes don't get too jealous because, served with your favorite cornbread, this dish is going to be Easter's new favorite!
Did someone say Dirty Rice? Easter is this weekend and if you're still looking for a comfortfood side-dish to round out your table...do I have a recipe for you...Vegan Dirty Rice with Mustard Greens!
I know...I KNOW what you're thinking..."mustard greens, really, Sarah?" Yes, really! They are delicious and this WILL be the recipe that convinces you, I promise!

I used the chopped mustard greens from my good friends over Palmetto Gardens and picked them up at my local Publix.
Palmetto Gardens is a 3rd generation, family farm, local to the southeast, so I always know their greens are going to be fresh and delicious...
Whether you're new to cooking with greens or you grew up with them, you're going to love this new take on dirty rice! Hopefully the green beans and mashed potatoes don't get too jealous because, served with your favorite cornbread, this dish is going to be Easter's new favorite!
What you are going to need to buy:
1.5 cups Minute Rice
1.5 cups veggie stock
1 cup of mustard greens, chopped fine
1/2 cup diced green pepper
1/2 cup dices white onion
1/2 cup diced celery
2 tablespoons minced garlic
2 tablespoons Olive Oil
2 tablespoons Dairy-Free Butter
1 cup of meatless crumbles
1 tablespoon fresh parsley, chopped
1/2 tablespoon dried oregano
1 teaspoon dried thyme
1.5 teaspoon salt
1.5 teaspoon ground black pepper
Cayenne pepper, to taste
Chili powder, to taste
What you are going to need to do:
1. Saute' the chopped onion, celery, green pepper, and garlic in olive oil, on medium heat, in a large skillet.
2. Once the onions have become translucent, add the meatless crumbles and spices (parsley, oregano, thyme, salt and pepper, and cayenne and chili powder)
3. Cook mixture until warmed through and spices have become fragrant.
4. Remove from heat and fold in the chopped mustard green.
5. In a separate pot, cook rice per manufacturers instructions, replacing the water with veggie stock.
6. Once the rice is cooked and fluffy, stir in butter.
7. Gently stir the rice into the veggie mixture until well incorporated.
8, Taste for seasoning.
9. Serve with your favorite cornbread.
I’d love to hear if you try it! You can always tag me online at @plantbasedgingr
Love, Light, and Lentils, my friends!
Sarah

Garlic Creamed Kale with a Parmesan Crust
Thanksgiving is right around the corner and while you might now typically think of kale as a food worthy of your holiday feasts, trust me, this recipe is going to win you over. A happy medium smack in the middle between a broccoli casserole and a green bean bake this unique side dish is packed with flavor the all the creamy goodness that you’re craving in your autumn inspired comfort foods!
Thanksgiving is right around the corner and while you might not typically think of kale as a food worthy of your holiday feasts, trust me, this recipe is going to win you over. A happy medium smack in the middle between a broccoli casserole and a green bean bake this unique side dish is packed with flavor the all the creamy goodness that you’re craving in your autumn inspired comfort foods!
One of the things that really upped my at-home cooking game in a big way was when I learned to master making a roux (pronounced rue)! Literally, the vault where all the soups and sauces you love are kept, is guarded by the culinary gatekeeper that is, roux. All it takes is a little butter and a little flour, some liquid and seasoning…once you get this down, you’ll never buy cream sauces or soups from the can or jar again. The cream sauce for this recipe is no exception and was literally whipped up with ingredients you probably already have in your pantry.


What you are going to need to buy:
Fresh Kale, about 4 cups, chopped into bite-sized pieces (1” - 2”)
4 tablespoons Minced Garlic - (we like these jarred options from Spice World!)
2 tablespoons of Flour
3 cups Original Oat Milk from Rise Brewing
4 tablespoons Butter - (We love THIS ONE from Earth Balance)
1/2 small white Onion, diced
1/2 cup of Vegan Mozzarella Cheese
1/2 cup Dairy Free Sour Cream
Salt and Pepper, to taste.
For the Crust/Topping
1/4 cup Bread Crumbs
1/4 cup Nutritional Yeast
1/4 cup of dairy free Parmesan
What you are going to need to do:
Preheat oven to 350 degrees.
To begin, in a high-walled skillet or saucepan, saute your onions and garlic with 3 tablespoons of butter until the onions are soft and have taken on just a little color.
Reduce heat to low and add another tablespoon of butter. Allow to melt.
Sprinkle 2 tablespoons of of flour over the top of the onions and the butter and with a large whisk, stir the flour into the onion until a paste is formed. Cook for 60 seconds and then gently add in 1 cup of oat milk, slowly, while you continue to whisk, so as not to get lumps.
Melt into mixture 1/2 cup of cream cheese and 1/2 cup of mozzarella cheese.
Stir in additional Oat Milk. You are looking for a consistency of a nice alfredo sauce.
Season to taste with salt and pepper.
If the sauce is too thin, allow to simmer until thickened. If the sauce seems too tick, add a little water.
Dump your chopped kale into the skillet and gently stir until combined.
Transfer your creamed kale to a small, oven safe, baking dish.
Top with your crust mixture that is equal parts bread crumbs, parmesan cheese, and nutritional yeast, spreading an even coat across the top of the baking dish.
Cover in foil and bake at 350 degrees for 20 minutes and then remove the foil and bake for another 10 minutes. Additionally, you can broil for a final 3-4 minutes so the top takes on nice color. (But watch it close so that it does not burn!)
Let sit for 10 minutes before serving.

Vegan Hamburger Helper with Homemade Cashew Free Cheese
f you’re an 80’s kid, like me, and you grew up in the States, you most definitely experienced Hamburger Helper as a part of your childhood. We had a lot of “boxed” meals growing up. This recipe is all the nostalgia of those family dinners without any of the meat or dairy! The best part of this recipe is that it makes use of a lot of left overs! Comfort food at it’s finest!
If you’re an 80’s kid, like me, and you grew up in the States, you most definitely experienced Hamburger Helper as a part of your childhood. My mother went back to nursing school the same year that I went to kindergarten and when my brother was just out of diapers so needless to say, she was juggling a lot. I guess it goes without saying that we had a lot of “boxed” meals growing up. This recipe is all the nostalgia of those family dinners without any of the meat or dairy!
If I’m honest, I was a little hesitant to post this as a recipe because it wasn’t one that I carefully sat down and planned out. Truth is, I was under the weather last week and wanted comfort food. This was thrown together with a lot of odds and ends but when I posted it on IG last week everyone went a little crazy, so here we are! Hope that you all enjoy.


What you are going to need to buy:
Pasta, I used orecchiette because I had it on hand but an small noodle will work. I do like this shape because they are like little noodle bowls for the sauce!
Your favorite plant-based ground meat - (I used the ground from Impossible Foods)
Small Sweet Onion, diced
Minced Garlic - (like this jarred options from Spice World!)
1/2 cup Vegetable Stock - Or half a cup of water and a veggie cube
Butter - (We love THIS ONE from Earth Balance)
Salt & Pepper
Liquid Smoke
Homemade Vegan Cheese Sauce! (Find that recipe HERE!)
What you are going to need to do:
To start, let’s make the sauce!
I make this cheese sauce every month or so and have it in the fridge to throw into all kinds of things, which is just exactly what happened with this recipe! Hope on over and make it! Will you have some left over? Yep. Is that a bad thing? Nope!
GO TO THE CHEESE SAUCE RECIPE HERE
Welcome back!
The rest is pretty easy.
In a medium saucepan, over medium heat, begin to cook down your plant-based meat, along with the diced onion. Once you put them in the pan try not to stir or move them around too much because you want to get some good color/char on the meat.
After about 1-2 minutes stir the mixture and add a tablespoon of dairy free butter, a tablespoon (or more if that’s your thing…) of minced garlic, a pinch of salt and pepper, 8-10 dashes of liquid smoke and continue to cook until the meat is done and the onions are nice and soft.
While the meat and onions cook, bring a pot of salted water to boil on the stove and when it’s ready, drop 4 servings of your pasta (follow the box directions for portions and cook time.)
Next, add your veggie stock to the meat and onions and using a wooden spoon, scrape up any of the little bits that have stuck to the bottom of the pan! This is where all the flavor is hiding!
Add in 1 cup of your cheese sauce and stir to combine.
A note about the cheese sauce: If you make the cheese sauce ahead of time, and I hope that you do because it stays good in the fridge for weeks…it will solidify a bit. It’s much easier to “melt” it back into your Hamburger helper if it’s runny so you can just scoop out what you need and toss it into the microwave for 10-20 seconds, stir, and that should do the trick!
Drain pasta, but save 1 cup of pasta water.
Add the pasta to the cheesy/meat mixture and stir to combine. If the dish is too dry and not all that “creamy” slowly add the pasta water to thin the mixture and help the sauce emulsify. You may not use all the water and that’s okay because if you get it too runny then you’ll need to cook it longer and let some of that liquid evaporate.
Taste for seasoning. Add salt, pepper, if necessary.
I like to top mine with fresh herbs to serve. Either thyme or rosemary work really well!
Enjoy!

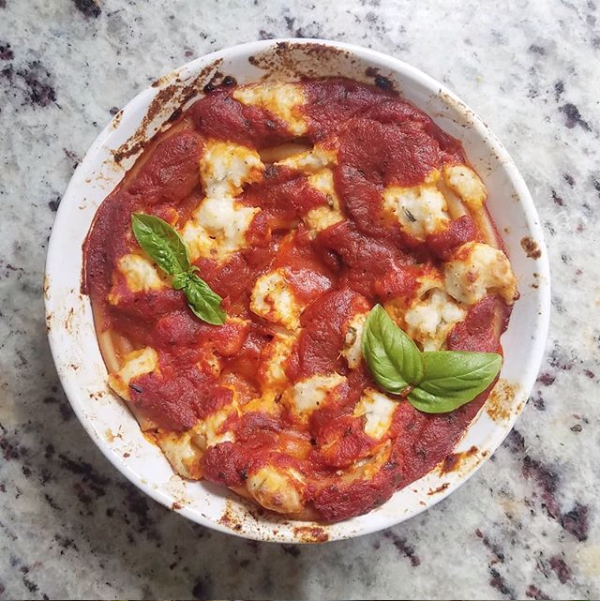
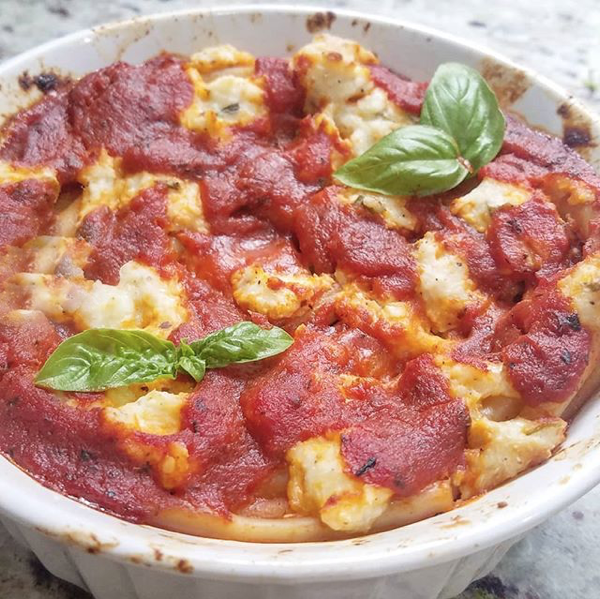
Butternut Squash Shells Stuffed with Sage Sausage, Spinach, and Ricotta
Looking for a fall twist on an old comfort classic? While we’ve still got a couple more weeks until Autumn officially arrives but over here I was craving some fall flavors...and these Butternut Squash Shells stuffed with Sage Sausage, Spinach and Ricotta totally hit the spot! The best part of this recipe is that, while the flavor profile is different, the assembly is basically the same, so if you’ve ever successfully made stuffed shells in the past, these will be a snap.
Looking for a fall twist on an old comfort classic? While we’ve still got a couple more weeks until Autumn officially arrives…over here I was craving some fall flavors...and these Butternut Squash Shells stuffed with Sage Sausage, Spinach and Ricotta totally hit the spot!
The best part of this recipe is that, while the flavor profile is different, the assembly is basically the same, so if you’ve ever successfully made stuffed shells in the past, these will be a snap. The entire dish does take a bit of time to make because you’ve got to roast the butternut squash and make the sauce so I would recommend that you plan to make a couple of recipes with squash so you can do some prep for several meals at once! Once the sauce is made, (which can be done ahead of time) the rest of the dish comes together in less than an hour!


What you are going to need to buy:
Medium Butternut Squash
Jumbo Shells
Medium Sweet Onion, diced
Minced Garlic - (like this jarred options from Spice World!)
1 cup Plant-Based Milk
1.5 cups Vegetable Stock
Dairy-Free Ricotta
Dairy-Free Mozerella
1/2 lb Plant-Based Sausage
Fresh Spinach
Just Egg, egg alternative
Olive Oil
Butter - (We love THIS ONE from Earth Balance)
Salt & Pepper
Fresh Sage
Warming Spices (Allspice, Nutmeg, Cinnamon, Ginger)
What you are going to need to do:
To start, let’s make the sauce!
Preheat your oven to 400 degrees.
Chop your squash in half and scoop out the seeds. Liberally salt and pepper the cut side. Roast on a baking sheet for one hour, flipping halfway through, until the squash is fork-tender.
In a high-walled saucepan or medium pot, saute in butter, the diced onion and a tablespoon of garlic until soft and translucent. Reduce heat and set aside.
Scoop out the roasted squash from the skin and into the saucepan with the onion and garlic. Add the plant-milk and the vegetable stock. Bring the mixture to a simmer and add a teaspoon of each of the warming spices.
At this point, if you have a stick blender, it’s helpful to blend the mixture for a smoother texture but it’s not 100% necessary.
Let the sauce reduce until it’s the consistency of pasta sauce. Taste for seasoning. Add salt and pepper, to taste.
Now, onto the filling!
In a small saucepan, gently wilt one bag of spinach over medium heat.
In a large mixing bowl combine the following:
sausage (does not need to be cooked)
the wilted spinach
the equivalent of one egg
1.5 cups of ricotta cheese
1 tablespoon of minced garlic
2-3 tablespoons of minced, fresh, sage
salt and pepper, to taste
The Shells:
Preheat the oven to 350 degrees.
Follow your package directions and cook your jumbo shells in boiling water.
After the shells are boiled and tender, remove and drain.
In a large skillet or baking dish fill the bottom of the dish with the butternut squash sauce.
Stuff each shell with the ricotta mixture and place into the baking dish.
Depending on the size of your dish you should be able to fit 15-20 shells. Do not overcrowd the dish. You want the sauce mixture to be able to rise up around the shells on either side.
Sprinkle mozzarella onto the top of the shells and cover with tin foil.
Bake for 15-20 minutes covered. Remove the tin foil and bake another 15 minutes until the sauce and cheese are hot and bubbly.
Let sit for 10 minutes before serving.
While the shells are resting, fry up some sage leaves in Olive Oil until crispy and crumble the leaves onto the top of the shells for garnish.
Serve the extra sauce on the side.
Enjoy!

Baked Brussel Sprouts with Onion and Herb Sauce
I typically don't use much frozen produce but Publix had Birdseye veggies on sale a couple weeks back so I grabbed a few bags. Topped with a creamy sauce made with sauteed onions, nutritional yeast, garlic, oat milk from the Rise Brewing Company, and some herbed cream cheese from Miyokos Creamery I honestly wouldn't have even known the difference between fresh and frozen.
I typically don't use much frozen produce but Publix had Birdseye veggies on sale a couple weeks back so I grabbed a few bags. Topped with a creamy sauce made with sauteed onions, nutritional yeast, garlic, oat milk from the Rise Brewing Company, and some herbed cream cheese from Miyokos Creamery I honestly wouldn't have even known the difference between fresh and frozen.
One of the things that really upped my at-home cooking game in a big way was when I learned to master making a roux (pronounced rue)! Literally, the vault of all the soups and sauces you love, is guarded by the culinary gatekeeper that is, roux. All it takes is a little butter and a little flour, some liquid and seasoning…once you get this down, you’ll never buy cream sauces or soups from the can or jar again. The cream sauce for this recipe is no exception and was literally whipped up with ingredients you probably already have in your pantry.


What you are going to need to buy:
Brussel Sprouts - (these were the ones used in this recipe)
One medium Onion, diced
Minced Garlic - (we like these jarred options from Spice World!)
Flour
Original Oat Milk from Rise Brewing
Nutritional Yeast - (If you don’t care about this recipe being vegan, you can use some grated parmesan.)
Butter - (We love THIS ONE from Earth Balance)
Herbed Cream Cheese from Miyokos Creamery
Salt & Pepper
Fresh Herbs, for garnish (pictured is Lemon Thyme)
What you are going to need to do:
Remove the brussel sprouts from the freezer and allow to begin to thaw.
Preheat over to 350 degrees.
To begin, in a medium skillet, saute your onions and garlic with a little butter until the onions are soft and have taken on just a little color. Add 3 tablespoons of nutritional yeast and mix well.
Reduce heat to low and add another tablespoon of butter. Allow to melt.
Sprinkle 2 tablespoons of of flour over the top of the onions and the butter and with a large whisk, stir the flour into the onion until a paste is formed. Cook for 60 seconds and then gently add in 1 cup of oat milk, slowly, while you continue to whisk, so as not to get lumps.
Melt into mixture 1/2 cup of cream cheese.
Season to taste with salt and pepper.
Remove sauce from heat.
Remove the brussel sprouts from the bag. If they are still too frozen to cut in half, just pop them into the microwave for one minute. Cut all of the brussel sprouts in half
No need to drain any liquid from them. You sauce has likely thickened up and the moisture from the brussel spouts will help loosen it back up when combined.
It’s okay that your brussel sprouts are still cold at this point, even still slightly frozen.
Into an oven safe baking dish, mix the brussel sprouts with the sauce and top with another tablespoon of nutritional yeast (or parm.)
Bake at 350 for 20 minutes until bubbly. Broil for the final 2-3 minutes so the top takes on nice color.
Let sit for 5 minutes before serving. Garnish with fresh herbs.

Bruschetta Inspired Mini Flatbread Pizzas
There are some flavors that are just a winning combination no matter how you use them. One of my favorite combinations is tomato and sweet basil…and one of the quick and easy ways that I like to use them are on these bruschetta inspired mini flatbread pizzas!
There are some flavors that are just a winning combination no matter how you use them. One of my favorite combinations is tomato and sweet basil…and one of the quick and easy ways that I like to use them are on these bruschetta inspired mini flatbread pizzas!
The perfect dish for a quick lunch or dinner, particularly if/when you are either too tired to cook a full meal, after a long day, or simply not that hungry. The use of both fresh and sun-dried tomatoes on these little pizzas makes for a complex, tangy yet sweet, tomato flavor that tastes way more fancy than it actually is. The other great thing about this recipe is that it is super customizable and by changing up the toppings these little flatbreads are a convenient way to use up “extra” odds and ends that you may have hanging around in the back of the fridge.


What you are going to need to buy:
Your favorite brand of tortilla or, if you prefer, and can find it, some roti from your local bakery.
Sweet yellow onion, small, sliced
Sun Dried Tomatoes - (We like California Sundry brand)
Vegan Cream Cheese - (We love the plain cream cheese from Kite Hill Foods)
Vegan Parmesan - (We love the Follow Your Heart shredded Parmesan)
Minced Garlic - (we like these jarred options from Spice World!)
Vinegar (Apple Cider or Rice Wine)
Olive Oil
Cherry Tomatoes
Fresh Basil - (If your leaves are large, chop down to size)
Italian Seasonings
Fresh Basil
Salt and Black Pepper
Balsamic Vinegar
What you are going to need to do:
Preheat oven to 350 degrees
In a small skillet, over medium low heat sauté your sliced onions, minced garlic and salt & pepper with some of the oil that the sun-dried tomatoes come packed in until the onions have turned translucent, and even taken on just a slight carmel color
Mix 1/4 cup of Vegan Cream Cheese with 1/4 Cup of Vegan Parmesan, a splash of vinegar and one teaspoon of minced garlic. Add salt, pepper, and Italian seasonings, to taste.
A note about cheese: The above mixtute is a version of a soft, spreadable cheese that I use a lot for a lot of different recipes. If you are not interested in making these little pizzas vegan, then feel free to use a low moisture mozzarella or even a feta blend.
Slice 3 or 4 cherry tomatoes, per pizza, into little round medallions lightly sprinkle with salt.
On a large cookie sheet lay out your tortillas or roti trying not to overlap the edges and lightly brush the tops with olive oil.
Begin with a light layer of cooked onions and then, in 1/2 teaspoon size dollops, spoon your cheese mixture on top, being careful to evenly distribute onto the entire tortilla.
Add sun-dried tomatoes, as well as fresh tomatoes, across the top of the flatbread.
Now, at this point I like to sprinkle some fresh basil onto the flatbreads. This basil is going to dehydrate and crisp up in the oven, so you don’t want to use it all but the crunchy and almost roasted flavor that is brought out by cooking some of the basil under the broiler is really nice. Again, don’t use all of your basil at this point because you will still want to add some fresh leaves to the top of the pizzas once they have come out of the oven.
Bake at 350 degrees for about 5 or 6 minutes and then turn on your broil setting and let the pizzas go another 2 or 3 minutes. Make sure to check about every 30 to 45 seconds once you have them under the broiler because if you are not careful they can burn…and quickly. The goal here is to crisp up the edges of the tortilla and melt all of the cheese.
Remove from oven and sprinkle with reserved basil leaves and just about 1/2 teaspoon of balsamic vinegar before serving. Enjoy!

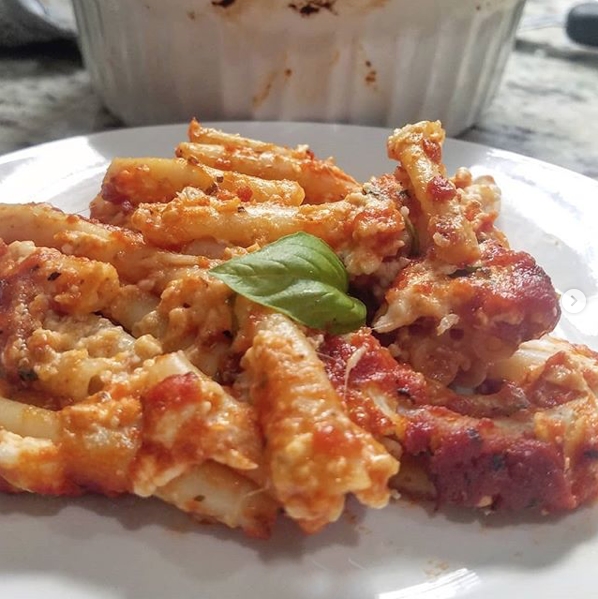
Poor Man's Vegan Chicken Parmesan Casserole
Who doesn’t love a good pasta dish? It’s the kind of comfort food that you crave when life get’s crazy and you don’t have any idea what else to make for dinner. Or, if you are like me, this week, it’s because you just need to go to the grocery store! This Poor Man's Vegan Chicken Parmesan Casserole is also the perfect way to use up the pasta that you have at home because just about any kind of noodle or shell will work for this dish.
Who doesn’t love a good pasta dish? It’s the kind of comfort food that you crave when life get’s crazy and you don’t have any idea what else to make for dinner. Or, if you are like me, this week, it’s because you just need to go to the grocery store! This Poor Man's Vegan Chicken Parmesan Casserole is also the perfect way to use up the pasta that you have at home because just about any kind of noodle or shell will work for this dish.
I have made several versions of a plant-based Chicken Parmesan dish over the years, but honestly, this is one of the easiest and everyone, even the meat eaters in my life, always love it. Part traditional Chicken Parmesan, part pasta casserole, it’s the best of both worlds when you’re craving some comfort food, plus because you’re not doing all the breading and frying it comes together in half the time, just about 30 minutes, total.


What you are going to need to buy:
Your favorite kind of pasta shell or small noodle. (Pictured here is cavatappi, or as my niece calls them, corkscrews!)
Red Sauce - (Make your own or use your favorite jarred brand. Trust me, either way, it’s going to be delicious.)
Vegan Parmesan - (We love the Follow Your Heart shredded Parmesan)
Vegan Mozzarella - (The Miyoko's Creamery has one that melts and browns up so nice that you’ll never know the difference)
Minced Garlic - (we like these jarred options from Spice World!)
Breaded Vegan Chicken Strips or Tenders - (Pictured here are the Gardein Crispy Tenders)
Salt and Black Pepper
Italian Seasoning or Fresh Herbs
What you are going to need to do:
To start, take your fingers out of the freezer so they can begin to thaw. (You can even pop them into the microwave for 30 seconds, or so…)
Preheat oven to 350 degrees
In a stock pot, bring salted water to a rolling boil to cook your desired pasta.
Once your pasta is cooked drained, mix in your pasta sauce and parmesan cheese. Amounts will vary based on how much past you have cooked and how many portions you are making. You want the pasta nice and covered in the sauce because you’re going to bake this dish and don’t want it to dry out.
I like to also mix in a bit of minced garlic to the pasta and the shells at this point.
Layer the pasta in a casserole dish, leaving room at the top for the Chicken.
Lay the chicken strips on top of the pasta. It’s best if these are at room temperate at this point and not frozen.
Place a heaping tablespoon of red sauce on top of the tenders and top with a thick slice of mozzarella.
Cover tightly with tin foil and bake for 15 minutes.
Uncover and turn your oven to broil. Broil, uncovered for 5 minutes to really melt that cheese and get some nice browning but keep your eye on it because it can go from brown and bubbly to burned real quick!
Let sit for 3-4 minutes before serving. Top with fresh herbs and serve with your favorite garlic bread!
Enjoy!

Impossible Cheeseburger Soup with Homemade Dairy Free Cheese Sauce
Another recipe that I probably would never have been exposed to had I not lived up in Ohio’s Amish Country for a decade or so is Cheese Burger Soup! I have re-worked the traditional “meat and potatoes” version into a glorious bowl of plant-based goodness. Part soup, part stew, part casserole, to be honest, this easy dish is a great way to clean out that crisper drawer at the end of the week and will totally become a family favorite, I promise!
Another recipe that I probably would never have been exposed to had I not lived up in Ohio’s Amish Country for a decade or so is Cheeseburger Soup! I have re-worked the traditional “meat and potatoes” version into a glorious bowl of plant-based goodness. Part soup, part stew, part casserole, to be honest, this easy dish is a great way to clean out that crisper drawer at the end of the week and will totally become a family favorite, I promise!
Remember last week when we made that dairy and cashew-free cheese sauce for our Wednesday night nachos? And…remember when I told you not to worry about making more that your nachos required because it totally keeps in the fridge and reheats PLUS you’ll use it for EVERYTHING! Well, here is one more yummy recipe to help use up the leftovers (like you need help…)
If you missed the post for the cheese sauce CLICK HERE!


What you are going to need to buy:
Potatoes, cubed or cut into 1/2 inch pieces (about 1.5 cups)
One large Onion, diced
Carrots, diced (about 1 cup)
Minced Garlic - (we like these jarred options from Spice World!)
Impossible Ground (or your favorite plant based crumbles)
Liquid Smoke
Butter - (We love THIS ONE from Earth Balance)
Veggie Stock or Veggie Bouillon Cubes
Noodles - (Corkscrews work great for this soup but anything small and spoon sized will work)
Onion Powder
Salt & Pepper
Veggie Cheddar Shreds - (the ones pictures here happen to be from Follow Your Heart)
Diced Tomatoes
Fresh Herbs, for garnish (we used chives)
What you are going to need to do:
First things first…if you haven’t made the Cashew Free Vegan Cheese Sauce…pop on over to that recipe and give it a shot. You will not be sorry!
Onto the soup:
The idea behind this soup is that it incorporates all the flavors that you’d find in your favorite cheeseburger!
In a stock pot, on medium/low melt 3 tablespoons of butter and once it’s melted and starts to bubble, sprinkle 2 tablespoons of flour on top. (Hint: we’re making a roux…) With a whisk, mix the flour and butter for 60-90 seconds, and gently start to add in the veggie stock, (about 4 cups) while continuing to whisk to avoid lumps. Let this soup base come to a boil and then reduce heat to maintain a simmer.
At this point you’ll want to add two cups of the cheese sauce (if you just made it fresh it will quickly incorporate into the stock, but if you’ve had it in the fridge it will need to re-melt. Not to worry, just dump it in the warm broth. It will slowly melt into the rest of the liquid. Try not to let the mixture boil at this point, just simmer.
Now, we are going to cook up a package of ground from Impossible Foods in a skillet, set to medium. I like to add a splash of Liquid Smoke and some minced garlic, salt and pepper, but feel free to season to your own taste. - We’re looking for nice hearty chunks so be careful not to break it up too much. Little 1” bites are perfect.
When the Impossible Ground is finished remove to a separate bowl or even a square of tin foil. To the pan where you cooked the ground add a tablespoon of butter and saute your onions, potatoes, and carrots until the veggies are soft and the potatoes have picked up a bit of crispy color on the outside. Add 2 tablespoons of minced garlic and cook another 1-2 minutes.
Back to the stock: Once the cheese has melted into the stock you can add your noodles. Check your package for portions but the equivalent of 2 portions worth should be just about right. Remember we’ve got a lot of other stuff going in this soup.
Cook the noodles in the cheese broth until tender.
Add in the veggies and the Impossible ground.
Taste for seasoning. Add Onion powder, salt and pepper, to taste. (it will likely need all 3)
Garnish with diced tomatoes, some veggie cheddar shreds, and fresh herbs!
A note about portions: With using an entire package of Impossible Ground and 3-4 cups of stock plus 2 cups of cheese sauce this will make 4 hearty servings…but this recipe is easy to cut down if you’re only cooking for one of two! (May know a little something about that!) You can always add a bit more broth once all the components are added if necessary! And, if your soup seem a bit too “soupy” - not to worry, dunking some nice, crusty bread in the broth, is maybe the best part!

Homemade Minestrone Soup
The weekends see a lot of soup-making at my house! Not only is it easy but it’s the perfect way to use up al of the odds and ends veg that is having around the fridge and countertops left over from the rest of the week…and this homemade minestrone soup is no exception! The best part? You can put the leftovers in a glass jar and it will keep in the fridge for up to a couple weeks, or freeze, for months!
I feel like homemade soup sometimes can get a bad wrap…“it takes too long, I don’t know what to put in it, it’s bland, etc…” but this homemade Minestrone Soup is so easy and so flavorful I promise you’ll never want to eat canned soup again!
The weekends see a lot of soup-making at my house! Not only is it easy but it’s the perfect way to use up al of the odds and ends veg that is hanging around the fridge and countertops left over from the rest of the week…and this homemade minestrone soup is no exception! The best part? You can put the leftovers in a glass jar and it will keep in the fridge for a couple weeks, or freeze, for months!


What you are going to need to buy:
Tomatoes (3-4), small, diced - This is honestly the perfect way to get rid of tomatoes that have gone a little squishy in the fridge. As long as they are not moldy, they are going to be just fine for soup.
White or Yellow Onion (1), medium - (Cut into chunks. No need to be too pretty, it’s all going to cook down anyway.
Minced Garlic - (We like the jarred kind from Spice World)
Tomato Paste, 1 tablespoon
Olive Oil
Veggie Broth (2-3 cups) or your favorite veggie bouillon cubes - (we like THESE from Edward & Sons)
White Mushrooms, sliced
Non-Dairy Butter - (We used Earth Balance)
Veggie Stock or Bouillon Cubes - (We used THESE from Edward and Sons)
Roasted veggies of choice, about 3 cups, total (We used baby potatoes, carrots, broccoli, baby corn, and snap peas, but again, use what you’ve got on hand!)
Dry Pasta - 1.5 -2 servings (We like orecchiette for this but any small shell or noodle should do)
Fresh Herbs - (Use what you like, use what you have. We used some rosemary and lots of curly parsley!)
Salt and Pepper, to taste.
Parmesan Cheese for topping - (Our favorite is THIS DAIRY FREE OPTION from Follow Your Heart)
What you are going to need to do:
Start by cutting your tomatoes and onions into 1” pieces - No need to be too pretty, it’s all going to cook down anyway.
In a skillet, over medium heat, stew the tomatoes, onions, and 1-2 tablespoons of garlic until the veg is soft and mushy. (This should take 5-10 minutes)
Once a lot of the liquid has cooked out of the tomatoes and has evaporated, add the tomato paste to the skillet and stir to incorporate. Continue to stir so that the tomato paste cooks, but does not burn for about 90 seconds, to 2 minutes. Mixture will be thick.
Remove from heat and into a soup pot add the stewed mixture, the veggie broth and rosemary (or preferred herbs). Stir and return to stove-top, allowing stock to simmer, but not boil. Cover with a loose lid so that you don’t loose too much to evaporation.
Now, Roast those Veggies!
Cut all your veg into bite size (1/2 to 1 inch) cubes. Making sure everything is roughly the same size allows all the veg to roast at about the same speed. Oil, and sprinkle with salt and pepper.
No leftover veggies and no time to cut and chop? THESE PACKS from Birdseye works just great. Simply dump the frozen veggies on a tray with oil, salt, and pepper, and roast like you would fresh!
Roast at 375 for 20 minutes, checking half-way through to make sure nothing is browning too quickly.
For the last 3-5 minutes of the roast you can turn the oven to a low broil to really make sure you get some nice color on the veggies. Watch this closely! All ovens broil at different rates…and you don’t want them to burn.
Assembly:
At this point, I like to use a stick blender in the stock liquid to bust up any remains of tomato skins, herbs, or large chunks of onions. We are not looking for it all to be super smooth, just not too chunky, so pulsing the stick blender in short bursts works better. You could also transfer and do this in a traditional blender, if you like.
After blended, into the simmering stock, add the pasta, and increase the heat to achieve a low boil. Allow pasta to cook for 8-9 minutes. Add more water, if necessary.
Add in all of the roasted veggies to the pot and like to add a bit more curly parsley at this point.
Simmer another 3-4 minutes. Taste for seasoning. Add salt and pepper, to taste. Serve with more fresh herbs and grated parmesan cheese.

Spinach and Mushroom White Lasagna
If you’re looking for a recipe this Holiday for a non-traditional family dinner or need to accommodate dairy free guests this Spinach and Mushroom White Lasagna made with oat milk from the Rise Brewing Company just might be it! Creamy and delicious, no one will know that this entire dish is dairy free! The best part about this recipe is that it reheats just as well the next day if you have any leftovers…but don’t hold your breath. You can make ahead and assemble the night before, just bring to room temperature before baking.
If you’re looking for a recipe this Holiday for a non-traditional family dinner or need to accommodate dairy free guests this Spinach and Mushroom White Lasagna made with oat milk from the Rise Brewing Company just might be it!
Did someone say carbs? Creamy and delicious, no one will know that this entire dish is dairy free! The best part about this recipe is that it reheats just as well the next day if you have any leftovers…but don’t hold your breath. You can make ahead and assemble the night before, just bring to room temperature before baking.


What you are going to need to buy:
Lasagna Noodles
1 bag (6 oz) Baby Spinach
8 to 10 oz of Baby Bella Mushrooms
Minced Garlic - (We like the jarred kind from Spice World)
Ricotta Cheese - (We used the Dairy Free Ricotta from Tofutti)
Sour Cream - (We used our favorite Dairy Free Version from Tofutti)
Mozzarella Cheese - (We used the Mozzarella Shreds from Follow Your Heart)
8 oz Parmesan Cheese - (We used the Parmesan Shreds, also from Follow Your Heart)
Oat Milk - (We love the Original Oat Milk from Rise Brewing)
1 Egg or your favorite vegan Egg Substitute - (We used Just Egg from Just Foods)
Plant Based Butter - (We used our favorite from Earth Balance)
Flour
Fresh Herbs, Basil, Rosemary and Parsley
Nutmeg
Salt and Pepper
What you are going to need to do:
This lasagna is assembled much like any traditional recipe.
To make the filling…
To begin, slice mushroom and saute in a medium skillet with butter, garlic, salt and pepper. Once Mushrooms are cooked stir in spinach and cook down until spinach has wilted down. Set mixture aside.
In a medium mixing bowl combine ricotta cheese, 4 or 5 oz of mozzarella cheese, 2 oz of Parmesan cheese, your egg, (or egg substitute), chopped herbs, salt and black pepper and mix until smooth.
To make the White Sauce…
In a saucepan over medium/low heat melt 2 tablespoons of butter. After butter is melted but before it begins to brown, reduce heat and sprinkle over 1 heaping tablespoon of flour, whisking until smooth. Cook flour and butter for one minute. Add in 1/4 cup of oat milk and whisk quickly to avoid lumps. Add in an additional 3/4 cup of oat milk and bring mixture to a light boil. After mixture has boiled, reduce heat and stir in 4 oz of Parmesan cheese, salt and pepper, to taste, and a pinch of nutmeg. if mixture is too thin, continue to cook on medium heat until it thickens up to a runny pudding consistency. Remove from heat and cool for 3-4 minutes. Stir in 1/2 cup of sour cream. Check seasoning. Add more salt/pepper/nutmeg if desired.
Boil the lasagna noodles until soft.
The Assembly…
Preheat Oven to 350 degrees.
In a buttered 9 x 9 pan spoon a small amount of the white sauce in the bottom, just to cover.
Add your first layer lasagna noodles, overlapping slighting at the seams. Follow with a layer of the ricotta mixture and top that with 1/3 of the spinach/mushroom mixture. Ladle 1/2 cup of the white sauce over the spinach and mushrooms and top with another layer of noodles.
Repeat 2 more times:
Noodles, Ricotta, Spinach and Mushroom, topped with the white sauce.
Top your 3rd layer with noodles and spoon over remaining white sauce. Top with remaining mozerellla and Parmesan cheese and sprinkle with chopped herbs.
Cover with foil and bake for 25 minutes.
Remove foil and bake for another 15 minutes until cheese on top and golden. You can also switch over the a low broil for this step but watch is closely so that the top doesn’t burn.
Let stand for 10-15 minutes before serving.
Enjoy!
7 Ingredient Creamy Pasta Casserole with Red Sauce
This vegan dish only requires 7 ingredients and is the perfect way to use up the pasta that you have at home because just about any kind of noodle or shell will work for this dish. While quick and almost embarrassingly easy, because of the baking time required for this recipe, this dish does not qualify as a 30 minute meal, however, because most of the time that this recipe demands is just “oven time” I think it still more than qualifies as a good option for a week night meal, especially for a crowd!
Who doesn’t love a good pasta casserole? It’s the kind of comfort food that you crave when life get’s crazy and you don’t have any idea what else to make for dinner. This vegan dish only requires 7 ingredients and is the perfect way to use up the pasta that you have at home because just about any kind of noodle or shell will work for this dish.
Admittedly, this is another one of those recipes that I hesitated to even type up and put on the blog because, well, it’s just so, so simple…BUT, my dear, sweet, Momma asked about it this week and wondered if I was going to share it, so here we are! While quick and almost embarrassingly easy, because of the baking time required for this recipe, this dish does not qualify as a 30 minute meal, however, because most of the time that this recipe demands is just “oven time” I think it still more than qualifies as a good option for a week night meal, especially for a crowd!

What you are going to need to buy:
Your favorite kind of thick pasta. (Really, anything will work but personally, I would stay away from stuff that is super thin like spaghetti or angel hair. I used some leftover pastitsio that I had on hand)
Red Sauce - (Make your own or use your favorite jarred brand. Trust me, either way, it’s going to be delicious)
Vegan Cream Cheese - (We love the plain cream cheese from Kite Hill Foods)
Vegan Parmesan - (We love the Follow Your Heart shredded Parmesan)
Minced Garlic - (we like these jarred options from Spice World!)
Salt and Black Pepper
Italian Seasoning or Fresh Herbs - (We used Rosemary and Basil)
What you are going to need to do:
In a stock pot, bring salted water to a rolling boil to cook your desired pasta.
Preheat oven to 350 degrees
Mix 1/4 cup of Vegan Cream Cheese with 1/4 Cup of Vegan Parmesan and one teaspoon of minced garlic, plus salt, pepper, and Italian Seasoning, to taste. Use these proportions for each “serving” you’d like to make. (ie: if you want to serve 4, then you will need approx. one cup of cream cheese, one cup of parmesan, etc…)
Optionally, you can use fresh herbs for this step and forgo the dried Italian Seasoning
Once your pasta is cooked drain and begin layering the casserole.
Begin with a barrier layer of red sauce on the bottom your oven safe casserole dish so that the pasta won’t stick and is less likely to burn.
Layer your pasta on top of the sauce and then top with evenly spaced teaspoonfulls of the cheese mixture.
Repeat layering with sauce, pasta, and cheese filling until you have reached the top of your casserole.
Bake at 350 degrees for 25 to 30 minutes, on medium rack, until the sauce is hot and bubbly. (Use a piece of tin foil to lightly cover the dish for the first 15 minutes of baking, if rack can not be moved to a center position and is too close to the upper heat coil in your oven.)
Let rest 10 to 15 minutes before serving. Garnish with minced fresh herbs and an additional sprinkle of parmesan cheese or nutritional yeast.
Pour your favorite glass of red wine and enjoy.
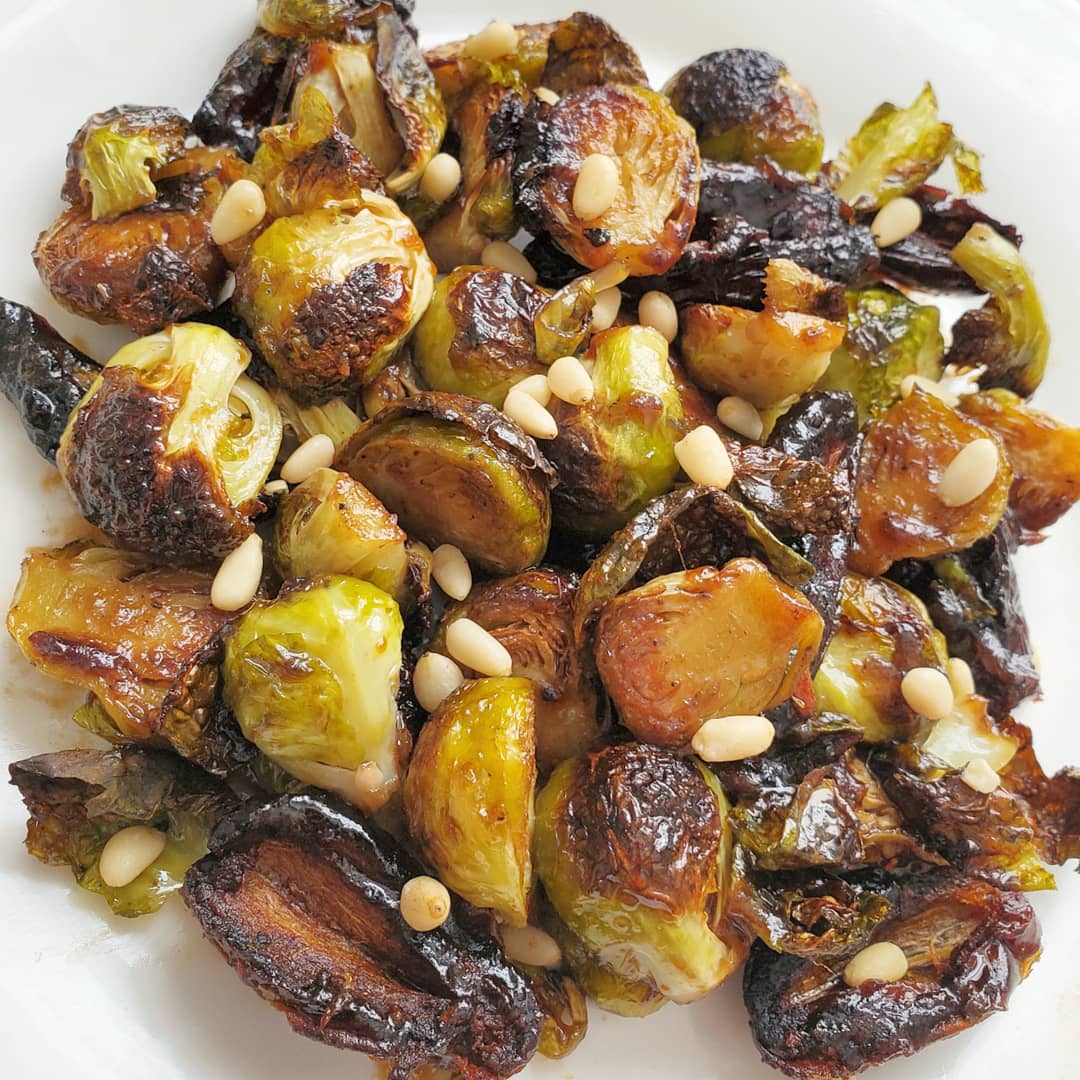
Crispy Roasted Brussel Sprouts with Dates and a Sweet Balsamic Glaze
Anyone who thinks that they don’t like Brussel sprouts, I dare you not to like this recipe. This dish is so good and so simple. It’s perfect for entertaining as we head into the holiday season because although brussel sprouts are often available year-round these days their peak season is from September to mid-February making them budget friendly for serving a crowd.
Anyone who thinks that they don’t like brussel sprouts, I dare you not to like this recipe. This dish is so good and so simple. It’s perfect for entertaining as we head into the holiday season because although brussel sprouts are often available year-round these days their peak season is from September to mid-February making them budget friendly for serving a crowd.
The trick to this recipe is, of course, fresh brussel sprouts, and really ripe dates! There is something kind of magical about the sugar content in the dates and how it almost caramelizes into a chewier crunch when they are roasted. If you are really time sensitive go ahead and get the pitted dates, but if you can spare a couple extra minutes I think buying dates with the pit in and removing yourself at home keeps them softer and sweeter. (I have no proof of this…it’s just been my experience.) With under 10 ingredients, including the spices, what’s not to love?


What you are going to need to buy:
Fresh Brussel Sprouts
Whole Dates
Pine Nuts
Salt and Pepper
Olive Oil
Minced Garlic - (we like these jarred options from Spice World!)
Maple Syrup - (The good stuff, not pancake syrup. You could also use agave or honey.)
Balsamic Vinegar - (I get mine locally here in Orlando from The Ancient Olive)
What you are going to need to do:
begin by preheating your oven to 400 degrees.
Remove all loose, witty, or soft outside petals from your brussel sprouts and cut in half length-wise.
Lightly oil, salt and pepper your brussel sprouts and place on a sheet pan or cookie sheet being careful that they are only one layer thick.
Cut your dates length-wise and remove the pit. Then cut each half length wise again so that you end up with 4 quartered wedges. Place on the sheet pan with the brussel sprouts. Roast at 400 degrees, on the middle rack for 25 minutes, flipping/stirring half-way through so that you can get some browning on all sides.
To make the glaze, mix equal parts of Olive Oil, and Balsamic Vinegar with minced garlic and maple syrup or honey, to taste. If you can’t find the thick balsamic vinegar, you can always take of of the extra soft and squishy dates from the package and scrape out the contents into the glaze. Use a fork or small wish to incorporate the date flesh into the mixture and it will thicken it up a bit. If you do this…you will need less maple syrup or honey because the dates are so naturally sweet.
After 25 minutes, turn oven on to a low broil and broil for another 5-7 minutes, checking every 90 seconds or so to make sure that nothing is burning. Note: The dates will get really dark in color, and you might be afraid that you have burned them…rest easy. You likely didn’t but this broil at the end is what makes them caramelize into a nice chewy crunch!
Once the brussel sprouts and dates are out of the oven, toss them with the glaze and allow to cool for 4-5 minutes before serving to let that glaze really thicken up. Garnish with pine nuts or chopped pistachios!
Enjoy!