


Carrot Bacon Topped Avocado Toast
If you have been in the veg community for any length of time, you’ve probably heard about the wonder that is, Carrot Bacon! And, while I can’t lay claim to this recipe nor the base idea, I do have enough people ask me about it when I post photos that feature it that I thought I would share with you all how I make my Carrot Bacon!
If you have been in the veg community for any length of time, you’ve probably heard about the wonder that is, Carrot Bacon! And, while I can’t lay claim to this recipe nor the base idea, I do have enough people ask me about it when I post photos that feature it that I thought I would share with you all how I make my Carrot Bacon!

I believe that the original recipe came from, the reigning vegan queen herself, Ms. Tabitha Brown, or at least that who I first saw share it! She uses a veggie peeler and an air fryer and my version uses a mandolin and the oven…just one more example of how most of cooking really is just good improv! Feel free to jump down to the end of the recipe if you just want my quick tips and tricks!
What you are going to need to buy:
Fresh Carrots
Liquid Smoke
Minced Garlic - (we like these jarred options from Spice World!)
Maple Syrup - (The good stuff, not pancake syrup.)
Garlic Powder, Paprika, Onion Powder
Salt & Pepper
Avocado
Sliced Vegan Cheese (like this ONE from Field Roast)
Tomato
Bread
Vegan Feta (this recipe uses the Block Feta from Violife!)
What you are going to need to do:
For the Carrot Bacon:
Using a mandolin or a veggie peeler slice your carrots into long thin strips/ribbons. This is why you want those fat carrots because they do tend to shirk up quite a bit in the oven.
Into a zip-top baggie that is large enough to hold your ribbons add:
1 -2 tablespoons of Liquid Smoke
1-2 tablespoons of Maple Syrup
1 teaspoon on minced garlic
1/2 teaspoon each of the spices. (Garlic Powder, Paprika, and Onion Powder, Salt and Pepper)
Let the carrot ribbons marinate for anywhere from 10-30 minutes.
Preheat your oven to 400 degrees.
On a baking tray lay out your carrot ribbons and place them in the oven to crisp up for 15-20 minutes. (Keep an eye on them, flipping after 10 minutes. You can also baste the reverse side with the leftover marinade when you flip them.
Feel free to turn on your broiler for the last 5 minutes or so to get your bacon extra crispy but watch is carefully so that it doesn’t burn…because it will!
Remove from oven and let sit for 1 -2 minutes until cool enough to handle.
The Assembly:
Apply your best practices for standard avocado toast preparation! I like mine to resemble a BLT and use tomato layered over some sliced vegan cheese and topped with dairy-free feta
Now, for the TIPS & TRICKS:
🌿 Use giant carrots...like really the fattest ones you can find. My local Asian Market has the biggest carrots I’ve ever seen!
🌿 Use a mandolin or a peeler because you won't be able to slice the carrots thin enough with a knife. I love my Pampered Chef Simple Slicer. I use it for everything!
🌿 The longer you can marinate the carrots, the better the flavor!
🌿 I bake mine on parchment because when that sticky marinade cooks onto your baking sheet at 400 degrees, it’s a pain to get off!
🌿 Use the leftover marinade to base when you flip the bacon half-way through cooking
🌿 Use the broil feature of your oven at the end to really crisp up the bacon but watch it carefully so it doesn’t burn! - I leave the oven door cracked so I can keep an eye on what’s happening!
Enjoy! And as Tabitha says…
“Hey, you have a good day, but if you can't, don't you go out messing up nobody else's.”

Thai Inspired Spicy Lime Peanut Sauce (Only SIX Ingredients!)
Perfect for everything from stir-fry and noodles to veggie wraps, or even as a dressing for a Asian inspired summer salad, this sauce is something you’ll want to have in your refrigerator this summer. I love this recipe because it looks and tastes fancy but it comes together with six simple pantry ingredients in just about 10 minutes.
Perfect for everything from stir-fry and noodles to veggie wraps, or even as a dressing for a Asian inspired summer salad, this sauce is something you’ll want to have in your refrigerator this summer. I love this recipe because it looks and tastes fancy but it comes together with simple pantry ingredients in just about 10 minutes.

I don’t know if you’re like me, but I have a hard time spending the money on sauces and dressings at the grocery store that I know I can make at home and this Thai Inspired Spicy Lime Peanut Sauce is no exception! And…bonus, it only takes SIX ingredients to whip up! This recipe makes about 4 - 5 servings, depending on what you are using it for and how thin you make it.
What you are going to need to buy:
Peanut Butter - (creamy is best)
Sesame Oil - (You can use another neutral oil, but the flavor will differ a bit)
Chili Oil - (If you don’t have Chili oil, you can use dried chili powder)
Soy Sauce
Maple Syrup
Lime Juice
Water, for thinning
What you are going to need to do:
This can be done on a bowl with the aid of the microwave, or on the stove-top in a small sauce pot.
Mix together the following
8 tablespoons of peanut butter
2 tablespoon of sesame oil
2 tablespoon of Soy Sauce
1 teaspoon of chili oil
Heat these ingredients until the peanut butter becomes soft enough to incorporate easily into the oils and whisk to combine. After well combined add:
2 tablespoon of maple syrup
2 tablespoon of lime juice
Salt and pepper, to taste
At this point, taste your sauce…want a bit more tang, add another splash of lime juice. Like things a but more spicy…more chili oil. Once you get the flavor you like use 2-3 tablespoons of water to thin sauce to desired consistency. I like mine about the thickness of a ranch dressing, thin enough to drizzle, but thick enough to stick to vegetables, noodles, or as a dressing for wraps.
To Serve/Store:
Drizzle peanut sauce on top of anything and everything. Store in the fridge for up to 2 weeks. (It won’t last that long, I promise!) Let sauce come to room temperature or warm slightly to re-serve. You can always add a bit more water if necessary after it’s been in the fridge a few days
Enjoy!

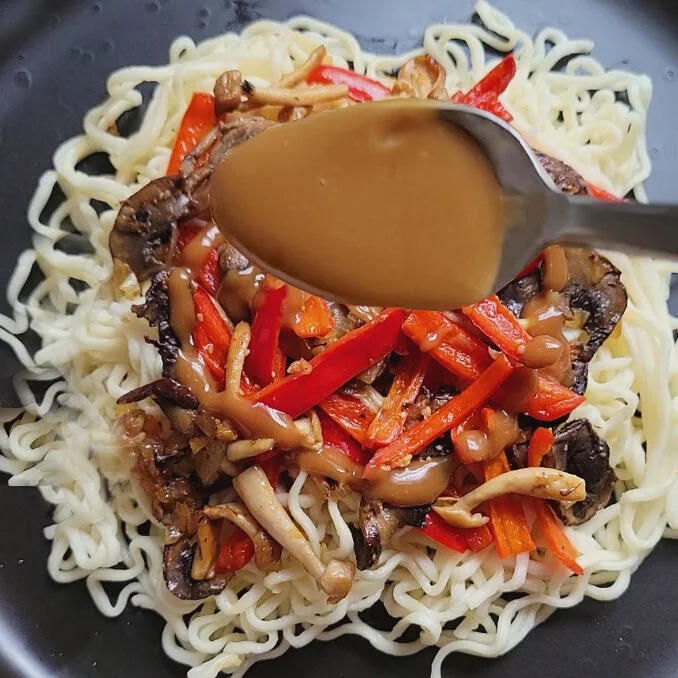
Noodles with Garlic Mushrooms and Peppers topped with Thai Inspired Spicy Lime Peanut Sauce
Raise your hand if you buy mushrooms, when they are on sale, and then spend the next week watching them turn to goo in your fridge because you’re uninspired as to what to do with them!? I’ve got you covered! The Thai inspired spicy lime peanut sauce is all you need to turn ramen and mushrooms into an amazing dinner! Make a little extra, because you’re going to want to put it on everything!
Sometimes you plan, shop for, and execute extravagant meals that look and taste like they should be served at the fanciest of restaurants and sometimes you haven’t been to the grocery store in a week and you’re trying to find way to level up ramen! This recipe is perfect because it looks and tastes fancy but it comes together with simple pantry ingredients and a small amount of produce, in less than 20 minutes!
Raise your hand if you buy mushrooms, when they are on sale, and then spend the next week watching them turn to goo in your fridge because you’re uninspired as to what to do with them!? I’ve got you covered! The Thai inspired spicy lime peanut sauce is all you need to turn ramen and mushrooms into an amazing dinner! Make a little extra, because you’re going to want to put it on everything!


What you are going to need to buy:
Ramen - (the stuff you ate in college is fine, especially if you have some in the house BUT a trip to your local Asian market for a more authentic option is really going to make this dish!)
Vegan Butter - (This recipe used Earth Balance)
Mushrooms, sliced - (This recipe used a couple kinds because it’s what I had in the bottom on the crisper drawer, but use what you’ve got!)
Red Peppers, julienned (cut into strips)
Yellow Onion, diced
Minced Garlic - (we like these jarred options from Spice World!)
Olive Oil
Salt and Pepper, to taste
Peanut Butter - (creamy is best)
Sesame Oil - (You can use another neutral oil, but the flavor will differ a bit)
Chili Oil - (If you don’t have Chili oil, you can use dried chili powder)
Soy Sauce
Maple Syrup
Lime Juice
Water, for thinning
What you are going to need to do:
In a medium skillet, saute your mushrooms, onions, peppers and garlic in a little olive oil until soft.
Note: add the garlic about 1/2 way through cooking, once the onions have given up a little moisture into the pan, so that it doesn’t burn
Prepare your ramen, per the package directions BUT if your ramen comes with a flavor packet, do not use it. Once noodles are soft, drain well and stir in one teaspoon of butter, while the noodles are hot.
To Make the Spicy Lime Peanut Sauce: (This makes enough for two servings)
This can be done on a bowl with the aid of the microwave, or on the stove-top in a small sauce pot.
Mix together the following
4 tablespoons of peanut butter
1 tablespoon of sesame oil
1 tablespoon of Soy Sauce
1/2 teaspoon of chili oil
Heat these ingredients until the peanut butter becomes soft enough to incorporate easily into the oils and whisk to combine. After well combined add:
1 tablespoon of maple syrup
1 tablespoon of lime juice
Salt and pepper, to taste
At this point, taste your sauce…want a bit more tang, add another splash of lime juice. Like things a but more spicy…more chili oil. Once you get the flavor you like use 2-3 tablespoons of water to thin sauce to desired consistency. I like mine about the thickness of a ranch dressing, thin enough to drizzle, but thick enough to stick to the mushrooms and noodles.
To Serve:
Plate the noodles and top with the cooked mushrooms, peppers and onions.
Drizzle peanut sauce on top.
Garnish with chopped peanuts, if desired.
Enjoy!

Baked Oatmeal with Creamy Yogurt and Fresh Summer Berries
You probably have most (if not all) of the ingredients that you need to make this delicious baked oatmeal in your pantry right now! It’s easy to mix up, hard to mess up, and everyone, even picky eaters, seem to love it!
One of my absolute favorite breakfast recipes is baked oatmeal. You probably have most (if not all) of the ingredients that you need to make this delicious breakfast in your pantry right now! It’s easy to mix up, hard to mess up, and everyone, even picky eaters, seem to love it!
I had never heard of this dish until I spent several years living up in Ohio’s Amish County where, needless to say, there were not a lot of vegetarian dishes on the menu very often. Brunch potlucks and Saturday morning community breakfasts were always overloaded with bacon and eggs - biscuits and sausage gravy, and casseroles filled with ham but the bright spot in my little plant-based world was always the baked oatmeal! The great part about this dish is that it’s hearty enough to be satisfying and simple enough to make either a vegetarian or vegan option. A crowd-pleaser for sure!


What you are going to need to buy:
Quick Cooking Oats (3 cups )
Brown Sugar - (you can also use coconut sugar) (1 cup)
Baking Powder (2 teaspoons)
Vanilla (1 Tbsp)
Pinch of Salt
Powdered Cinnamon, Nutmeg, Clove - (you can also use pumpkin pie spice) (1 teaspoon each)
2 Eggs - (Or the vegan equivalent such as Just Egg, which is what we used)
Milk - (Substitute your plant based favorite - we like Oat Milk, for this recipe, for obvious reasons! The Vanilla Oat Milk from Rise Brewing is great for baking. (Almond and Cashew also work well) (1 cup)
Butter, melted - (or vegetable oil, vegan spread) (1/2 cup) - (We like Earth Balance)
Yogurt, for topping! (We used this non-dairy option from the Forager Project)
Honey - (or Maple Syrup/Agave)
Fresh Fruit
What you are going to need to do:
Okay, here is my disclaimer for this recipe: I know that I always say that I don’t do measurements and 99.9% of the time that is true…but baking is another whole animal. If I’m honest, I don’t do it often. I’m not great at it. (Which may be why I like this recipe, because it’s hard to screw up) Having said that…I did go ahead and offer measured suggestions for this recipe. Happy Baking!
The Baking.
Preheat over to 350.
In a large bowl combine dry ingredients, oats, sugar, (yes, the sugar is considered “dry” for this recipe), baking powder, salt and spices.
In another bowl beat, by hand, lightly, the eggs and vanilla and then add the milk and the butter or oil. If you’re using the Just Egg, BONUS: no need to beat, just lightly mix to incorporate.
Gently stir the dry ingredients into the wet until well incorporated.
Spoon into a nine inch pan that has been sprayed with baking spray and bake for 30-40 minutes.
Now, the timing on this one can be tricky. Every oven is different. Glass pan vs metal pan, etc. I like to check on mine at the 30 minute mark because you really don’t want to over-bake this dish. The center should be set, but if your toothpick comes out just a little sticky (not runny) you should be okay. In this instance we want the center to set but we are NOT looking for the toothpick to come out too “clean” or dry. The dish will continue to set up a little on the counter after you take it out of the oven.
Let rest 2-3 minutes before serving.
The Toppings.
Many of the Ohio Amish serve this dish, in a bowl, and pour milk over it. (Also, the way that a lot of them eat shortcake) but that’s not really my style. I like the creaminess of yogurt! I also like to mix in just a little honey (or maple/agave syrup for the vegan version) to slightly sweeten the yogurt and loosen it up just a little.
Top with your sweetened yogurt and fresh berries. Red, white, and blue seemed appropriate for Memorial Day, coming up at the end of the month, but use whatever fruit your family likes. In the fall this dish topped with stewed apples is a total game changer. We also love fresh peaches in the summertime!