


Vegan Huevos Rancheros Breakfast Tostadas with JustEgg
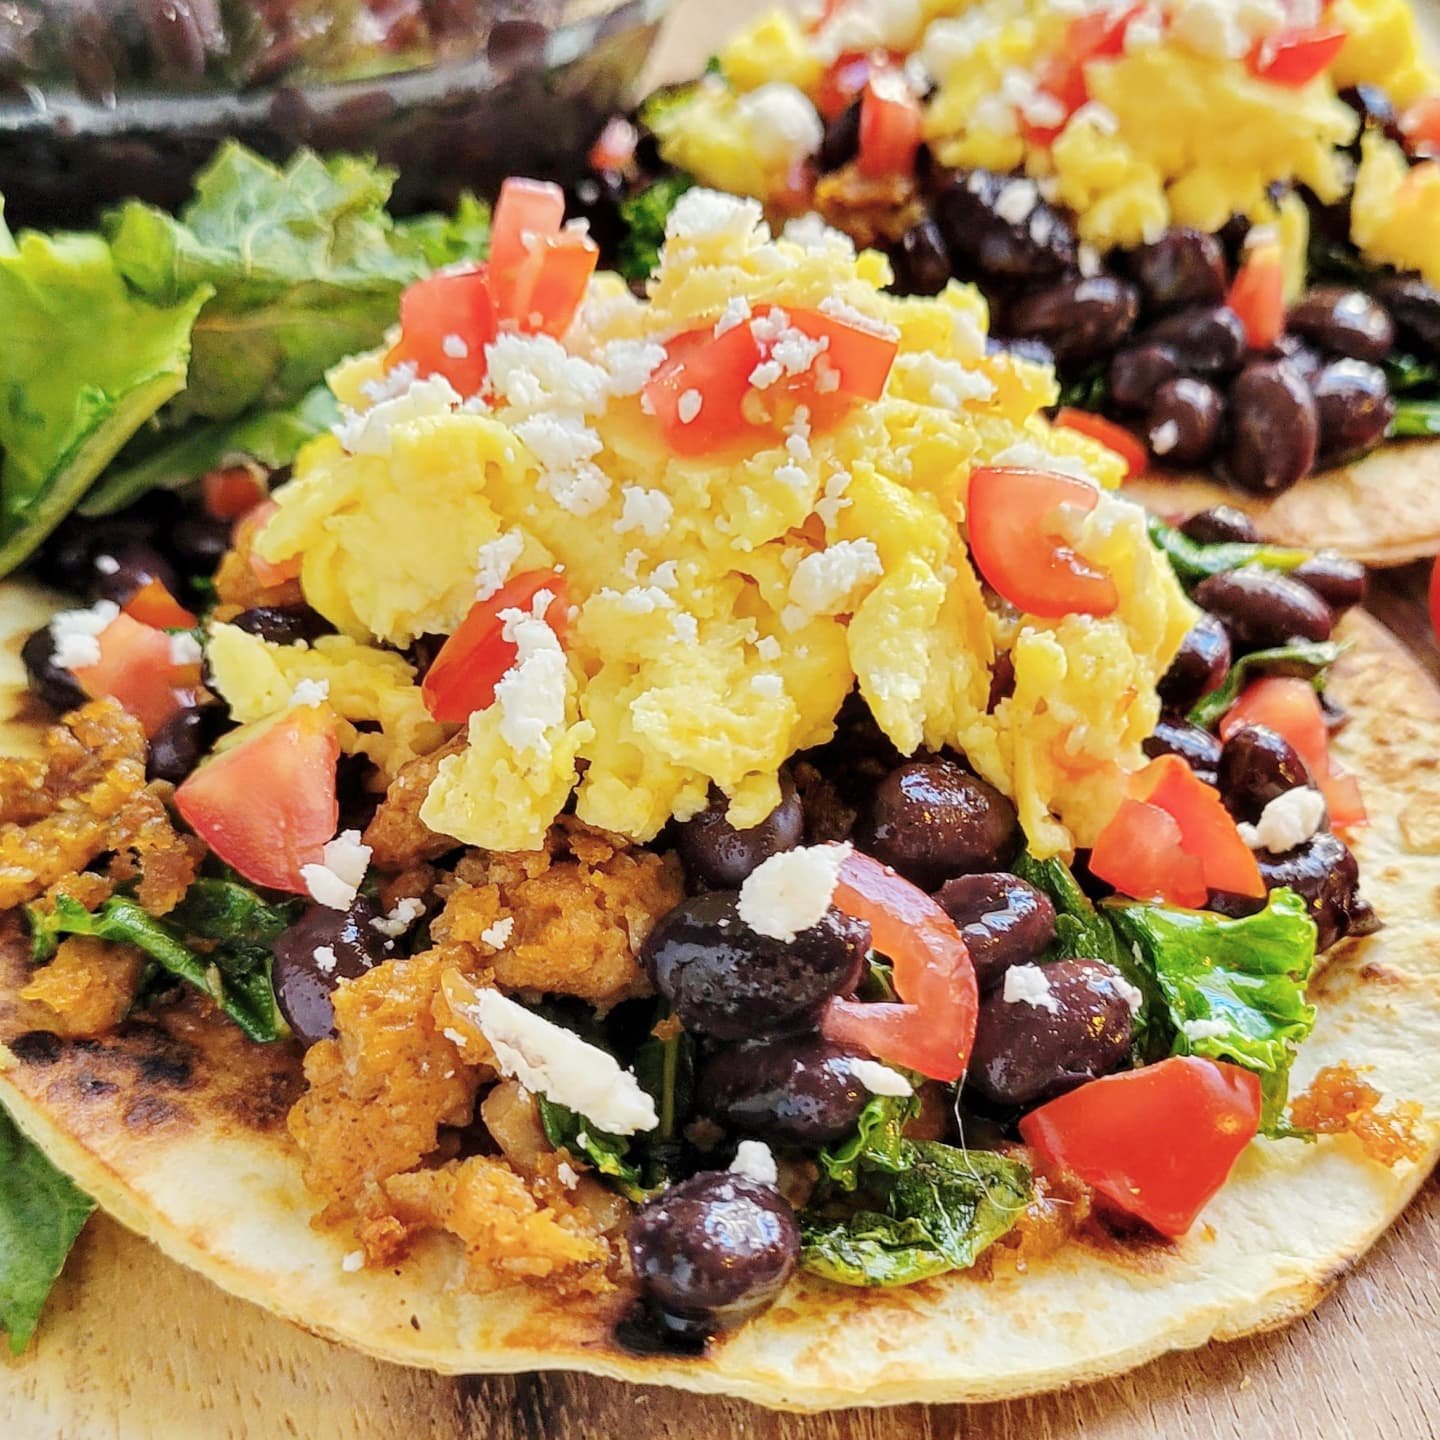
These Huevos Rancheros Breakfast Tostadas with vegan sausage, wilted kale, black beans, eggs, tomatoes, and feta, are the perfect way to kick off your weekend brunch! Topped with a drizzle of maple syrup, even the pickiest eaters will gobble them right up...yes, please! Using the JustEgg allows you to quickly and easily scramble up an egg substitute for these tostadas that even your non-vegan friends will love! (My pro tip: Just don’t tell them! Trust me, no one will even notice!)
These Huevos Rancheros Breakfast Tostadas with vegan sausage, wilted kale, black beans, eggs, tomatoes, and feta, are the perfect way to kick off your weekend brunch! Topped with a drizzle of maple syrup, even the pickiest eaters will gobble them right up...yes, please! Using the JustEgg allows you to quickly and easily scramble up an egg substitute for these tostadas that even your non-vegan friends will love! (My pro tip: Just don’t tell them! Trust me, no one will even notice!)
The best part about breakfast tostadas is that you can customize them for everyone’s individual likes! My favorite way to serve them is to honestly get all the topping ready and just let people choose what they want buffet style! Below is how I like mine…
What you are going to need to buy:
Tortillas, small
Plant-Based Sausage
Liquid Smoke
Olive Oil
Minced Garlic - (we like these jarred options from Spice World!)
Salt and Pepper, to taste
Smoked Paprika, to taste
Just Egg
Black Beans
Tomatoes, diced
Dairy-Free Feta Cheese
Fresh Kale
Maple Syrup
Hot Sauce, optional
What you are going to need to do:
To start, fry up your plant-based sausage with a little olive oil, a few dashes of liquid smoke, and some minced garlic. Once the sausage is almost done and getting a little crispy on the edges wilt in a handful of kale and stir to combine. Once the kale has softened and the sausage has finished cooking, remove and set aside.
Wipe out your skillet and use your JustEgg to make some scrambled eggs. Season with salt, pepper, and paprika, to taste. Remove and set aside.
Again, wipe out your skillet, and on medium-high heat, toast your tortillas until they take on some nice golden brown color…a little char around the edges never hurt anybody, either!
Assemble your tostadas by layering your sausage and kale mixture with the eggs, black beans, tomatoes, and cheese and topping with a drizzle of maple syrup and a splash of hot sauce (if you like a little kick!)
Customize your tostadas by adding avocado, sour cream, hot peppers, etc!

Cashew Free VEGAN Cheese Sauce!
Let’s be real…what’s the best part of nachos if it isn’t the cheese sauce? The main comment I hear from folks who are just transitioning into a plant-based lifestyle or who are simply trying to eat less dairy is, “…but, I just love cheese so much!” Me, too, my friends! Me, too! The dairy free cheese sauce that I used on this dish also makes a great sauce to top Mac ‘n Cheese or to make your own at home hamburger-helper casserole. And this cashew free version is even safe for our friends with allergies!
Let’s be real…what’s the best part of nachos if it isn’t the cheese sauce? The main comment I hear from folks who are just transitioning into a plant-based lifestyle or who are simply trying to eat less dairy is, “…but, I just love cheese so much!” Me, too, my friends! Me, too! The dairy free cheese sauce that I used on this dish also makes a great sauce to top Mac ‘n Cheese or to make your own at home hamburger-helper casserole. And this cashew free version is even safe for our friends with allergies!
The world of plant based cheese has come a long way in the past 20 years since I stopped eating meat…A LONG way but so many of the cheese sauces at restaurants and available in stores contain cashews but this recipe, made with some of my favorite ingredients from brand like Violife, Earth Balance, Tofutti, and Rise Brewing is safe for our friends with nut allergies and is still 100% plant based!


What you are going to need to buy:
Non-Dairy Butter - ( We used Earth Balance)
Flour
Organic Oat Milk from RISE BREWING - (Can you use something else…um, yeah, but why?)
Non-Dairy Cheese Shreds - (We used THESE CHEDDAR SHREADS from VioLife!)
Non-Dairy Sour Cream - (in our opinion Tofutti is the OG…and also the best!)
Yellow Mustard - (yes, just trust us!)
Salt and Pepper, to taste
Garlic and Onion Powder, to taste
What you are going to need to do:
Okay, let’s tackle this cheese sauce first: This recipe is probably going to make way more sauce than you’ll need unless you’re making nachos for a party BUT trust me, you’ll find all kind of other uses for it and it keeps in the fridge just fine!
In a medium pot, on low heat, melt about 2 tablespoons of butter and gently allow butter to brown, but not burn, because we’re going to make a roux.
Sprinkle 2 tablespoons of flower on top of the melted butter and whisk to combine. Cook mixture for about 30 seconds and then slowly add 1.5 - 2 cups of oat milk, whisking the entire time so that no lumps form. Bring to a boil and let boil about 30 seconds.
Stir in 1/3 cup of sour cream.
Add 1 tablespoon of yellow mustard…don’t be afraid, just do it! (You can use brown mustard, if you like it!)
Reduce heat and add the cheddar shreds (yes, the whole bag), stirring to melt.
Continue to stir, on low/medium heat, until everything is melted.
Add salt and pepper, and garlic/onion powder to taste. It will take more salt than you think…a full teaspoon isn’t too much!
…And, boom! vegan cheese sauce! If it seems thin, increase the heat and let simmer for 1-2 minutes, but remember it will tighten up as it cools.
A note about ingredients and brands: I’ve been plant-based for 20 years and believe me, I’ve seen quite the evolution of dairy-free products, particularly, when it comes to milks and cheeses! The products and brands that I recommend for this recipe are not sponsors and I don’t get paid to promote them…they are, simply, in my opinion, the best options, for this dish! Can you use something different? Sure. Can you substitute one brand for another? Of course…but this is legit the best cheese sauce that I’ve had, plus…it’s quick, easy, and also cashew free, so if you want to make THIS delicious version, in your home kitchen, I’d say, stick with these brands!
…And do NOT worry about making too much because you can keep this cheese sauce in the fridge for up to two weeks and simply reheat it when you need it! It will thicken back up when it’s cool, but not to worry…portion out what you want to use and pop it into the microwave in 20 second bursts, stirring in-between, and it will melt right back down! It’s perfect for mac n’ cheese, casseroles, to top burgers, or just to eat with chip!

Loaded Impossible Nachos with Homemade Cashew Free Cheese Sauce!
Let’s be real…what’s the best part of nachos if it isn’t the cheese sauce? The main comment I hear from folks who are just transitioning into a plant-based lifestyle or who are simply trying to eat less dairy is, “…but, I just love cheese so much!” Me, too, my friends! Me, too! The dairy free cheese sauce that I used on this dish also makes a great sauce to top Mac ‘n Cheese or to make your own at home hamburger-helper casserole. And this cashew free version is even safe for our friends with allergies!
Let’s be real…what’s the best part of nachos if it isn’t the cheese sauce? The main comment I hear from folks who are just transitioning into a plant-based lifestyle or who are simply trying to eat less dairy is, “…but, I just love cheese so much!” Me, too, my friends! Me, too! The dairy free cheese in this recipe is something you’re going to just want to make and have on hand…so you can drizzle it on everything. Trust me!
The world of plant based cheese has come a long way in the past 20 years since I stopped eating meat…A LONG way but so many of the cheese sauces at restaurants and available in stores contain cashews but this recipe, made with some of my favorite ingredients from brand like Violife, Earth Balance, Tofutti, and Rise Brewing is safe for our friends with nut allergies and is still 100% plant based!


What you are going to need to buy:
For the Nachos:
White of Yellow Onion, diced (Some to cook with the meat and some raw to sprinkle on top)
Liquid Smoke
Olive Oil
Minced Garlic - (we like these jarred options from Spice World!)
Nacho/Taco Chips - (I used these from GOOD & GATHER)
Tomatoes, Diced
Sour Cream - (I’m a pretty die-hard Tofutti fan, so that’s what I always use!)
Salt and Pepper, to taste
Optional: Avocado, Black Olive, Fresh Herbs (Whatever else you like on your Nachos)
Fresh Lime
For the Cheese Sauce:
Non-Dairy Butter - ( We used Earth Balance)
Flour
Organic Oat Milk from RISE BREWING - (Can you use something else…um, yeah, but why?)
Non-Dairy Cheese Shreds - (We used THESE CHEDDAR SHREADS from VioLife!)
Non-Dairy Sour Cream - (in our opinion Tofutti is the OG…and also the best!)
Yellow Mustard - (yes, just trust us!)
Salt and Pepper, to taste
Garlic and Onion Powder, to taste
What you are going to need to do:
Okay, let’s tackle the cheese sauce first: This recipe is probably going to make way more sauce than you’ll need unless you’re making nachos for a party BUT trust me, you’ll find all kind of other uses for it and it keeps in the fridge just fine!
In a medium pot, on low heat, melt about 2 tablespoons of butter and gently allow butter to brown, but not burn, because we’re going to make a roux.
Sprinkle 2 tablespoons of flower on top of the melted butter and whisk to combine. Cook mixture for about 30 seconds and then slowly add 1.5 cups of oat milk, whisking the entire time so that no lumps form. Bring to a boil and let boil about 30 seconds.
Stir in 1/3 cup of sour cream.
Add 1 tablespoon of yellow mustard…don’t be afraid, just do it! (You can use brown mustard, if you like it!)
Reduce heat and add the cheddar shreds (yes, the whole bag), stirring to melt.
Continue to stir, on low/medium heat, until everything is melted.
Add salt and pepper, and garlic/onion powder to taste. It will take more salt than you think…a full teaspoon isn’t too much!
…And, boom! vegan cheese sauce! If it seems thin, increase the heat and let simmer for 1-2 minutes, but remember it will tighten up as it cools.
A note about ingredients and brands: I’ve been plant-based for 20 years and believe me, I’ve seen quite the evolution of dairy-free products, particularly, when it comes to milks and cheeses! The products and brands that I recommend for this recipe are not sponsors and I don’t get paid to promote them…they are, simply, in my opinion, the best options, for this dish! Can you use something different? Sure. Can you substitute one brand for another? Of course…but this is legit the best cheese sauce that I’ve had, plus…it’s quick, easy, and also cashew free, so if you want to make THIS delicious version, in your home kitchen, I’d say, stick with these brands!
Now, for the rest of the nachos: In a skillet on medium heat saute your diced onions and garlic in a little olive oil. Once the onions get a little soft (2-3 minutes) add your Impossible Ground and a splash of liquid smoke and cook meat until brown. (Don’t be afraid to let some of the meet get a little “well-done” - those little crispy bits are delicious!)
Add the salt and pepper, to taste, and remove from heat.
The rest is pretty standard nacho assembly. Start with a layer of chips. Layer the meat on top, followed by drizzling your homemade cheese-sauce. Next comes the fresh toppings, (ie: tomatoes, onions, olives, avocado) and finished off with sour cream and fresh herbs! I like a fresh squeeze of lime juice over the top of mine…and enjoy!

Spicy Jackfruit Carnitas Street Tacos with Apple Salsa
I don’t know about you but when the days get busier tacos always seem to be a go-to meal for me! Quick, easy, and who doesn’t love tacos? These Spicy #Jackfruit Carnitas Street Tacos taste just like Summer to me. The smoky spiciness of the jackfruit with the cold sweet crunch of the apple salsa...in case you were wondering, yes...yes, this is one of best things I have put in my face in recent memory!

I don’t know about you but when the days get busier tacos always seem to be a go-to meal for me! Quick, easy, and who doesn’t love tacos? These Spicy Jackfruit Carnitas Street Tacos taste just like Summer to me. With an Apple, Onion, and Garlic Salsa, tossed with a balsamic glaze, and topped with some vegan crema and fresh herbs these sound weird...but taste amazing!
The smoky spiciness of the jackfruit with the cold sweet crunch of the apple salsa...in case you were wondering, yes...yes, this is one of best things I have put in my face in recent memory! I seriously could have eaten three more!
What you are going to need to buy:
Jackfruit - (Fresh or Frozen is fine. This recipe uses frozen from The Jackfruit Company)
Tortilla or Hard Taco Shells, whatever you prefer
Medium Apple
Medium Sweet Onion
Minced Garlic - (we like these jarred options from Spice World!)
Sour Cream - (I’m a pretty die-hard Tofutti fan, so that’s what I always use!)
Balsamic Vinegar
Spices for your Jackfruit - (we used oregano, cumin, paprika, chili and a touch of brown sugar)
Liquid Smoke
Salt and Pepper, to taste
Fresh Cilantro - (or flat leaf parsley, if you must!)
Lime Juice
What you are going to need to do:
Honestly, these tacos look so fancy but they come together so fast and easy!
To start you’re going to finely chop your onion and 3/4 of your apple (reserving some apple for large slices as garnish, if you like.)
Into a bowl combine the apples, onion, minced garlic, (to taste, maybe a teaspoon), and a tablespoon of your favorite balsamic vinegar. Currently, I am loving this cilantro and garlic option from The Ancient Olive!
Set aside.
Preparing the Jackfruit:
In a medium skillet you’re going to saute the Jackfruit until it becomes soft and begins to give up up some of it’s juices.
With 2 forks, gently pull the bulbs apart like you would pull pork.
Reduce heat and add to the skillet: a dash of liquid smoke plus oregano, cumin, paprika, chili and a touch of brown sugar. Measurements will vary based on the amount you are making. Start out conservative and you can always add more of the flavors you like.
Salt and Pepper, to taste.
Assembly:
Onto your taco shell of choice, layer your Jackfruit mixture and top with your onion and apple salsa.
Drizzle some sour cream that has been cut with a teaspoon of lime juice and sprinkle with paprika to garnish. Additionally, garnish with apple wedges and fresh herbs.
Here’s a taco shell tip from Sarah: Can’t decide between hard and soft tacos? Drape your soft shells over the grates/rails of a hot oven and let them “crisp up” for about 4 minutes and boom, best of both worlds.

Vegan Fish Tacos with Spicy Lime Aioli
If you’re like me…you can’t seem to get enough tacos… and Fish Taco are one of my absolute favorites, especially in the Summer time! The fishless fillets from Gardein make them so quick and easy to whip up and taste amazing! Maybe a little nontraditional...topped with a spicy lime and garlic aioli but these are the perfect vegan tacos to add to your weekly Taco Tuesday lineup.
If you’re like me…you can’t seem to get enough tacos… and Fish Tacos are one of my absolute favorites, especially in the Summer time! The fishless filets from Gardein make them so quick and easy to whip up and taste amazing! Maybe a little nontraditional...topped with a spicy lime and garlic aioli but these are the perfect vegan tacos to add to your weekly Taco Tuesday lineup.
Taco are not something that I ever think to put on the blog, although, not gonna lie…I eat them at least once a week for either lunch or dinner BUT a sweet friend wrote me and asked if I would post the recipe for the yummy Fish Tacos that I featured over on my @plantbasedgingr IG page this week.


What you are going to need to buy:
The Fishless Filets from Gardein
Tortilla or Hard Taco Shells, whatever you prefer
Shredded Cabbage - (I often keep a bag of a shredded cole slaw mix on hand to use in recipes like this where I’m not going to need or want and entire head of cabbage!)
Tomatoes, Diced
Avocado
Sour Cream - (I’m a pretty die-hard Tofutti fan, so that’s what I always use!)
Salt and Pepper, to taste
Fresh Herbs
Fresh Lime
For the Spicy Lime Aioli:
Mayo - (Vegan or otherwise)
White Vinegar
Hot Sauce/Chili Sauce
White Sugar
Lime Juice
Salt & Pepper, to taste
What you are going to need to do:
Start by preheating your oven and cooking the fishless filets. They are small and don’t take long. I don’t even wait for the oven to preheat, just set the temp and throw them on a baking tray. They, honestly, should be plenty warm by the time you get all the rest of the ingredients together.
Dice your tomato and your avocado and chop your herbs. You can really put anything in these tacos that you like. I have added sweet corn before and that is also really delicious.
Now for the Aioli:
Now, some people will, for sure, argue with me, but in my book aioli is just fancy, runnier mayo! It’s super easy to make…very customizable and might just become your favorite condiment.
Quantities are hard for this because it really depends on how much you need to make: Mix together Mayo with a splash of vinegar and the juice of 1/2 a lime until the consistence loosens up but is not too runny. Think like a nice alfredo sauce…it will cling to the food and not run off, but way thinner than mayo and you don’t need a knife to spread it…drizzle-able. Not a word, but you get the idea!
Taste for flavor and add salt, pepper, a pinch of sugar and depending on how spicy you want it, your desired amount of hot sauce. If you get it too spicy for your liking, just add a tablespoon or so, more mayo. Tweak until you like the taste. For these tacos this aioli provides a big punch of flavor so I like mine very lime-forward and very spicy!
Assembly:
Remove your fishless filets from the oven and slice into 1/2” strips.
Onto your taco shell of choice, layer your cabbage, fish, tomato, avocado (and anything else you like) and drizzle with the aioli you just made!
Garnish with fresh herbs like cilantro, parsley or even dill!
Here’s a taco shell tip from Sarah: Can’t decide between hard and soft tacos? Drape your soft shells over the grates/rails of a hot oven and let them “crisp up” for about 4 minutes and boom, best of both worlds.

Mom's Burrito Pie (Deep Dish Mexican Pizza!)
I grew up eating this dish once a week. Well, maybe that’s n exaggeration, but for sure, twice a month, at least! My Momma always called it burrito pie but someone informed me on my Instagram this week that it’s also deep dish Mexican Pizza! Either way, it's one of the most simple dishes you can imagine and it's good every single time! Dare I say, it will stand up to ALL the pickiest eaters, and this vegan version with homemade refried beans is the perfect thing to serve to a crowd of “mixed eaters”!
I grew up eating this dish once a week. Well, maybe that’s an exaggeration, but for sure, twice a month, at least! My Momma always called it burrito pie but someone informed me on my Instagram this week that it’s also deep dish Mexican Pizza! Either way, it's one of the most simple dishes you can imagine and it's good every single time! Dare I say, it will stand up to ALL the pickiest eaters, and this vegan version with homemade refried beans is the perfect thing to serve to a crowd of “mixed eaters”!
This recipe uses the homemade refried beans that we made earlier in the week. Obviously, canned are just fine but be careful because if you’re wanting this recipe to be plant based…check the can! Unless it otherwise states “vegetarian” a lot of commercial refried beans contain lard, making them not vegan at all…and not even vegetarian! Aside from that, the best part of this recipe, like a lot of the things I like to make, is that it’s totally customizable to your pallet and the ingredients that you love (or hate, as the case may be.)


What you are going to need to buy:
Tortillas, size depends on the casserole dish you want to bake this in and how large a pie you are making.
Refried Beans
Olive Oil
Ground “Beef” - this recipe used the ground from Beyond Meat but you do end up crumbing it up, so the frozen crumbles work just as well.
Medium onion, diced
Minced Garlic - (we like these jarred options from Spice World!)
Taco Seasoning (or your preferred spices to season taco meat)
Red Sauce or Enchilada Sauce (Not tomato sauce, chili based)
Cheddar Shreds - (pictured are the Cheddar Shreds from Violife)
Sour Cream - (Tofutti is the best!)
Diced Tomatoes
Fresh Herbs, for garnish
What you are going to need to do:
Preheat over to 350 degrees.
In a pan, on medium heat, with 1 tablespoon of olive oil saute’ you onions and garlic until the onion is translucent.
Add into the pan your Beyond Meat cook until brown and crumbled. Add a splash of water and your taco seasoning (amount will depend on how much filling you are making.) Taste for seasoning. Remove from heat.
In a round casserole dish, roughly the size of your tortillas, pour about 3 tablespoons of the red sauce into the the dish, just to cover the bottom.
We’re basically making taco lasagna!
Holding a tortillas in your hand, or placing it on the counter-top, spread a nice thick layer of refried beans onto the tortilla and place in the dish.
Note: Do not try to spread the beans on the tortilla after you place it in the dish or you are just going to pull your hair out! Before, before, before…
Layer the meat filling on top of the beans, followed by a handful of cheese and another 3 tablespoons of red sauce.
Repeat this layering process until you reach the top of the baking dish. I typically get 3 layers.
Top off your Burrito Pie with a final tortilla and pour the remaining red sauce onto the top to cover the entire thing.
Top with cheese and cover loosely with tin foil or the lid to the casserole dish. (Do not let the cover touch the cheese.
Bake at 350 for 30 minutes. After 30 minutes, uncover, turn your over to broil, and bake another 3-5 minutes until cheese is nice and melted. Keep a close eye on it for the last 5 minutes. Every stove/broiler is different and you don’t want it to burn!
Remove from oven and let stand for 15-25 minutes before serving.
Top with sour cream, tomatoes, and fresh herbs (or whatever you like…guac, pico, olives, etc…)
Cut into wedges and enjoy!